ReactJS is an open-source JavaScript library developed by Facebook (now Meta) for building fast, interactive, and component-based user interfaces, primarily for single-page applications (SPAs).
It uses a declarative approach and a virtual DOM for efficient UI rendering.
- Initial release: March 2013
- Core features:
- Component-based architecture
- Virtual DOM for performance
- JSX syntax
- One-way data binding
- Hooks API for state & side effects
Latest stable version (as of Aug 2025): React 19 (released April 25, 2024)
- Adds:
useActionState,useOptimistic, improved Server Components, enhanced form handling, better async rendering.
If you want, I can give you a React version history from 0.x to 19 in detail.
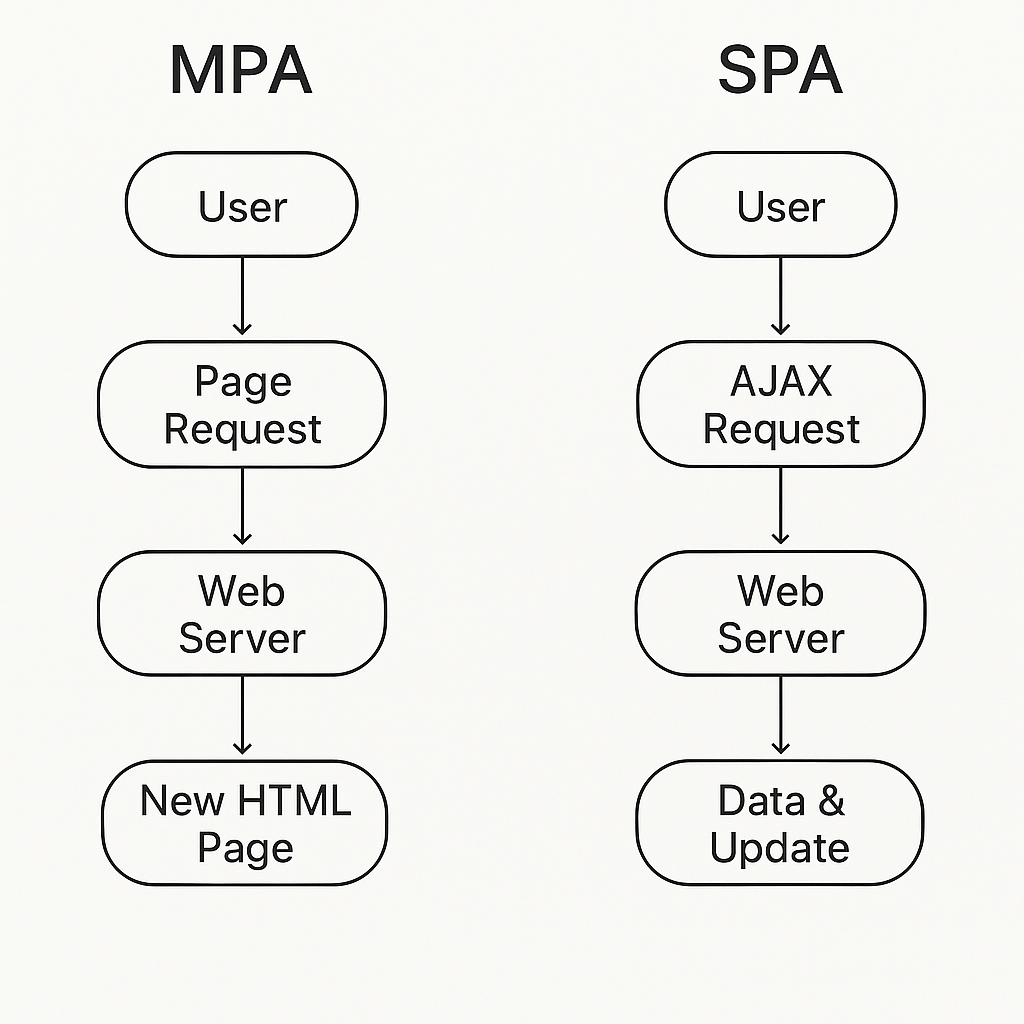
It’s called a SPA (Single Page Application) because:
- Only one HTML page loads (
index.html) when you first visit. - After that, JavaScript dynamically updates the content without full page reloads.
- Navigation feels instant because only parts of the page change, not the whole document.
- Frameworks like React, Vue, Angular use a virtual DOM or similar approach to re-render efficiently.
- Backend is usually hit via AJAX / Fetch / APIs, not traditional full-page HTTP requests.
Example:
In a traditional website, clicking a link → sends request → server returns a whole new HTML page.
In a SPA, clicking a link → JS intercepts → updates view instantly → fetches data in background if needed.
Here are the main benefits of ReactJS:
ReactJS Benefits
- Fast Rendering with Virtual DOM – Updates only changed parts of the UI for better performance.
- Component-Based Architecture – Reusable, modular components make development faster and easier to maintain.
- Unidirectional Data Flow – Predictable state changes, easier debugging.
- Rich Ecosystem – Huge library support for routing, state management, animations, and more.
- Hooks API – Cleaner state & side-effect management without classes.
- Cross-Platform Development – Same React knowledge works for React Native, Next.js, VR, etc.
- SEO-Friendly (with SSR) – Paired with Next.js or Gatsby, React supports server-side rendering.
- Strong Community & Corporate Support – Maintained by Meta and widely adopted in the industry.
- Easy Integration – Can be added to existing projects without full rewrites.
- Future-Ready Features – Concurrent rendering, Suspense, Server Components for modern apps.
For your WordPress blog, here’s a simple yet clear definition you can use for React Component Re-rendering:
🔄 What is Re-rendering in React?
In React, re-rendering means React calls the component function again to produce an updated UI when its state, props, or context change.
- The Virtual DOM compares the new output with the previous one.
- Only the changed parts are updated in the real DOM (efficiently via reconciliation).
- This keeps the UI in sync with data without reloading the whole page.
When Does a Component Re-render?
- State changes →
setStateoruseStateupdate. - Props change → Parent passes new data.
- Context changes → When
useContextvalue updates. - Force updates →
forceUpdate()or manual triggers.
Why It Matters
- Too many re-renders = performance issues.
- Optimize with
React.memo,useMemo,useCallback, and proper component design.
Example:
function Counter() {
  const [count, setCount] = useState(0);
  return (
    <button onClick={() => setCount(count + 1)}>
      Count: {count} {/* Re-renders when count changes */}
    </button>
  );
}
Before learning ReactJS, you should have a strong grasp of these fundamentals — this is your React learning curve foundation:
📚 Prerequisites Before ReactJS
1. HTML & CSS
- HTML tags, attributes, forms, tables.
- CSS selectors, box model, flexbox, grid.
- Media queries & responsive design.
- Basic accessibility (alt tags, semantic HTML).
2. Core JavaScript (ES6+)
- Variables:
let,const. - Functions: arrow functions, default params.
- Arrays & Objects: spread/rest, destructuring.
- Loops:
for,for...of,map,filter,reduce. - DOM manipulation:
querySelector,addEventListener. - Events & bubbling.
- Template literals.
- Modules:
import/export.
3. Advanced JavaScript
- this keyword.
- Closures & scope.
- Promises & async/await.
- Fetch API (AJAX calls).
- Event loop & microtasks.
- JSON parsing & stringifying.
4. Git & Basic CLI
- Version control basics (
git add,commit,push). - Navigating files & running commands in terminal.
5. Basic Package Management
- Installing dependencies with npm or yarn.
💡 If you master these, React will feel much easier because React is just JavaScript with extra tools for UI.
ReactJS version history from 0.x to 19, focusing on major changes and features:
📜 React Version History
0.x Series (2013 – Early Days)
- React 0.3 – 0.14 (2013–2015)
- Initial public release (March 2013).
- JSX introduced.
- Virtual DOM concept popularized.
- ReactDOM extracted from
reactin v0.14 (2015).
1.x – 14.x
(React skipped v1–13; went directly from 0.14 to 15 to align versioning)
React 15 (April 2016)
- HTML-like attribute naming aligned with DOM (
className,htmlFor). - Stateless functional components supported.
- Error boundaries were not yet available.
React 16 (September 2017)
- New Fiber architecture for async rendering.
- Error Boundaries introduced.
Fragments(<> </>) added.Portalsfor rendering children outside the DOM hierarchy.- New Context API (16.3).
- Hooks announced in 16.8 (Feb 2019).
React 17 (October 2020)
- No new features — “stepping stone” release.
- Improved gradual upgrades.
- Event delegation changes.
- Removed old event pooling.
React 18 (March 2022)
- Concurrent Rendering support.
- Automatic Batching for state updates.
- New Hooks:
useId,useTransition,useDeferredValue. startTransitionAPI.- Suspense improvements for data fetching.
React 19 (April 25, 2024)
- New Hooks:
useActionState(manage async form submissions).useOptimistic(optimistic UI updates).
- Form Actions integrated into components.
- Server Components improved.
- Automatic memoization in Server Components.
- Better async rendering with improved transitions.
- Enhanced JSX runtime.
Feature / Aspect ReactJS Angular Vue.js Type Library for building UIs Full-fledged front-end framework Progressive framework Language JavaScript (with JSX) TypeScript (default) JavaScript (with optional TypeScript) Learning Curve Moderate – JSX & concepts like hooks/state need understanding Steep – many built-in concepts (RxJS, DI, decorators) Easy – simple syntax and clear docs Architecture Component-based, unopinionated Component-based, opinionated & structured Component-based, flexible DOM Handling Virtual DOM Real DOM with change detection Virtual DOM Data Binding One-way (props/state) Two-way ( [(ngModel)])Two-way ( v-model)State Management React hooks, Context API, Redux, Zustand Built-in services, RxJS, NgRx Vuex, Pinia Performance Fast due to Virtual DOM & selective rendering Slower for large apps due to digest cycle Fast & lightweight Ecosystem Huge – many third-party libraries for routing, state Complete – built-in router, HTTP, forms, etc. Moderate – official router & state mgmt Best For Highly interactive UIs, SPAs Enterprise-scale apps Small-to-medium apps, rapid dev Maintained By Meta (Facebook) Evan You + open-source community Release Year 2013 2010 2014
🚀 ReactJS Advantages Over Angular & Vue
| Advantage | Why React Excels |
|---|---|
| 1. Huge Ecosystem & Community | React has the largest job market & npm ecosystem among frontend libraries. Thousands of third-party packages available. |
| 2. Flexibility & Unopinionated | Unlike Angular (opinionated) or Vue (defined structure), React lets you choose your own stack for routing, state, APIs, etc. |
| 3. Virtual DOM Performance | Efficient diffing & re-rendering ensures better performance in complex UIs vs Angular’s digest cycle. |
| 4. JSX Power | Combines HTML & JS in one file for better component logic + markup integration, unlike Angular templates. |
| 5. Reusable Components | Fully declarative & reusable components make UI maintenance easier. |
| 6. Hooks API | Powerful state & side-effect management without classes, cleaner than Angular services or Vue’s setup(). |
| 7. Strong Corporate Backing | Maintained by Meta and used by Facebook, Instagram, WhatsApp, Netflix, Airbnb. |
| 8. Cross-Platform | React Native for mobile, React VR, Next.js for SSR – all under the same React paradigm. |
| 9. Easy Integration | Can be embedded into existing apps without rewriting everything (unlike Angular which requires full adoption). |
| 10. Future-Ready Features | Concurrent rendering, Suspense, Server Components – making it ready for modern large-scale apps. |
⚠️ ReactJS Disadvantages
| Disadvantage | Why It’s a Challenge |
|---|---|
| 1. Not a Full Framework | Unlike Angular, React is only a UI library — you need extra tools for routing, state, and APIs. |
| 2. Steep Learning for Beginners | JSX, Hooks, and concepts like Virtual DOM & reconciliation can overwhelm newcomers. |
| 3. Too Many Choices | Large ecosystem means decision fatigue (Redux vs Zustand vs MobX, Next.js vs Remix, etc.). |
| 4. Frequent Updates | React’s rapid evolution means older tutorials & libraries may become outdated quickly. |
| 5. Boilerplate in Complex Apps | Large apps often need more code compared to Vue’s simpler syntax. |
| 6. SEO Challenges (Without SSR) | React SPAs need SSR (Next.js) or pre-rendering for better SEO, unlike Angular Universal or Nuxt. |
| 7. JSX Not Loved by All | Mixing HTML & JS in JSX can feel messy for devs used to separation of concerns. |
| 8. State Management Complexity | For big apps, managing state can become hard without a structured approach. |
| 9. Performance Tuning Needed | Over-rendering issues may appear if components & props aren’t optimized. |
| 10. Requires Build Setup | Cannot run directly in the browser without bundlers like Webpack, Vite. |
📊 ReactJS vs Angular vs Vue — Pros & Cons
| Aspect | ReactJS | Angular | Vue.js |
|---|---|---|---|
| Pros | – Huge ecosystem & community- Flexible & unopinionated- Virtual DOM for performance- Hooks API for clean state mgmt- Easy to integrate into existing apps- Cross-platform support (React Native, Next.js) | – Complete framework (routing, HTTP, forms, DI built-in)- Strong TypeScript support- Mature for enterprise apps- Two-way data binding- Large corporate backing (Google) | – Easy learning curve- Simple & clean syntax- Virtual DOM for speed- Two-way binding with v-model– Official ecosystem tools (Vue Router, Vuex/Pinia) |
| Cons | – Not a full framework (needs extra libraries)- JSX learning curve- Too many library choices- SEO issues without SSR- Performance tuning needed for large apps | – Steep learning curve (RxJS, decorators, DI)- Verbose code- Heavy bundle size- Slower startup in large apps | – Smaller job market than React/Angular- Less enterprise adoption- Limited ecosystem compared to React- Frequent API changes in early versions |
✅ Summary:
- React → Best for flexible, modern, high-performance UI apps.
- Angular → Best for large, enterprise-scale structured projects.
- Vue → Best for small-to-medium, fast-to-market apps.
📚 React Ecosystem Libraries
1. Core React
- react – Main library.
- react-dom – DOM rendering.
- react-native – Mobile apps.
- react-360 – VR experiences.
2. Routing
- react-router-dom – Most popular SPA routing.
- wouter – Minimal routing.
- next/router – Built-in routing for Next.js.
- react-location – Type-safe routing.
3. State Management
- Redux + @reduxjs/toolkit – Industry-standard predictable state.
- Zustand – Minimal global state.
- Recoil – State for React with atoms/selectors.
- Jotai – Primitive atom-based state.
- MobX – Observable state management.
- XState – State machines & workflows.
- valtio – Proxy-based state.
4. Data Fetching & Server State
- React Query (TanStack Query) – Server state management.
- SWR – Data fetching & caching.
- Apollo Client – GraphQL.
- Relay – GraphQL with Facebook’s approach.
5. Forms & Validation
- react-hook-form – Lightweight form handling.
- Formik – Popular form library.
- Yup – Schema validation.
- Zod – TypeScript-first validation.
- Vest – Unit-test style form validations.
6. Styling
- styled-components – CSS-in-JS.
- emotion – CSS-in-JS with flexibility.
- Tailwind CSS – Utility-first CSS framework.
- Chakra UI – Component library with styling.
- Material UI (MUI) – Google Material Design.
- Ant Design – Enterprise UI components.
- Radix UI – Unstyled accessible components.
7. Testing
- Jest – Testing framework.
- React Testing Library – DOM testing for React.
- Cypress – E2E testing.
- Playwright – E2E cross-browser testing.
- Vitest – Fast Vite-native testing.
8. Animations
- Framer Motion – Production-ready animations.
- react-spring – Physics-based animations.
- GSAP – High-performance animations.
9. Build Tools
- Vite – Modern fast bundler.
- Create React App – Basic React starter.
- Next.js – Full framework with SSR/SSG.
- Remix – SSR-first React framework.
- Parcel – Zero-config bundler.
10. Internationalization
- react-intl – i18n.
- i18next – Multi-language support.
- next-translate – i18n for Next.js.
11. Accessibility
- react-aria – ARIA hooks.
- reach-ui – Accessible components.
- headlessui – Unstyled accessible UI.
Got it ✅
Here’s your WordPress-friendly blog post converting the React “Getting Started” documentation into a clean, structured, and modern article that you can directly use for publishing.
Getting Started with React – The Complete Beginner’s Guide
React is one of the most popular JavaScript libraries for building user interfaces. Whether you’re creating a small interactive widget or a complex web application, React offers a flexible, efficient, and component-based way to build modern UIs.
In this guide, you’ll learn how to start with React, where to practice, how to learn step-by-step, and where to go for advanced topics.
🚀 Why React?
React was designed for gradual adoption. You can:
- Add it to an existing HTML page.
- Use it for a small feature.
- Or build an entire large-scale application.
It’s lightweight, declarative, and makes UI development more predictable.
🖥 Try React
You can experiment with React right away in online playgrounds:
💡 Tip: If you want to try it locally without setting up a build tool, you can download a simple HTML file with React and edit it directly.
🌐 Adding React to a Website
If you have an existing website, you can add React with just a script tag in under a minute. This is great for adding interactive widgets without rebuilding your entire site.
📦 Creating a New React App
For larger applications, you’ll want a toolchain that helps with:
- Bundling
- Hot reloading
- Asset optimization
The easiest starting point:
- Vite (recommended for speed)
- Create React App (simple setup, but slower builds)
- Next.js (SSR + API support for full-stack apps)
📚 Learning React
React offers multiple learning paths:
1. Practical Tutorial
The official React tutorial builds a Tic-Tac-Toe game. Even if games aren’t your thing, it teaches fundamental concepts like:
- Components
- Props
- State
- Event handling
2. Step-by-Step Guide
For a more theoretical, structured approach:
- Learn JSX, components, props, state, and lifecycle.
- Understand Thinking in React, a must-read article that shows how to break UI into components.
3. Beginner-Friendly Resources
If the docs feel too fast-paced, try:
- Tania Rascia’s React Guide
- FreeCodeCamp’s React tutorials
- React for Designers (great if you’re from a design background)
💡 JavaScript Prerequisites
React uses JavaScript heavily. You don’t need to be a JS master, but knowing the basics will make learning React much easier.
Recommended JS topics:
- Variables (
let,const) - Functions & arrow functions
- ES6 features (
map,filter,spread operator) - Event handling
- DOM basics
📌 Resources:
⚙️ Advanced React
Once you’ve mastered the basics, explore:
- Context API – global state without props drilling
- Refs – direct DOM access
- Hooks – custom logic with
useState,useEffect, etc. - React Suspense & Concurrent Features (React 18+)
📖 API Reference
The React API reference is your dictionary for:
React.ComponentmethodssetState()behavior- Lifecycle methods
- Built-in hooks
📰 Staying Updated
Stay informed via:
- React Official Blog
- @reactjs on Twitter
- React GitHub releases page
🕰 Versioned Docs
React documentation always reflects the latest stable version. For older versions, you can access versioned docs (React 16+) if you’re working on legacy projects.
🛠 Something Missing?
The React team loves feedback! You can:
- File an issue on GitHub
- Tweet at @reactjs
✅ Conclusion
React is beginner-friendly yet powerful.
You can start small, build gradually, and unlock advanced features as you grow. Whether you prefer hands-on tutorials or step-by-step guides, React offers resources for every learning style.
React “Hello World” – Your First Step into the React Universe
If you’re new to React, you’re about to start a fun journey! This guide will walk you through creating your very first React app — starting with the smallest possible example: “Hello, World!”
Whether you’re a complete beginner or brushing up on skills, this is where it all begins.
📌 What is React?
React is a JavaScript library for building interactive user interfaces. Instead of manually manipulating the DOM, you write components — small, reusable pieces of code that React renders to the screen.
🖥 Your First React Example – Hello World!
Here’s the simplest React example:
const root = ReactDOM.createRoot(document.getElementById('root'));
root.render(<h1>Hello, world!</h1>);
📋 What’s Happening Here?
- ReactDOM.createRoot
- Finds the HTML element where you want React to display content.
- Usually, this is a
<div>withid="root"in your HTML.
- root.render()
- Tells React what to show inside that element.
- Here, we’re rendering
<h1>Hello, world!</h1>— a simple heading.
✅ The result? You’ll see Hello, World! displayed on your webpage.
🛠 Try It Yourself!
You can test this live using CodePen or any online editor.
- Open CodePen.
- Add the React and ReactDOM scripts (from a CDN or CodePen settings).
- Copy and paste the code above.
- See the magic happen instantly!
🧩 Understanding the Building Blocks
In React, you’ll work with two main concepts:
- Elements – The smallest units in React (like
<h1>Hello</h1>). - Components – Reusable building blocks that return elements.
const root = ReactDOM.createRoot(document.getElementById('root'));
root.render(<h1>Hello, world!</h1>);
This is modern React (v18+) syntax for rendering something to the DOM.
Here’s the deep dive ⬇
1️⃣ document.getElementById('root')
- This is plain JavaScript, not React.
- It searches your HTML for an element with the
idof"root". - In your HTML file, you probably have something like:
<div id="root"></div>
That <div> is an empty container where React will “take over” and render your app.
Think of it like:
- HTML page → basic skeleton.
- #root div → a box where React puts its content.
2️⃣ ReactDOM.createRoot(...)
- This is ReactDOM’s method introduced in React 18.
- It creates a “root” React rendering context inside that HTML element.
- In React 17 and earlier, we used:
ReactDOM.render(<App />, document.getElementById('root'));But in React 18+, the new API is:const root = ReactDOM.createRoot(document.getElementById('root')); - Why this change?
- Concurrent Mode support — allows React to pause, resume, and split rendering work for better performance.
- Future-proof — it’s designed for upcoming React features.
Analogy:
If document.getElementById('root') is a blank stage,
then ReactDOM.createRoot(...) sets up the stage lighting, sound, and props, preparing it for a performance.
3️⃣ const root = ...
- We store this “root” object in a variable called
root. - This object now has methods we can use — the most important one is
.render().
4️⃣ root.render(<h1>Hello, world!</h1>)
.render()tells React what to show inside the root container.- Here, we pass a JSX element:
<h1>Hello, world!</h1>. - JSX is not HTML — it’s JavaScript syntax that looks like HTML.
- Behind the scenes, JSX gets compiled to:
React.createElement('h1', null, 'Hello, world!');
- Behind the scenes, JSX gets compiled to:
- React then translates that element into real DOM nodes and inserts it into the
<div id="root">.
5️⃣ What happens behind the scenes
- Find container:
document.getElementById('root')finds the div in HTML. - Create root:
ReactDOM.createRoot(...)sets up React’s rendering engine in that div. - Render element:
.render(<h1>Hello, world!</h1>)tells React:- Convert
<h1>JSX into a virtual DOM representation. - Compare it to what’s already on screen (if anything).
- Apply minimal real DOM updates to match it (in this case, insert
<h1>).
- Convert
- Display result: Browser renders Hello, world!.
6️⃣ Why not just use innerHTML?
You could do:
document.getElementById('root').innerHTML = '<h1>Hello, world!</h1>';
But:
- This replaces all content each time.
- No diffing, no optimization.
- No reactivity — React updates only what’s necessary.
- No components, props, or state management.
React’s approach:
- Maintains a virtual DOM in memory.
- Efficiently updates only the changed parts.
- Works seamlessly with state & props.
Final Visual Flow
HTML file:
<body>
  <div id="root"></div>
</body>
JS:
// Step 1: Find #root div
const container = document.getElementById('root');

// Step 2: Prepare React root
const root = ReactDOM.createRoot(container);

// Step 3: Render "Hello, world!"
root.render(<h1>Hello, world!</h1>);
Browser result:
Hello, world!
how React actually processes
const root = ReactDOM.createRoot(document.getElementById('root'));
root.render(<h1>Hello, world!</h1>);
We’ll break this into three levels:
- Level 1 – Developer’s view (what you write and see)
- Level 2 – React’s internal view (what React does in memory)
- Level 3 – Browser’s view (how it ends up on screen)
Level 1 – Developer’s View
You write:
const root = ReactDOM.createRoot(document.getElementById('root'));
root.render(<h1>Hello, world!</h1>);
What you think happens:
- Find the
#rootdiv in HTML. - Put the
<h1>element inside it.
That’s true, but it’s too simplified — React does a lot more.
Level 2 – React’s Internal View
React is not just dumping HTML into your page.
It uses a Virtual DOM + Fiber architecture to decide how to update the screen efficiently.
Here’s the internal breakdown:
Step 1: DOM Node Selection
document.getElementById('root')
- The browser returns a reference to the
<div>withid="root". - This is the container DOM node that React will manage.
Example HTML:
<body>
  <div id="root"></div>
</body>
Now React has:
container = <div id="root"></div>
Step 2: Creating the Root Renderer
ReactDOM.createRoot(container)
- React internally calls a function that initializes a Fiber Root.
- Fiber Root = the entry point into React’s rendering system.
- Think of it as a project manager that knows:
- Which DOM container to control.
- Which React tree lives here.
- What needs to be updated.
React stores:
FiberRootNode {
  containerInfo: container, // #root DOM node
  current: FiberNode,       // pointer to the current React tree
  pendingUpdates: []
}
Step 3: Rendering JSX
root.render(<h1>Hello, world!</h1>);
The JSX:
<h1>Hello, world!</h1>
is transformed by Babel into:
React.createElement('h1', null, 'Hello, world!')
Step 4: Creating the Virtual DOM Node
React.createElement returns a React Element object:
{
  type: 'h1',
  props: { children: 'Hello, world!' },
  key: null,
  ref: null,
  $$typeof: Symbol(react.element)
}
This is not real DOM — it’s a lightweight JS object.
Step 5: Scheduling an Update
When you call root.render(...), React:
- Creates a fiber (special data structure) for the element.
- Schedules this fiber in the update queue.
- Marks the root as “dirty” — meaning it needs work.
Step 6: Reconciliation (Diffing)
React compares:
- Current Virtual DOM (what’s on screen now — empty at first)
- New Virtual DOM (your
<h1>Hello, world!</h1>)
Since it’s the first render:
- No matching elements exist.
- React decides: “We need to create an
<h1>node.”
Step 7: Commit Phase
The “Commit Phase” is when React:
- Calls
document.createElement('h1') - Sets its
textContentto"Hello, world!" - Inserts it into
#root.
At this point:
<div id="root">
  <h1>Hello, world!</h1>
</div>
Level 3 – Browser’s View
From the browser’s perspective:
- HTML parser loads the page and creates the DOM tree.
- React modifies that DOM tree by inserting new nodes.
- Browser’s rendering engine paints the updated DOM on screen.
- You see “Hello, world!” in your browser window.
Why This Approach Is Special
If you did:
document.getElementById('root').innerHTML = '<h1>Hello, world!</h1>';
- The browser destroys and recreates DOM nodes each time.
- React instead keeps a virtual copy and only updates what changed.
- This is more efficient and enables features like:
- State-based UI updates
- Conditional rendering
- Concurrent rendering (pausing/resuming work)
Summary Timeline
JSX → React Element → Fiber → Virtual DOM diff → Commit Phase → Real DOM → Screen
You’ve basically pasted the old React docs page about “Add React to a Website”, and it’s showing how to use React without any build tools — just via CDN links — so you can integrate it into an existing HTML site.
Adding React to an Existing Website (Without Build Tools)
React is often associated with large Single Page Applications (SPAs), but you don’t have to rebuild your whole website to use it.
You can sprinkle interactivity into an existing HTML page using only a few <script> tags — no bundlers, no complex setup.
1. Why Use React in an Existing Site?
Most websites don’t need to be fully converted into React apps.
You might just want to:
- Add a dynamic widget (e.g., like button, comment box)
- Improve certain parts of your UI without touching the rest of the site
- Test React in a small section before committing fully
React allows gradual adoption, so you can use it in isolated spots.
2. Step-by-Step Guide
Step 1: Add a DOM Container
This is where React will render your component.
<div id="like_button_container"></div>
You can place this anywhere inside your <body>.
React will take over this container and replace its contents.
Step 2: Add Script Tags
Just before the closing </body> tag, load React and your own component script.
<!-- Load React (development version for learning) -->
<script src="https://unpkg.com/react@18/umd/react.development.js" crossorigin></script>
<script src="https://unpkg.com/react-dom@18/umd/react-dom.development.js" crossorigin></script>

<!-- Your component code -->
<script src="like_button.js"></script>
Important:
When deploying to production, replace the .development.js files with .production.min.js for better performance.
Step 3: Create a React Component
In like_button.js:
const e = React.createElement;

class LikeButton extends React.Component {
  constructor(props) {
    super(props);
    this.state = { liked: false };
  }

  render() {
    if (this.state.liked) {
      return 'You liked this.';
    }

    return e(
      'button',
      { onClick: () => this.setState({ liked: true }) },
      'Like'
    );
  }
}

// Find the container and render the component
const domContainer = document.querySelector('#like_button_container');
const root = ReactDOM.createRoot(domContainer);
root.render(e(LikeButton));
Step 4: Open in Browser
Just refresh your HTML page and the Like button will appear.
When clicked, the text changes — no page reload needed.
3. Using JSX (Optional, More Readable)
JSX makes React code look like HTML:
return (
  <button onClick={() => this.setState({ liked: true })}>
    Like
  </button>
);
Browsers can’t read JSX directly, so you can:
- Use Babel Standalone for quick demos
- Use a proper build tool (like Vite or Create React App) for production
For a quick Babel setup in HTML:
<script src="https://unpkg.com/babel-standalone@6/babel.min.js"></script>
<script type="text/babel">
  // JSX code here
</script>
4. Performance Note
- For production, always use minified React scripts.
- Remove
babel-standaloneand precompile JSX using tools like Babel CLI or Vite. - Keep React components isolated if your page has other JS frameworks.
5. Example Full HTML
<!DOCTYPE html>
<html>
<head>
  <title>React in HTML</title>
</head>
<body>
  <div id="like_button_container"></div>

  <script src="https://unpkg.com/react@18/umd/react.development.js" crossorigin></script>
  <script src="https://unpkg.com/react-dom@18/umd/react-dom.development.js" crossorigin></script>

  <script>
    const e = React.createElement;
    class LikeButton extends React.Component {
      constructor(props) {
        super(props);
        this.state = { liked: false };
      }
      render() {
        if (this.state.liked) return 'You liked this.';
        return e('button', { onClick: () => this.setState({ liked: true }) }, 'Like');
      }
    }
    const root = ReactDOM.createRoot(document.querySelector('#like_button_container'));
    root.render(e(LikeButton));
  </script>
</body>
</html>
Summary:
- You can integrate React into any HTML page using
<script>tags. - Start with
React.createElement(browser-ready). - Optionally switch to JSX with Babel for cleaner syntax.
- Use production builds before deploying.
How to Add React to an Existing Website in 1 Minute (No Build Tools Required)
React is not just for big single-page apps — you can also add React to any HTML page without complex build tools.
This makes it perfect for adding small dynamic widgets to an existing site without rewriting everything.
In this tutorial, you’ll learn how to add a React component to an existing website in just a few steps.
Why Use React in an Existing Website?
Most websites don’t need to be fully converted to React.
Sometimes you just want to:
- Add a like button
- Create an interactive form
- Show live-updating data
- Test React in a small section before going all-in
React’s gradual adoption model lets you start small and scale later.
Step 1: Add a Container <div>
In your HTML file, create a container where React will render your component.
<div id="like_button_container"></div>
You can place this anywhere inside the <body> tag.
Step 2: Add Script Tags for React
Before the closing </body> tag, load React and ReactDOM from a CDN, and include your custom JavaScript file.
<!-- Load React (development version for learning) -->
<script src="https://unpkg.com/react@18/umd/react.development.js" crossorigin></script>
<script src="https://unpkg.com/react-dom@18/umd/react-dom.development.js" crossorigin></script>

<!-- Your component code -->
<script src="like_button.js"></script>
Tip: For production, replace react.development.js and react-dom.development.js with react.production.min.js and react-dom.production.min.js.
Step 3: Create a React Component
Create a file called like_button.js in the same folder as your HTML file.
const e = React.createElement;

class LikeButton extends React.Component {
  constructor(props) {
    super(props);
    this.state = { liked: false };
  }

  render() {
    if (this.state.liked) {
      return 'You liked this.';
    }

    return e(
      'button',
      { onClick: () => this.setState({ liked: true }) },
      'Like'
    );
  }
}

// Render the component inside the container
const domContainer = document.querySelector('#like_button_container');
const root = ReactDOM.createRoot(domContainer);
root.render(e(LikeButton));
Step 4: Open Your HTML Page
When you open the HTML file in a browser, you’ll see a “Like” button.
Click it, and the text changes — all without reloading the page.
Optional: Use JSX for Cleaner Code
React supports JSX, which looks like HTML and is easier to read.
Example with JSX:
return (
  <button onClick={() => this.setState({ liked: true })}>
    Like
  </button>
);
Browsers don’t understand JSX directly, so for quick demos, you can use Babel Standalone:
<script src="https://unpkg.com/babel-standalone@6/babel.min.js"></script>
<script type="text/babel">
  // JSX code here
</script>
For production, precompile JSX using Babel CLI, Vite, or similar tools.
Full Example HTML
Here’s a complete working example without JSX:
<!DOCTYPE html>
<html>
<head>
  <title>React in HTML</title>
</head>
<body>
  <div id="like_button_container"></div>

  <script src="https://unpkg.com/react@18/umd/react.development.js" crossorigin></script>
  <script src="https://unpkg.com/react-dom@18/umd/react-dom.development.js" crossorigin></script>

  <script>
    const e = React.createElement;
    class LikeButton extends React.Component {
      constructor(props) {
        super(props);
        this.state = { liked: false };
      }
      render() {
        if (this.state.liked) return 'You liked this.';
        return e('button', { onClick: () => this.setState({ liked: true }) }, 'Like');
      }
    }
    const root = ReactDOM.createRoot(document.querySelector('#like_button_container'));
    root.render(e(LikeButton));
  </script>
</body>
</html>
Final Thoughts
With just a few lines of HTML and JavaScript, you can bring React’s power to any website.
This method is great for prototyping, learning, or adding small features without setting up a complex development environment.
When you’re ready to build bigger apps, check out React.dev for modern, build-tool-based setups like Vite or Create React App.
rsion next?
