🧑🎓 Beginner Level
✅ 1. Basics & Syntax
- Statements, Keywords, Identifiers
- Comments, Whitespaces
- Variables (
var,let,const) - Data Types (Primitive, Non-Primitive)
✅ 2. Operators
- Arithmetic, Assignment, Comparison
- Logical (AND, OR, NOT)
- Bitwise, Ternary
- Nullish Coalescing (
??), Optional Chaining (?.)
✅ 3. Control Flow
if,else,switch- Loops:
for,while,do-while break,continue,label
✅ 4. Functions
- Function Declaration vs Expression
- Arrow Functions
- Default, Rest, Spread
- IIFE (Immediately Invoked Function Expression)
- Callback Functions
📦 Intermediate Level
✅ 5. Arrays
- Array Methods:
map,filter,reduce,forEach,find,some,every sort,splice,slice,push,pop,shift,unshift- Array Destructuring
- Multidimensional Arrays
✅ 6. Strings
- String Methods:
charAt,slice,substr,substring,split,replace,includes,indexOf - Template Literals
- String Immutability
✅ 7. Objects
- Object Creation (
{},Object.create()) - Accessing & Updating Properties
thisin Objects- Object Destructuring
- Shallow vs Deep Copy
Object.keys,Object.values,Object.entries
✅ 8. DOM Manipulation
- Selecting Elements (
getElementById,querySelector) - Changing Content, Styles, Attributes
- Creating/Removing Elements
- Events & Listeners
🧠 Advanced Level
✅ 9. Scopes & Closures
- Global, Function, Block Scope
- Lexical Scope
- Closures (Practical Use Cases)
✅ 10. this & Execution Context
thisin global, function, arrow, object, class- Call, Apply, Bind
- Execution Context & Call Stack
✅ 11. Asynchronous JavaScript
- Callbacks, Promises
- Async/Await
setTimeout,setInterval,clearTimeout- Microtasks vs Macrotasks (Event Loop)
✅ 12. Error Handling
try,catch,finally,throw- Custom Error Classes
✅ 13. ES6+ Features
let,const- Arrow Functions
- Template Literals
- Destructuring
- Rest/Spread Operators
- Classes,
super,constructor - Modules:
import,export - Sets, Maps
- Optional Chaining, Nullish Coalescing
🔒 Expert Level
✅ 14. Advanced Functions
- Higher-Order Functions
- Currying
- Memoization
- Debounce & Throttle
- Composition & Pipe
✅ 15. Event Loop & Concurrency
- Call Stack, Web APIs, Callback Queue
- Event Loop Diagrams
- Job Queue vs Task Queue
- Starvation, Blocking
✅ 16. Prototypes & Inheritance
- Prototype Chain
__proto__vsprototype- Classical vs Prototypal Inheritance
✅ 17. Classes & OOP
- Constructor Functions
- ES6 Classes
- Inheritance, Encapsulation
- Static Methods, Private Fields
✅ 18. Modules & Tooling
- ES Modules (
import,export) - CommonJS vs ESM
- Transpilers (Babel)
- Bundlers (Webpack, Vite)
🧪 Testing, Debugging, & Environment
✅ 19. Debugging
console.log,debugger- Chrome DevTools
✅ 20. Testing
- Unit Testing with Jest
- DOM Testing with RTL
🧰 Bonus: Modern JS Topics
- Immutable Data Patterns
- Functional Programming in JS
- Service Workers, WebSockets
- Type Coercion & Equality (
==,===) - Memory Management (GC, Leaks)
✨ JavaScript – Complete Guide
📌 What is JavaScript?
JavaScript is a high-level, interpreted programming language primarily used to build interactive web applications. It’s one of the core technologies of the web, along with HTML and CSS.
✅ JavaScript runs in the browser
✅ It makes websites dynamic and responsive
✅ Can also run on servers using Node.js
📜 History of JavaScript
| Year | Milestone |
|---|---|
| 1995 | Created by Brendan Eich at Netscape, originally named Mocha then LiveScript |
| 1996 | Renamed to JavaScript (to ride Java’s popularity) |
| 1997 | Standardized as ECMAScript (ES) by ECMA International |
| 2009 | Node.js released – JavaScript runs on servers |
| 2015 | Major update: ES6 (a.k.a. ECMAScript 2015) introduced let, const, classes, arrow functions |
| Present | Used for web, mobile, desktop apps, game dev, AI, and more! |
🧠 Why Use JavaScript?
- 🖱️ Add interactivity (click, drag, hover)
- 🧮 Dynamic data updates without page reload (AJAX)
- 📦 Build complex apps using frameworks like React, Vue, Angular
- 📱 Cross-platform apps with React Native, Ionic
- ⚙️ Backend logic using Node.js
- 🌐 Control browser APIs (storage, DOM, geolocation, etc.)
🔢 JavaScript Versions (ECMAScript Evolution)
| Version | Key Features |
|---|---|
| ES5 (2009) | Strict mode, JSON, Array methods |
| ES6 / ES2015 | let, const, arrow functions, template literals, classes, modules |
| ES7 / ES2016 | includes(), ** exponentiation |
| ES8 / ES2017 | async/await, Object.entries |
| ES9 / ES2018 | Rest/spread for objects, Promise.finally() |
| ES10 / ES2019 | flat(), trimStart/End() |
| ES11 / ES2020 | Nullish coalescing ??, Optional chaining ?. |
| ES12–ES14 | Logical assignment, WeakRefs, top-level await, Array.findLast(), etc. |
🛠️ Common Uses of JavaScript
- 🌐 Web development (React, Vue, Angular)
- 📲 Mobile apps (React Native, NativeScript)
- 🖥️ Desktop apps (Electron)
- 🔁 APIs & Servers (Node.js, Express.js)
- 🤖 AI and ML (TensorFlow.js)
- 📦 Automation & Scripting (Gulp, Webpack)
🧩 Example Code
<!DOCTYPE html>
<html>
<head><title>JS Example</title></head>
<body>
  <h1 id="greet">Hello!</h1>
  <button onclick="sayHello()">Click Me</button>

  <script>
    function sayHello() {
      document.getElementById("greet").innerText = "Hello, JavaScript!";
    }
  </script>
</body>
</html>
📚 Final Thoughts
JavaScript is the heartbeat of modern web development. With continuous updates and a massive ecosystem, it’s not just a browser language anymore — it’s everywhere!
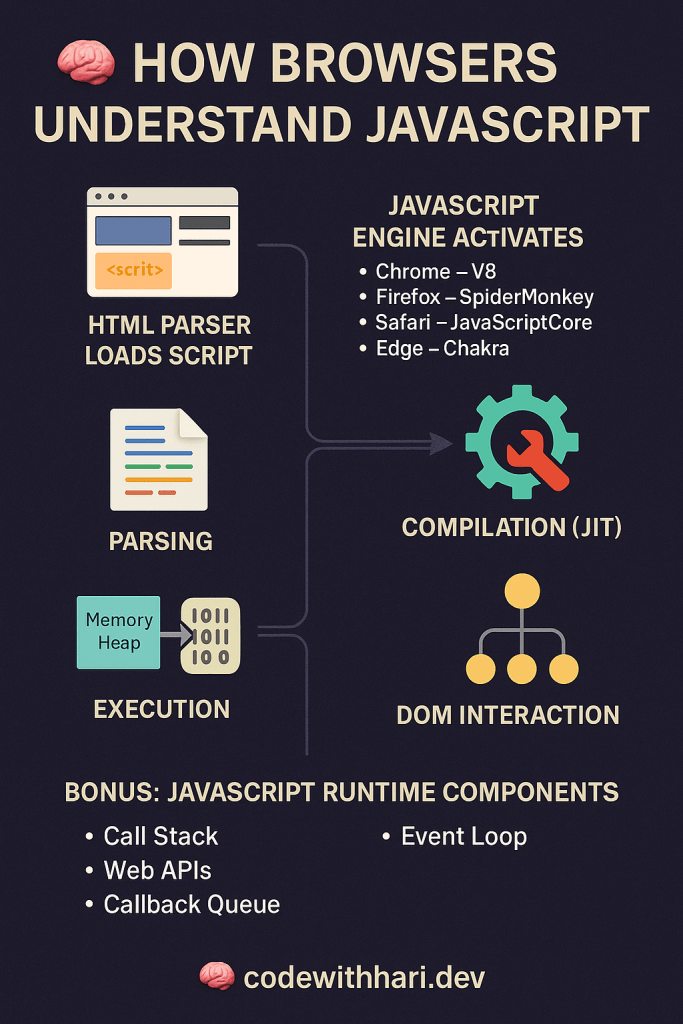
The browser understands JavaScript through a built-in component called the JavaScript engine. Here’s how it works step-by-step:
🧠 How Browser Understands JavaScript
- HTML Parser Loads Script
- While parsing HTML, the browser encounters a
<script>tag and pauses rendering.
- While parsing HTML, the browser encounters a
- JavaScript Engine Activates
- Each browser has a JavaScript engine:
- Chrome → V8
- Firefox → SpiderMonkey
- Safari → JavaScriptCore
- Edge → Chakra (now also uses V8)
- Each browser has a JavaScript engine:
- Parsing
- The JS engine parses the JavaScript code (converts code into tokens and then into an Abstract Syntax Tree).
- Compilation (JIT)
- The parsed code is compiled using Just-In-Time (JIT) compilation to speed up execution.
- Converts code into machine-level instructions for your device.
- Execution
- The engine executes the compiled code using components like:
- Memory Heap (for memory allocation)
- Call Stack (to manage function calls)
- The engine executes the compiled code using components like:
- DOM Interaction
- JS interacts with the browser’s DOM API to manipulate HTML/CSS (e.g., change content, styles, handle events).
🔧 Bonus: JavaScript Runtime Components
- Call Stack – Tracks function execution
- Web APIs – Provided by browser (e.g.,
setTimeout,fetch) - Callback Queue – Queued events or async callbacks
- Event Loop – Handles async code by checking the call stack and callback queue
📝 This is how JavaScript becomes interactive magic inside your browser!
🧠 How Browsers Understand JavaScript – Deep Dive
Have you ever wondered how your browser runs JavaScript code behind the scenes? Let’s break it down step-by-step in a clear and friendly way.
🌐 1. What Happens When a Web Page Loads?
When you visit a website, your browser goes through the following steps:
- HTML is parsed first.
- It encounters a
<script>tag with JavaScript. - The browser pauses rendering the page to load and run the JavaScript.
🚀 2. JavaScript Engines: The Power Inside the Browser
Each modern browser has a JavaScript engine:
| Browser | JavaScript Engine |
|---|---|
| Chrome / Edge | V8 |
| Firefox | SpiderMonkey |
| Safari | JavaScriptCore (Nitro) |
| Opera | V8 |
These engines are responsible for understanding and running JavaScript code.
🔍 3. Step-by-Step – How JavaScript is Processed
🔸 A. Parsing
The engine scans the JS code line-by-line, breaking it into tokens, then builds an Abstract Syntax Tree (AST) – a structured representation of your code.
🔸 B. Compilation (JIT – Just-In-Time)
Modern engines use JIT compilation, which compiles parts of the JS code into machine code while the program is running. This improves performance.
🔸 C. Execution
The engine starts running the compiled code:
- Manages variables and memory
- Executes functions via the Call Stack
- Handles events, clicks, or timeouts
🧩 4. Key Components of JavaScript Runtime
| Component | Description |
|---|---|
| Call Stack | Tracks function calls – Last In, First Out |
| Memory Heap | Stores variables and objects |
| Web APIs | Provided by browser (e.g. setTimeout, fetch) |
| Callback Queue | Holds async operations waiting to run |
| Event Loop | Constantly checks if call stack is clear and pushes from queue |
⚙️ 5. JavaScript + Browser = Magic ✨
When you run something like:
document.getElementById("btn").addEventListener("click", () => {
  alert("Clicked!");
});
- JavaScript talks to the DOM API (browser’s interface to the page)
- Adds a click listener using Web API
- When clicked, the Event Loop ensures the function is pushed to the Call Stack and executed
📝 Summary
👉 Browsers use JavaScript engines
👉 Code is parsed, compiled, and executed in real-time
👉 The event loop, Web APIs, and call stack are the unsung heroes
👉 This is how your favorite websites respond to your clicks and scrolls!
🔥 Browsers Use JavaScript Engines – What Does That Mean?
Every modern browser comes with a built-in JavaScript engine – a powerful program that understands and runs your JavaScript code.
🧠 What is a JavaScript Engine?
A JavaScript engine is the part of the browser responsible for:
- Parsing your JavaScript code
- Compiling it to machine code (JIT)
- Executing it to make your webpage dynamic and interactive
🧰 Major JavaScript Engines
| Browser | JavaScript Engine |
|---|---|
| Chrome | V8 |
| Edge | V8 |
| Firefox | SpiderMonkey |
| Safari | JavaScriptCore (Nitro) |
| Opera | V8 |
🧪 Example: V8 Engine (Chrome & Node.js)
- Developed by Google
- Uses Just-In-Time (JIT) compilation to make JS super fast
- Powers both Chrome browser and Node.js backend apps
🚀 Why It Matters?
Understanding that browsers use JavaScript engines helps you:
- Write more optimized code
- Understand how features like async/await, setTimeout work
- Debug performance and memory issues better
📌 In short: The browser’s JavaScript engine is the brain that executes your code. Without it, your webpage would just be static HTML!
🦸♂️ The Event Loop, Web APIs, and Call Stack – The Unsung Heroes of JavaScript
Behind every responsive web app is a trio of silent workers:
🔁 Event Loop, 🌐 Web APIs, and 📚 Call Stack.
Together, they make JavaScript non-blocking, smooth, and fast.
📚 Call Stack – The Task Manager
The Call Stack keeps track of what function is being run.
It follows a LIFO (Last-In-First-Out) order.
function greet() {
  console.log("Hello");
}
greet();
greet()is added to the stack → executed → removed from the stack.
🌐 Web APIs – Provided by the Browser
The browser gives access to Web APIs like:
setTimeout()DOM eventsfetch()
These don’t block the main thread. Instead, they run outside JavaScript in the browser’s environment.
🔁 Event Loop – The Coordinator
The Event Loop constantly checks:
Is the call stack empty?
If yes, push tasks from the callback queue (likesetTimeout) into the stack.
That’s how async code works in JavaScript without freezing the page!
🧠 Visual Flow
JS Code ➝ Call Stack ➝ (Async? ➝ Web API ➝ Callback Queue) ➝ Event Loop ➝ Back to Call Stack
✅ Real Example
console.log("Start");
setTimeout(() => console.log("Timeout!"), 1000);
console.log("End");
📦 Output:
Start
End
Timeout!
Why? Because setTimeout runs via Web API, waits in callback queue, and the event loop pushes it after stack is clear.
🎯 Conclusion
The Call Stack runs code, Web APIs handle async, and the Event Loop connects them — they’re the unsung heroes behind every JavaScript app!
👉 This is How Your Favorite Websites Respond to Clicks & Scrolls!
Every time you click a button, scroll a page, or fill a form — JavaScript springs into action behind the scenes.
With the help of:
- 🧠 Call Stack (to track function execution)
- 🌐 Web APIs (like
addEventListener,fetch,setTimeout) - 🔁 Event Loop (to manage async tasks smoothly)
…your browser dynamically updates the UI without reloading the page.
✅ That’s how interactive websites like YouTube, Amazon, and Instagram feel so fast and responsive.
🔍 Next time you click “Add to Cart” or “Like a post,” remember — it’s JavaScript + browser magic doing the job!
✨ JavaScript Whitespace: A Beginner-Friendly Guide
Whitespace in JavaScript refers to spaces, tabs, and line breaks that are ignored by the engine but essential for readability.
📌 What Counts as Whitespace?
space(tab(\t)newline(\n)carriage return(\r)form feed(\f)
🧠 Why Use Whitespace?
- Improves code readability
- Helps in indentation and structure
- Doesn’t affect how JS runs
✅ Example:
// Without whitespace (hard to read)
function add(a,b){return a+b}

// With whitespace (clean and readable)
function add(a, b) {
  return a + b;
}
🚫 Bad Practices
Avoid inconsistent indentation or mixing tabs and spaces. Example:
function test() {     // too many spaces
     return true;     // inconsistent indentation
}
💡 Tip for Beginners
Use a code formatter like Prettier or built-in editor format (VSCode: Shift + Alt + F) to maintain clean whitespace automatically.
🧾 JavaScript Statements – A Simple Guide
In JavaScript, a statement is a complete instruction that tells the browser to do something.
📌 What is a Statement?
A JavaScript statement performs an action. It’s like a sentence in English — it should end with a semicolon (;), although it’s optional in many cases.
🧪 Example Statements:
let x = 5;         // Declaration + Assignment
x = x + 1;         // Expression Statement
console.log(x);    // Function Call Statement
🧠 Types of Statements:
- Declaration Statement:
let x = 10; - Assignment Statement:
x = 20; - Conditional Statement:
if (x > 5) { ... } - Loop Statement:
for (...) { ... } - Function Call:
alert("Hi!");
🚀 Fun Fact:
JavaScript code runs statement-by-statement, top to bottom. Each one is executed in order unless control flow changes it.
🆔 JavaScript Identifiers – Naming Things in Code
In JavaScript, identifiers are the names used to identify variables, functions, arrays, classes, etc.
📌 What is an Identifier?
An identifier is the name you give to:
- Variables →
let age = 25; - Functions →
function greet() {} - Classes →
class Person {}
✅ Rules for Valid Identifiers:
- Must start with a letter,
$, or_ - Cannot start with a number
- Cannot be a JavaScript reserved word
- Case-sensitive →
Ageandageare different
🚫 Invalid Examples:
let 2cool = "no";       // ❌ starts with number
let let = 5;            // ❌ reserved word
👍 Valid Examples:
let _total = 100;
let $value = 50;
let userName = "Hari";
🧠 Best Practices:
- Use camelCase for variables and functions →
userAge - Use PascalCase for classes →
UserProfile - Make names meaningful and readable
🗂️ JavaScript Keywords List (with Meanings)
JavaScript keywords are reserved words used to define the syntax and structure of the language. You cannot use them as variable or function names.
✅ Control Flow & Conditionals
| Keyword | Meaning |
|---|---|
if | Executes code block if a condition is true |
else | Defines alternate block if if condition is false |
switch | Selects one of many code blocks to execute |
case | Matches value in a switch statement |
default | Fallback block in a switch statement |
break | Exits from a loop or switch block |
continue | Skips current loop iteration |
🔁 Loops
| Keyword | Meaning |
|---|---|
for | Loop with initializer, condition, and final expression |
while | Loop while a condition is true |
do | Loop at least once, then check condition |
in | Iterates over object properties |
of | Iterates over iterable values like arrays |
📦 Variable Declarations
| Keyword | Meaning |
|---|---|
var | Declares a function-scoped variable |
let | Declares a block-scoped variable |
const | Declares a block-scoped constant (can’t be reassigned) |
🧠 Functions
| Keyword | Meaning |
|---|---|
function | Declares a function |
return | Returns a value from a function |
yield | Pauses and resumes a generator function |
async | Declares an asynchronous function |
await | Pauses async function until promise resolves |
🧱 Classes & Objects
| Keyword | Meaning |
|---|---|
class | Declares a class |
extends | Inherits from another class |
constructor | Special method to initialize object |
super | Calls the parent class constructor or method |
this | Refers to the current object context |
new | Creates an instance of a class |
🎯 Exception Handling
| Keyword | Meaning |
|---|---|
try | Defines block to test for errors |
catch | Handles errors from try |
finally | Executes code after try/catch regardless |
throw | Manually throws an error |
🌐 Modules
| Keyword | Meaning |
|---|---|
import | Imports modules or variables |
export | Exports functions, variables, or classes |
from | Specifies module source in import/export |
🔍 Operators & Others
| Keyword | Meaning |
|---|---|
typeof | Returns variable type |
instanceof | Checks object type |
void | Discards return value of an expression |
delete | Deletes object property |
⚙️ Meta Keywords
| Keyword | Meaning |
|---|---|
with | Extends scope chain (not recommended) |
debugger | Pauses code execution in debugger |
🔒 Literals
| Keyword | Meaning |
|---|---|
true / false | Boolean values |
null | Represents no value |
undefined | Value not assigned |
NaN | Not a Number |
Infinity | Represents infinity |
🚫 Reserved for Future Use
| Keyword | Meaning / Notes |
|---|---|
enum | Future reserved (used in TypeScript) |
implements | Used in class contracts (future use) |
interface | For type definition (used in TypeScript) |
package | Reserved for package declarations |
private | Access modifier for class fields |
protected | Access modifier for class inheritance |
public | Declares public members |
static | Defines static members in a class |
✍️ JavaScript Expressions & Comments – A Beginner’s Guide
Understanding expressions and comments is key to writing clean, readable, and effective JavaScript code.
📌 What is a JavaScript Expression?
An expression is any valid set of literals, variables, operators, and functions that produces a value.
✅ Examples of Expressions:
5 + 3              // Arithmetic Expression → 8
x = 10             // Assignment Expression
"Hello" + " World" // String Expression → "Hello World"
Math.max(5, 10)    // Function Expression → 10
➡️ Expressions are used inside statements.
💬 What are Comments in JavaScript?
Comments are ignored by JavaScript engines. They help document the code, explain logic, and disable code temporarily.
🗒️ Types of Comments:
- Single-line Comment:
// This is a comment
let x = 10; // assign value
- Multi-line Comment:
/*
  This is a multi-line comment.
  It can span multiple lines.
*/
💡 Tips:
- Use comments to explain why, not just what
- Keep expressions simple and readable
- Prefer
//for short notes and/* */for block documentation
🧠 JavaScript Variables – The Complete Guide for all
JavaScript variables are containers for storing data values. Think of them like labeled jars where you can store numbers, text, or even complex data.
📦 What Is a Variable?
A variable in JavaScript is a named space in memory where data can be stored and retrieved later.
let name = "Hari";
Declaring a variable
🔄 1. Why Use Variables?
- Store values (like numbers, strings)
- Reuse data without rewriting
- Make your code dynamic and readable
✨ 2. Declaring Variables
JavaScript gives us three keywords to declare variables:
| Keyword | Scope | Reassignment | Hoisting |
|---|---|---|---|
var | Function | ✅ Yes | ✅ Hoisted |
let | Block | ✅ Yes | ❌ Not Hoisted |
const | Block | ❌ No | ❌ Not Hoisted |
✅ Examples:
var x = 10;     // old school
let y = 20;     // modern & recommended
const z = 30;   // constant value
🔥 3. Rules for Naming Variables
✅ Can contain letters, digits, _ and $
✅ Must begin with a letter, _ or $
❌ Cannot be a reserved keyword (like let, return)
✅ Use camelCase for best practices
let userName = "Hari";
let _isLoggedIn = true;
🧪 4. Dynamic Typing in JS
JavaScript is dynamically typed — the variable type is determined at runtime.
let data = 10;       // Number
data = "Now text!";  // String
📌 5. Reassigning & Redeclaring
varallows redeclaration & reassignmentletallows only reassignmentconstallows neither
var a = 5;
var a = 10;   // allowed

let b = 15;
b = 20;       // allowed

const c = 25;
c = 30;       // ❌ Error
🧠 Best Practices
✅ Use let for values that can change
✅ Use const for values that shouldn’t
❌ Avoid var in modern code
✅ Name clearly: userEmail not x
🌐 Final Thoughts
Variables are the foundation of all programming logic. Mastering them means you’re one step closer to writing clean, scalable JavaScript.
📝 All Snippet for everyone:
const fullName = "Hari Mohan";
let age = 34;
var isDeveloper = true;

console.log(`My name is ${fullName} and I am ${age} years old.`);
🧪 JavaScript Variable Examples – All-in-One Guide
Each case is covered with clear examples to help beginners understand every concept deeply.
✅ 1. var Example (Function Scope, Redeclaration, Hoisting)
function greet() {
  var message = "Hello from inside!";
  console.log(message);
}
greet();
// console.log(message); ❌ Error: message is not defined

var x = 10;
var x = 20; // Redeclaration allowed
console.log(x); // 20

console.log(y); // undefined (hoisted)
var y = 5;
✅ 2. let Example (Block Scope, No Redeclaration, Reassignment Allowed)
let age = 30;
age = 31; // ✅ reassignment allowed
// let age = 40; ❌ SyntaxError: Identifier 'age' has already been declared

if (true) {
  let localVar = "Inside block";
  console.log(localVar); // "Inside block"
}
// console.log(localVar); ❌ Error: not defined (block scoped)
✅ 3. const Example (Block Scope, No Redeclaration or Reassignment)
const pi = 3.14;
// pi = 3.14159; ❌ TypeError

const user = {
  name: "Hari",
  age: 34,
};
user.age = 35; // ✅ Allowed: object properties can change
// user = {}; ❌ TypeError
✅ 4. Naming Rules Examples
let _name = "Hari";
let $age = 25;
let user1 = "User"; // digits allowed after first character
// let 1user = "Wrong"; ❌ Error
// let let = 10; ❌ Error: reserved keyword
✅ 5. Dynamic Typing Example
let data = 100;
console.log(typeof data); // number
data = "Now I'm a string!";
console.log(typeof data); // string
data = true;
console.log(typeof data); // boolean
✅ 6. Hoisting Comparison: var vs let vs const
console.log(a); // undefined (hoisted)
var a = 5;

// console.log(b); ❌ ReferenceError
let b = 10;

// console.log(c); ❌ ReferenceError
const c = 15;
✅ 7. Scope Demo: Function, Block, Global
var globalVar = "Global";

function testScope() {
  var funcVar = "Function";
  if (true) {
    let blockVar = "Block";
    console.log(blockVar); // ✅
    console.log(funcVar);  // ✅
    console.log(globalVar); // ✅
  }
  // console.log(blockVar); ❌
}
// console.log(funcVar); ❌
testScope();
✅ 8. Template Literal with Variables
const name = "Hari";
let age = 34;

console.log(`Hello, my name is ${name} and I'm ${age} years old.`);
✅ 9. Constants with Arrays and Objects
const numbers = [1, 2, 3];
numbers.push(4); // ✅
console.log(numbers); // [1,2,3,4]

// numbers = [5, 6]; ❌ Error

const person = { name: "Hari" };
person.name = "Updated"; // ✅
✅ Summary Table
| Case | Example |
|---|---|
| Declare | let a = 10; |
| Reassign | a = 20; |
| Block Scope | let, const |
| Function Scope | var |
| Hoisting | var only (partial) |
| Const with object | props changeable |
| Dynamic typing | a = "text" |
🔀 JavaScript let, var, and const Explained
In JavaScript, variables can be declared using three keywords: var, let, and const. Understanding their differences is crucial for writing modern, bug-free code.
✅ var – Old Way (Function Scoped)
var name = "Hari";
var name = "Mohan"; // ✅ Redeclaration allowed
🔍 Key Features:
- Function-scoped
- Can be redeclared and reassigned
- Hoisted (declared at the top, initialized as
undefined)
console.log(x); // undefined (hoisted)
var x = 10;
⚠️ Not recommended in modern JavaScript
✅ let – Modern & Flexible (Block Scoped)
let age = 30;
age = 31; // ✅ Reassignment allowed
// let age = 32; ❌ Redeclaration not allowed in same scope
🔍 Key Features:
- Block-scoped
- ❌ Cannot be redeclared in same scope
- ✅ Can be reassigned
- ❌ Not hoisted like
var(temporal dead zone)
if (true) {
  let msg = "Hello";
  console.log(msg);
}
// console.log(msg); ❌ ReferenceError
✅ const – Constants (Block Scoped, Read-Only)
const pi = 3.14;
// pi = 3.14159; ❌ TypeError
🔍 Key Features:
- Block-scoped
- ❌ Cannot be redeclared or reassigned
- ✅ Must be initialized on declaration
- ❗ Object properties can still change
const user = { name: "Hari" };
user.name = "Updated"; // ✅ Allowed
user = {}; // ❌ Error
📋 Quick Comparison Table
| Feature | var | let | const |
|---|---|---|---|
| Scope | Function | Block | Block |
| Redeclaration | ✅ Yes | ❌ No | ❌ No |
| Reassignment | ✅ Yes | ✅ Yes | ❌ No |
| Hoisting | ✅ Yes | ❌ No | ❌ No |
| Initialization | Optional | Optional | Required |
💡 Best Practices
- Use
**let**for variables that will change - Use
**const**by default - Avoid
**var**unless legacy support is required
DataType in Javascript
🧠 JavaScript: Primitive vs Reference Values (With Examples)
In JavaScript, values are divided into two main types:
- ✅ Primitive values
- ✅ Reference values (Objects)
Understanding the difference is crucial to avoid unexpected behavior with assignments, copying, and comparisons.
🔹 1. Primitive Values
Primitive types are immutable and stored directly in the stack. They hold actual values.
✅ Types of Primitives:
stringnumberbooleanundefinednullbigintsymbol
🔍 Example:
let a = "Hari";
let b = a;

b = "Mohan";

console.log(a); // "Hari"
console.log(b); // "Mohan"
❗
aremains unchanged — because primitives are copied by value.
🧩 JavaScript Primitive Data Types – With Examples
1. string
Represents a sequence of characters.
let name = "Hari";
let greeting = 'Hello';
let phrase = `Welcome, ${name}!`;

console.log(name); // "Hari"
2. number
Represents both integer and floating-point numbers.
let age = 30;
let price = 99.99;
let temp = -5;

console.log(age + price); // 129.99
3. boolean
Represents true or false.
let isLoggedIn = true;
let isAdmin = false;

console.log(isLoggedIn); // true
4. undefined
A variable that is declared but not initialized.
let data;
console.log(data); // undefined
5. null
Represents the intentional absence of any value.
let selectedBoat = null;
console.log(selectedBoat); // null
6. bigint
Used for very large integers beyond Number.MAX_SAFE_INTEGER.
let bigNumber = 1234567890123456789012345678901234567890n;
console.log(bigNumber); // 1234567890123456789012345678901234567890n
7. symbol
Unique identifiers, often used for object keys.
let id = Symbol("userId");
let anotherId = Symbol("userId");

console.log(id === anotherId); // false
🔹 2. Reference Values
Reference types include objects, arrays, and functions. They are stored in the heap and accessed by a reference (memory address).
✅ Types of Reference:
ObjectArrayFunctionDate,Map,Set, etc.
🔍 Example:
let obj1 = { name: "Hari" };
let obj2 = obj1;

obj2.name = "Mohan";

console.log(obj1.name); // "Mohan"
console.log(obj2.name); // "Mohan"
❗ Both variables point to the same memory reference.
🔁 Key Difference: Copy by Value vs Reference
📌 Primitive Copy:
let x = 100;
let y = x;
y = 200;

console.log(x); // 100
console.log(y); // 200
📌 Reference Copy:
let list1 = [1, 2, 3];
let list2 = list1;
list2.push(4);

console.log(list1); // [1, 2, 3, 4]
console.log(list2); // [1, 2, 3, 4]
🧪 How to Create True Copies (Cloning)
✅ For Objects (Shallow copy):
let obj = { name: "Hari" };
let copy = { ...obj };
copy.name = "Mohan";

console.log(obj.name);  // "Hari"
✅ For Arrays:
let arr = [1, 2, 3];
let copy = [...arr];
copy.push(4);

console.log(arr);  // [1, 2, 3]
🧠 Summary Table
| Feature | Primitive | Reference |
|---|---|---|
| Stored in | Stack | Heap |
| Copied by | Value | Reference |
| Mutable? | No | Yes |
| Examples | string, number, boolean | object, array, function |
| Compared by | Value | Reference |
✅ Final Thought
Knowing the difference between primitive and reference types helps you:
- Prevent unwanted mutations
- Write cleaner, bug-free code
- Handle data structures efficiently
🔁 JavaScript: Shallow Copy vs Deep Copy – Explained with Examples
In JavaScript, copying objects or arrays can be tricky because of how reference types work. Let’s explore the difference between shallow and deep copies.
📌 What is a Shallow Copy?
A shallow copy duplicates the top-level properties, but nested objects still share the same references.
🔍 Example:
let original = { name: "Hari", address: { city: "Delhi" } };
let shallow = { ...original };

shallow.address.city = "Mumbai";

console.log(original.address.city); // "Mumbai" ❗
Changing
shallow.address.cityaffectsoriginal.address.city.
✅ Ways to Make a Shallow Copy
1. Using Spread Operator { ...obj } (for objects)
let copy = { ...original };
2. Using Object.assign()
let copy = Object.assign({}, original);
3. Using Array methods (for arrays)
let arr = [1, 2, 3];
let shallowArr = [...arr];
📌 What is a Deep Copy?
A deep copy duplicates everything — including nested objects. The original and copied objects become completely independent.
🔍 Example:
let original = { name: "Hari", address: { city: "Delhi" } };
let deep = JSON.parse(JSON.stringify(original));

deep.address.city = "Mumbai";

console.log(original.address.city); // "Delhi" ✅
Deep copy breaks all reference links.
✅ Ways to Make a Deep Copy
1. JSON.parse(JSON.stringify(obj)) ✅ Easy & Common
let deep = JSON.parse(JSON.stringify(original));
⚠️ Limitation: Doesn’t work well with
Date,undefined,function,Map,Set.
2. Using structuredClone() (✅ Recommended Modern Method)
let deep = structuredClone(original);
✅ Handles
Date,Map,Set,ArrayBuffer, etc.
3. Manual Recursion (for custom control)
function deepCopy(obj) {
  if (obj === null || typeof obj !== "object") return obj;

  let copy = Array.isArray(obj) ? [] : {};
  for (let key in obj) {
    copy[key] = deepCopy(obj[key]);
  }
  return copy;
}
📋 Comparison Table
| Feature | Shallow Copy | Deep Copy |
|---|---|---|
| Copies top-level only | ✅ Yes | ❌ No |
| Copies nested refs | ❌ No (shared) | ✅ Yes (new instances) |
| Performance | Fast | Slightly slower |
| Use case | Simple objects/arrays | Complex or nested structures |
🧠 Final Tips
- ✅ Use shallow copy when working with flat data
- ✅ Use deep copy when dealing with nested structures
- ✅ Prefer
structuredClone()for deep copies in modern browsers
🧠 JavaScript: Key by Value vs Key by Reference
In JavaScript, how objects and keys behave depends on whether you’re using primitive values or reference types.
🔑 Key by Value (Primitives)
When you use a primitive (string, number, etc.) as a key, JavaScript uses the actual value.
✅ Example:
let obj = {};
let key1 = "userId";
let key2 = "userId";

obj[key1] = "Hari";
obj[key2] = "Mohan";

console.log(obj); // { userId: "Mohan" }
Both keys are equal (
key1 === key2) — stored by value.
🧠 Key by Reference (Objects)
When using objects or arrays as keys, JavaScript uses the reference (memory address), not the content.
✅ Example:
let obj = {};
let ref1 = { id: 1 };
let ref2 = { id: 1 };

obj[ref1] = "Hari";
obj[ref2] = "Mohan";

console.log(obj); // { '[object Object]': 'Mohan' }
Though
ref1andref2look similar, they are different objects → stored by reference, so they overwrite the same stringified key.
🧰 Solution: Use Map for Reference Keys
JavaScript’s built-in Map lets you use objects as actual keys (by reference):
let map = new Map();
let ref1 = { id: 1 };
let ref2 = { id: 1 };

map.set(ref1, "Hari");
map.set(ref2, "Mohan");

console.log(map.size); // 2 ✅
Mappreserves reference identity properly.
✅ Summary
| Type | Key Stored As | Key Example | Works with object keys? |
|---|---|---|---|
| Object | By value (stringified) | "id", 1 | ❌ Overwrites by [object Object] |
| Map | By reference | {} | ✅ Safe and accurate |
🧮 JavaScript Operators – A Complete Guide
JavaScript operators are special symbols used to perform operations on values and variables. From basic math to logical decisions, these operators form the core of JavaScript programming.
1️⃣ Arithmetic Operators
Used for mathematical calculations.
const a = 10, b = 5;
console.log(a + b); // 15
console.log(a - b); // 5
console.log(a * b); // 50
console.log(a / b); // 2
console.log(a % b); // 0
Operators:
+Addition-Subtraction*Multiplication/Division%Modulus (Remainder)
2️⃣ Assignment Operators
Used to assign and update variable values.
let x = 5;
x += 2;  // x = x + 2
x *= 3;  // x = x * 3
console.log(x); // 21
Common:
=assign+=,-=,*=,/=,%=update with operation
3️⃣ Comparison Operators
Compare values and return true or false.
console.log(10 > 5);     // true
console.log(5 === "5");  // false (strict equality)
List:
==,!=(loose equality)===,!==(strict equality)<,>,<=,>=
4️⃣ Logical Operators
Used for boolean logic.
const a = true, b = false;
console.log(a && b); // false
console.log(a || b); // true
console.log(!a);     // false
Operators:
&&AND||OR!NOT
5️⃣ Bitwise Operators
Operate on binary representations.
console.log(5 & 1); // 1 (0101 & 0001)
List:
&,|,^,~<<,>>,>>>
6️⃣ Ternary Operator
A shorthand if...else.
const age = 18;
const result = age >= 18 ? "Adult" : "Minor";
console.log(result); // Adult
7️⃣ Comma Operator
Evaluates multiple expressions, returns the last one.
let x = (1, 2, 3);
console.log(x); // 3
8️⃣ Unary Operators
Operate on one operand.
let a = 5;
console.log(++a); // 6
console.log(typeof a); // number
9️⃣ Relational Operators
Used to compare relationships.
const obj = { name: "Hari" };
console.log("name" in obj); // true
console.log([] instanceof Array); // true
🔟 BigInt Operators
Used for very large integers.
const big = 12345678901234567890n + 1n;
console.log(big); // 12345678901234567891n
🔠 String Operators
Used for string concatenation.
const greeting = "Hello" + " " + "World";
console.log(greeting); // Hello World
🔗 Optional Chaining Operator (?.)
Safely access deeply nested properties.
const user = { name: "Hari", address: { city: "Delhi" } };
console.log(user.address?.city); // Delhi
console.log(user.phone?.number); // undefined
🧠 Summary Table
| Operator Type | Example Symbol | Use Case |
|---|---|---|
| Arithmetic | +, -, * | Math operations |
| Assignment | =, += | Assigning/updating variables |
| Comparison | ===, < | Value comparisons |
| Logical | &&, ` | |
| Bitwise | &, ` | ` |
| Ternary | ? : | Inline if…else |
| Comma | , | Sequence expressions |
| Unary | typeof, ++ | Single operand manipulation |
| Relational | in, instanceof | Object/property checks |
| BigInt | +, * (with n) | Big integer arithmetic |
| String | +, += | Concatenation |
| Optional Chaining | ?. | Safe property access |
Here’s a deep and clear explanation of each JavaScript operator type, one by one, with detailed examples and output:
🔢 1. Arithmetic Operators
Used to perform basic math operations.
const a = 10, b = 3;

console.log("Addition:", a + b);       // 13
console.log("Subtraction:", a - b);    // 7
console.log("Multiplication:", a * b); // 30
console.log("Division:", a / b);       // 3.333...
console.log("Modulus:", a % b);        // 1 (remainder)
console.log("Exponent:", a ** b);      // 1000 (10^3)
📦 2. Assignment Operators
Assign values and update them.
let x = 5;
x += 3;   // x = x + 3 → 8
x *= 2;   // x = x * 2 → 16
x -= 4;   // x = x - 4 → 12
x /= 3;   // x = x / 3 → 4
x %= 3;   // x = x % 3 → 1

console.log("Final x:", x); // 1
❓ 3. Comparison Operators
Compare values (returns true or false).
console.log(5 == "5");    // true (value equal, type ignored)
console.log(5 === "5");   // false (strict: value & type)
console.log(10 != 8);     // true
console.log(10 !== "10"); // true
console.log(10 > 5);      // true
console.log(5 <= 5);      // true
⚙️ 4. Logical Operators
Used in condition checking (AND, OR, NOT).
const a = true, b = false;

console.log(a && b); // false – both must be true
console.log(a || b); // true  – one is enough
console.log(!a);     // false – negates the value
Here are the truth table for Logical Operators in JavaScript
🔹 && (Logical AND)
| A | B | A && B |
|---|---|---|
| true | true | true |
| true | false | false |
| false | true | false |
| false | false | false |
🔹 || (Logical OR)
| A | B | A || B |
|---|---|---|
| true | true | true |
| true | false | true |
| false | true | true |
| false | false | false |
🔹 ! (Logical NOT)
| A | !A |
|---|---|
| true | false |
| false | true |
🧠 5. Bitwise Operators
Work on binary representations.
console.log(5 & 3);  // 1 → (101 & 011 = 001)
console.log(5 | 3);  // 7 → (101 | 011 = 111)
console.log(5 ^ 3);  // 6 → (101 ^ 011 = 110)
console.log(~5);     // -6 → inverts bits
console.log(5 << 1); // 10 → left shift (add 0)
console.log(5 >> 1); // 2  → right shift
Here are the rules for Bitwise Operators in JavaScript:
✅ General Rules:
- Bitwise operators work on 32-bit integers.
- JS converts operands to 32-bit signed integers.
- Result is also a 32-bit signed integer.
- Operands are treated at the bit level (binary).
- Example:
5 → 00000000000000000000000000000101
- Example:
🔸 Operator Rules:
| Operator | Rule / Meaning |
|---|---|
& | AND – bit is 1 only if both bits are 1. |
| ` | ` |
^ | XOR – bit is 1 if bits differ. |
~ | NOT – inverts all bits. |
<< | Left shift – shifts bits left, fills with 0. |
>> | Right shift – shifts right, preserves sign. |
>>> | Unsigned right shift – shifts right, fills 0, sign lost. |
⚠️ Notes:
~x = -(x + 1)>>>always returns a non-negative number- Used in low-level operations like flags, permissions, performance optimization, or bitmasking
🔹 & (Bitwise AND)
- Truth Table:
| A | B | A & B |
|---|---|---|
| 0 | 0 | 0 |
| 0 | 1 | 0 |
| 1 | 0 | 0 |
| 1 | 1 | 1 |
- Explanation: Only returns
1if both bits are1. - Use case: Often used to mask bits. For example,
n & 1checks if a number is odd/even.
Example:5 & 3 → 0101 & 0011 = 0001 → result: 1
🔹 | (Bitwise OR)
- Truth Table:
| A | B | A | B |
|---|---|---|
| 0 | 0 | 0 |
| 0 | 1 | 1 |
| 1 | 0 | 1 |
| 1 | 1 | 1 |
- Explanation: Returns
1if any one of the bits is1. - Use case: Used to set specific bits to 1 without changing others.
Example:5 | 3 → 0101 | 0011 = 0111 → result: 7
🔹 ^ (Bitwise XOR)
- Truth Table:
| A | B | A ^ B |
|---|---|---|
| 0 | 0 | 0 |
| 0 | 1 | 1 |
| 1 | 0 | 1 |
| 1 | 1 | 0 |
- Explanation: Returns
1if bits are different. - Use case: Used in swapping values or detecting bit changes.
Example:5 ^ 3 → 0101 ^ 0011 = 0110 → result: 6
🔹 ~ (Bitwise NOT)
- Truth Table:
| A | ~A |
|---|---|
| 0 | 1 |
| 1 | 0 |
- Explanation: Flips each bit.
1becomes0,0becomes1. - Use case: Used for bit inversion or two’s complement calculation.
Note: In JavaScript, ~x = -(x + 1)
Example:~5 → -(5 + 1) → result: -6
🔹 << (Left Shift)
- Explanation: Shifts bits to the left, fills empty right bits with
0. - Effect: Multiplies number by 2 for each shift.
Example:5 << 1 → 0101 << 1 = 1010 → result: 10
🔹 >> (Signed Right Shift)
- Explanation: Shifts bits to the right, keeps sign bit (MSB).
- Effect: Divides number by 2, keeps sign (for negative numbers too).
Example:-5 >> 1 → result: -3
🔹 >>> (Unsigned Right Shift)
- Explanation: Shifts bits to the right, fills leftmost bits with
0. - Effect: Converts signed to unsigned.
- Use case: Useful when dealing with binary data in unsigned form.
Example:-5 >>> 1 → result: 2147483645 (a large unsigned integer)
🧾 6. Ternary Operator
Shorthand for if...else.
const score = 85;
const result = score >= 90 ? "A+" : "Less than A+";
console.log(result); // Less than A+
📍 7. Comma Operator
Evaluates expressions from left to right.
let result = (1 + 2, 3 + 4, 5 + 6);
console.log(result); // 11 (last expression)
➕ 8. Unary Operators
Operate on a single value.
let num = 10;
console.log(++num); // 11 (pre-increment)
console.log(num--); // 11 (then becomes 10)
console.log(typeof num); // number
🧩 9. Relational Operators
Used to check relationships.
const person = { name: "Hari" };
console.log("name" in person);         // true
console.log([] instanceof Array);      // true
🔢 10. BigInt Operators
Handle very large integers.
const big1 = 123456789123456789123456789n;
const big2 = 987654321987654321987654321n;

console.log(big1 + big2);
// Output: 1111111111111111111111111110n
🔠 11. String Operators
Used to combine strings.
const first = "Hello";
const second = "World";
console.log(first + " " + second);  // Hello World

let msg = "Hi";
msg += " there!";
console.log(msg); // Hi there!
❓ 12. Optional Chaining Operator
Safely access deeply nested properties.
const user = {
  name: "Hari",
  address: {
    city: "Bangalore"
  }
};

console.log(user.address?.city);     // Bangalore
console.log(user.profile?.email);    // undefined (no error)
🧮 1. Arithmetic Operators
📘 Description:
Used to perform basic mathematical calculations between numerical values.
✅ Syntax:
result = operand1 operator operand2;
🔍 Rules:
- Only works with numbers.
- Follows standard operator precedence (
*,/,%before+,-).
🧪 Example:
const a = 15, b = 4;

console.log("Add:", a + b);        // 19
console.log("Sub:", a - b);        // 11
console.log("Mul:", a * b);        // 60
console.log("Div:", a / b);        // 3.75
console.log("Modulus:", a % b);    // 3
console.log("Power:", a ** b);     // 50625
📝 2. Assignment Operators
📘 Description:
Used to assign values to variables and perform operations before assigning.
✅ Syntax:
variable operator= value;
🔍 Rules:
=assigns value.+=,-=,*=, etc. perform operation then assign.
🧪 Example:
let x = 10;
x += 5;  // x = x + 5 → 15
x *= 2;  // x = x * 2 → 30
x /= 3;  // x = x / 3 → 10

console.log("Final x:", x); // 10
🤔 3. Comparison Operators
📘 Description:
Compare two values and return a boolean (true or false).
✅ Syntax:
value1 operator value2
🔍 Rules:
==checks equality without type===checks both value and type
🧪 Example:
console.log(10 == "10");    // true
console.log(10 === "10");   // false
console.log(8 !== 9);       // true
console.log(5 >= 5);        // true
🔐 4. Logical Operators
📘 Description:
Used in conditions to combine multiple boolean expressions.
✅ Syntax:
condition1 && condition2
condition1 || condition2
!condition
🔍 Rules:
&&(AND): all must be true.||(OR): at least one true.!(NOT): inverts the result.
🧪 Example:
const a = true, b = false;

console.log(a && b); // false
console.log(a || b); // true
console.log(!a);     // false
⚡ 5. Bitwise Operators
📘 Description:
Operate at the binary level on numbers.
✅ Syntax:
a & b
a | b
a ^ b
~a
🔍 Rules:
- Only work on 32-bit integers.
- Often used in low-level programming.
🧪 Example:
console.log(5 & 3);  // 1
console.log(5 | 3);  // 7
console.log(5 ^ 3);  // 6
console.log(~5);     // -6
console.log(5 << 1); // 10
console.log(5 >> 1); // 2
🔁 6. Ternary Operator
📘 Description:
A compact form of if...else.
✅ Syntax:
condition ? exprIfTrue : exprIfFalse
🔍 Rules:
- Must return a value.
- Not for complex logic.
🧪 Example:
let age = 20;
let result = age >= 18 ? "Adult" : "Minor";
console.log(result); // Adult
🧮 7. Comma Operator
📘 Description:
Evaluates multiple expressions, returning the last.
✅ Syntax:
(expr1, expr2, ..., exprN)
🔍 Rules:
- Useful in
forloops or assignments.
🧪 Example:
let result = (1 + 2, 3 + 4, 5 + 6);
console.log(result); // 11
☝️ 8. Unary Operators
📘 Description:
Work with a single operand.
✅ Syntax:
++a // pre-increment
a++ // post-increment
typeof a
🔍 Rules:
++,--change values.typeofreturns data type as a string.
🧪 Example:
let x = 5;
console.log(++x);         // 6
console.log(x--);         // 6 (then becomes 5)
console.log(typeof x);    // number
🔍 9. Relational Operators
📘 Description:
Used to check relationships between objects and constructors.
✅ Syntax:
"property" in object
object instanceof Constructor
🧪 Example:
const obj = { name: "Hari" };
console.log("name" in obj);          // true
console.log([] instanceof Array);    // true
🔢 10. BigInt Operators
📘 Description:
Used for operations on very large integers.
✅ Syntax:
const big = 123456789n + 999999999n;
🔍 Rules:
- Use
nsuffix. - Cannot mix BigInt with regular
numbertypes.
🧪 Example:
const big1 = 10n ** 20n;
const big2 = 10n ** 18n;
console.log(big1 + big2);
// Output: 101000000000000000000n
🔡 11. String Operators
📘 Description:
Used to join (concatenate) strings.
✅ Syntax:
"Hello" + "World"
🧪 Example:
const greet = "Hi" + " " + "there!";
console.log(greet); // Hi there!
❓ 12. Optional Chaining Operator
📘 Description:
Safely access deeply nested properties.
✅ Syntax:
object?.property
object?.method?.()
🔍 Rules:
- Prevents
undefinederrors.
🧪 Example:
const user = { name: "Hari", address: { city: "Delhi" } };

console.log(user.address?.city);     // Delhi
console.log(user.contact?.email);    // undefined
🔍 Types of Conditional Statements in JavaScript
Conditional statements help your JavaScript code make decisions based on conditions. Let’s explore all types with examples and simple flowcharts.
1. ✅ if Statement
Use: Runs a block of code only if the condition is true.
📊 Flowchart:
→ Condition → [True] → Execute block
→ [False] → Skip
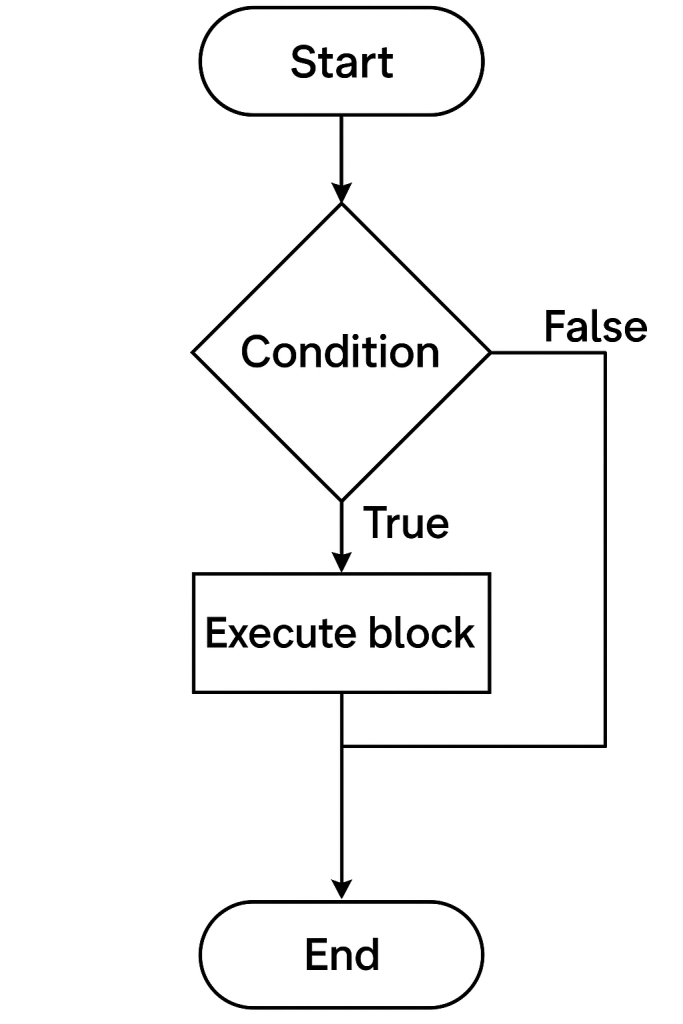
let age = 20;
if (age >= 18) {
  console.log("You are eligible to vote.");
}
2. 🔁 if...else Statement
Use: Executes one block if true, another if false.
📊 Flowchart:
→ Condition → [True] → Block A
→ [False] → Block B
let age = 16;
if (age >= 18) {
  console.log("Adult");
} else {
  console.log("Minor");
}
3. 🔄 if...else if...else Statement
Use: Multiple conditions, only one block executes.
📊 Flowchart:
→ Condition 1 → True → Block 1
→ Condition 2 → True → Block 2
→ Else → Block 3

let marks = 75;
if (marks >= 90) {
  console.log("Grade A");
} else if (marks >= 60) {
  console.log("Grade B");
} else {
  console.log("Grade C");
}
4. 🔘 switch Statement
Use: Tests a value against multiple cases.
📊 Flowchart:
→ Value → Case 1? → Block 1
→ Case 2? → Block 2
→ Default → Block n

let day = 2;
switch (day) {
  case 1:
    console.log("Monday");
    break;
  case 2:
    console.log("Tuesday");
    break;
  default:
    console.log("Another day");
}
5. 🤏 Ternary Operator
Use: Shorthand for if...else.
📊 Flowchart:
→ Condition → True : Value A
→ False : Value B
let age = 20;
let message = (age >= 18) ? "Adult" : "Minor";
console.log(message);
🧠 Conclusion
| Statement Type | Use Case | Syntax Format |
|---|---|---|
if | Simple condition | if (condition) {} |
if...else | Two-way branching | if/else |
if...else if...else | Multi-branch logic | else if |
switch | Multiple exact match conditions | switch...case |
| Ternary Operator | Short and clean conditional expression | condition ? A : B |
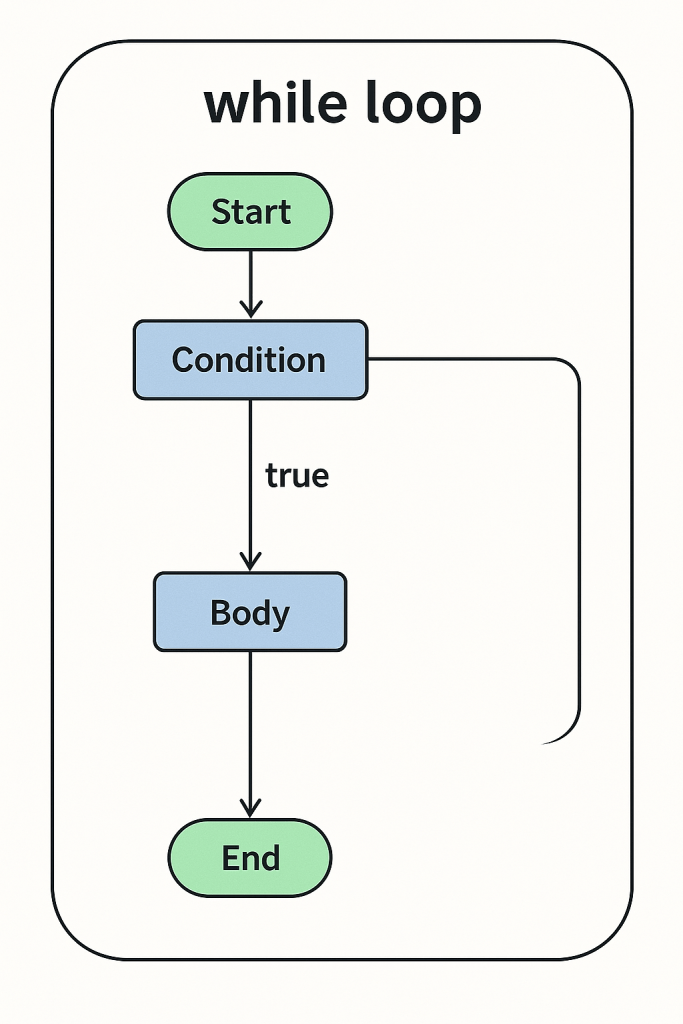
🔁 1. for Loop
Used when the number of iterations is known.
Syntax:
for (initialization; condition; increment) {
  // code block
}
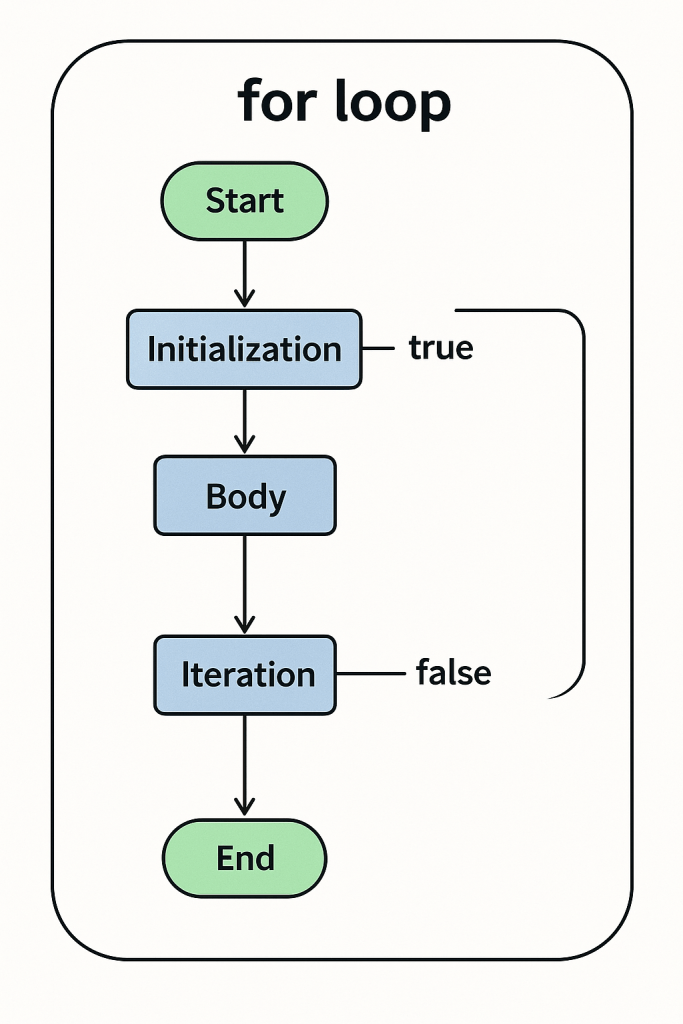
‘Examples:
1. Print numbers 1 to 5
for (let i = 1; i <= 5; i++) {
  console.log(i);
}
// Output: 1 2 3 4 5
2. Sum of first 5 numbers
let sum = 0;
for (let i = 1; i <= 5; i++) {
  sum += i;
}
console.log(sum); // Output: 15
3. Print even numbers between 1–10
for (let i = 2; i <= 10; i += 2) {
  console.log(i);
}
// Output: 2 4 6 8 10
🔁 2. while Loop
Used when the number of iterations is unknown; runs while the condition is true.
Syntax:
while (condition) {
  // code block
}
Examples:
1. Count down from 5
let i = 5;
while (i > 0) {
  console.log(i);
  i--;
}
// Output: 5 4 3 2 1
2. Sum numbers until total exceeds 20
let i = 1, total = 0;
while (total <= 20) {
  total += i;
  i++;
}
console.log(total); // Output: 21
3. Print first 5 odd numbers
let i = 1, count = 0;
while (count < 5) {
  console.log(i);
  i += 2;
  count++;
}
// Output: 1 3 5 7 9
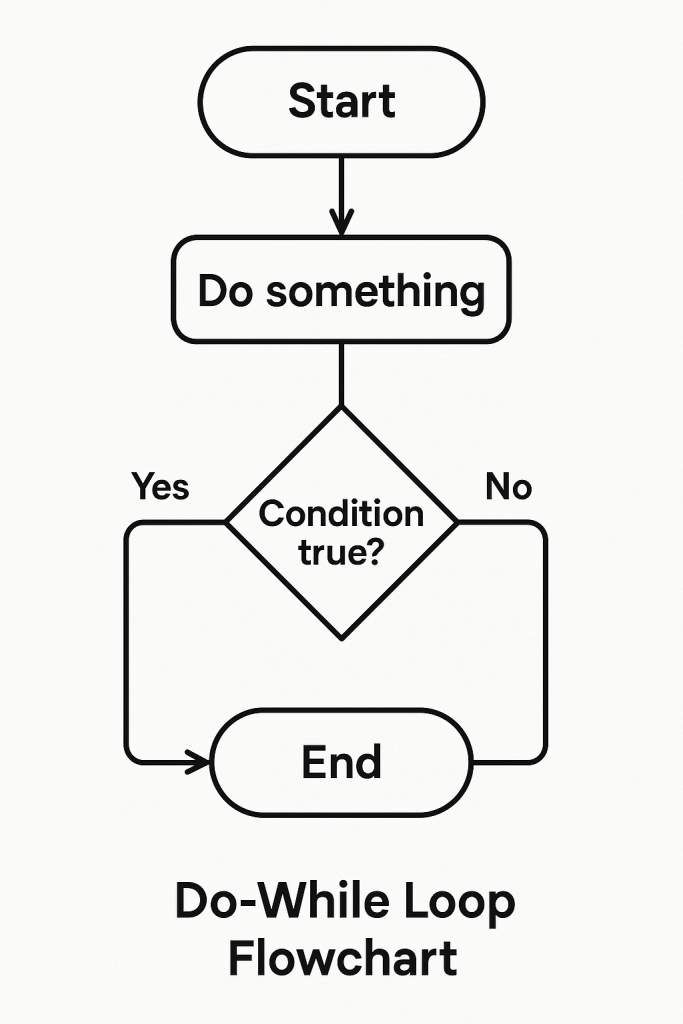
🔁 3. do...while Loop
Similar to while but runs at least once even if condition is false.
Syntax:
do {
  // code block
} while (condition);
Examples:
1. Run at least once
let x = 10;
do {
  console.log("Runs once");
} while (x < 5);
// Output: "Runs once"
2. Print numbers from 1 to 5
let i = 1;
do {
  console.log(i);
  i++;
} while (i <= 5);
// Output: 1 2 3 4 5
3. Ask user for input until they enter “yes” (simulated here)
let answer;
let inputs = ["no", "maybe", "yes"];
let index = 0;
do {
  answer = inputs[index++];
  console.log("User said:", answer);
} while (answer !== "yes");
// Output: User said: no, maybe, yes
🧠 Mastering JavaScript Arrays: A Complete Guide to All Array Methods
JavaScript arrays are powerful data structures that allow you to store and manipulate collections of values. Whether you’re just starting out or brushing up on your skills, understanding array methods is essential for efficient programming.
In this article, we’ll cover all major array methods with clear examples. Bookmark this for future reference! 🔖
📌 Table of Contents
- Creating Arrays
- Adding/Removing Elements
- Searching Elements
- Transforming Arrays
- Iterating Arrays
- Sorting & Reversing
- Combining & Slicing
- Utility Methods
- ES6+ Modern Methods
- Conclusion
📥 Creating Arrays
let arr = [1, 2, 3];
let empty = new Array(3);        // [undefined, undefined, undefined]
let filled = Array.of(4, 5, 6);  // [4, 5, 6]
➕ Adding/Removing Elements
| Method | Description |
|---|---|
push() | Add to end |
pop() | Remove from end |
unshift() | Add to start |
shift() | Remove from start |
splice() | Add/remove at any index |
arr.push(4);     // [1, 2, 3, 4]
arr.pop();       // [1, 2, 3]
arr.splice(1, 1) // removes 1 element at index 1 → [1, 3]
🔍 Searching Elements
| Method | Description |
|---|---|
includes() | Checks if value exists |
indexOf() | First index of value |
lastIndexOf() | Last index of value |
find() | First value that matches |
findIndex() | Index of first match |
arr.includes(3); // true
arr.indexOf(2);  // 1
🔄 Transforming Arrays
| Method | Description |
|---|---|
map() | Transforms each element |
filter() | Filters values based on condition |
reduce() | Reduces array to a single value |
flat() | Flattens nested arrays |
flatMap() | Maps + flattens in one go |
arr.map(x => x * 2);        // [2, 4, 6]
arr.filter(x => x > 2);     // [3]
arr.reduce((a, b) => a + b, 0); // 6
🔁 Iterating Arrays
| Method | Description |
|---|---|
forEach() | Executes callback for each item |
entries() | Returns key/value pairs |
keys() | Returns indexes |
values() | Returns values |
arr.forEach(console.log);
for (let [i, v] of arr.entries()) console.log(i, v);
🔃 Sorting & Reversing
| Method | Description |
|---|---|
sort() | Sorts alphabetically by default |
reverse() | Reverses array |
arr.sort((a, b) => a - b); // ascending
arr.reverse();
🧩 Combining & Slicing
| Method | Description |
|---|---|
concat() | Merges arrays |
slice() | Extracts a part of array |
join() | Converts to string |
arr.concat([4, 5]);      // [1, 2, 3, 4, 5]
arr.slice(1, 3);         // [2, 3]
arr.join("-");           // "1-2-3"
🛠️ Utility Methods
| Method | Description |
|---|---|
isArray() | Checks if it’s an array |
length | Number of elements in array |
fill() | Fills array with static value |
copyWithin() | Copies part of array to another location |
Array.isArray(arr); // true
arr.fill(0);        // [0, 0, 0]
🚀 ES6+ Modern Methods
| Method | Description |
|---|---|
Array.from() | Converts array-like to array |
Array.of() | Creates new array from args |
at() | Access item using negative indexing |
toSorted() | Returns new sorted array (immutable) |
toReversed() | Returns new reversed array (immutable) |
Array.from("abc");    // ['a', 'b', 'c']
[1, 2, 3].at(-1);      // 3
🔤 Mastering JavaScript Strings: A Complete Guide to All String Methods
Strings in JavaScript are used to store and manipulate text. They are one of the most important data types, and JavaScript provides a rich set of methods to work with them efficiently.
In this article, we’ll explore all the essential string methods with examples. 📚
📌 Table of Contents
- Creating Strings
- Accessing Characters
- Searching in Strings
- Modifying Strings
- Extracting Substrings
- Comparing Strings
- Trimming & Padding
- Splitting & Joining
- Other Useful Methods
- Conclusion
✍️ Creating Strings
let str1 = "Hello";
let str2 = 'World';
let str3 = `Template ${str1}`;
🔎 Accessing Characters
| Method | Description |
|---|---|
charAt(index) | Returns character at index |
charCodeAt() | Returns UTF-16 code |
[] | Modern way to access |
str1.charAt(1);    // 'e'
str1[0];           // 'H'
🔍 Searching in Strings
| Method | Description |
|---|---|
includes() | Checks if string contains substring |
indexOf() | First index of substring |
lastIndexOf() | Last index of substring |
startsWith() | Checks beginning of string |
endsWith() | Checks end of string |
str1.includes("ll");    // true
str1.startsWith("He");  // true
✂️ Modifying Strings
| Method | Description |
|---|---|
replace() | Replace part of the string |
replaceAll() | Replace all matches |
toUpperCase() | Convert to uppercase |
toLowerCase() | Convert to lowercase |
repeat() | Repeat string |
str1.replace("l", "x");   // "Hexlo"
str1.toUpperCase();       // "HELLO"
🧪 Extracting Substrings
| Method | Description |
|---|---|
slice(start, end) | Extracts part of string |
substring(start, end) | Similar to slice |
substr(start, length) | Legacy, avoid in new code |
str1.slice(1, 4);     // "ell"
str1.substring(0, 2); // "He"
🆚 Comparing Strings
| Method | Description |
|---|---|
localeCompare() | Compares two strings |
=== / !== | Compare values directly |
"apple".localeCompare("banana"); // -1
✂️ Trimming & Padding
| Method | Description |
|---|---|
trim() | Removes whitespace from both ends |
trimStart() | From the beginning |
trimEnd() | From the end |
padStart() | Pads string at start |
padEnd() | Pads string at end |
"  JS  ".trim();      // "JS"
"5".padStart(3, "0"); // "005"
🧩 Splitting & Joining
| Method | Description |
|---|---|
split() | Split string into array |
join() | (on arrays) Join array into string |
"hi there".split(" "); // ["hi", "there"]
["hi", "there"].join("-"); // "hi-there"
🛠️ Other Useful Methods
| Method | Description |
|---|---|
length | Returns number of characters |
normalize() | Unicode normalization |
match() | Returns result of regex match |
matchAll() | All regex matches |
"JavaScript".length;        // 10
"abc".match(/a/);           // ["a"]
🧱 Mastering JavaScript Objects: A Complete Guide to All Object Methods
📌 Table of Contents
- Creating Objects
- Accessing & Updating Properties
- Object Methods
- Object Utility Methods
- Prototype & Inheritance
- Cloning & Merging
- Looping Over Objects
- Object Meta Methods
- Conclusion
🧱 Creating Objects
let obj = {
  name: "Hari",
  age: 30
};

let obj2 = new Object(); // Using constructor
📝 Accessing & Updating Properties
console.log(obj.name);    // Dot notation
console.log(obj["age"]);  // Bracket notation

obj.name = "Mohan";       // Update
obj["city"] = "Bangalore"; // Add
⚙️ Object Methods
| Method | Description |
|---|---|
Object.keys() | Array of property names |
Object.values() | Array of property values |
Object.entries() | Array of key-value pairs |
Object.assign() | Copies properties from one to another |
Object.freeze() | Makes object immutable |
Object.seal() | Prevent adding/removing properties |
Object.keys(obj);     // ["name", "age"]
Object.values(obj);   // ["Hari", 30]
Object.entries(obj);  // [["name", "Hari"], ["age", 30]]
🛠️ Object Utility Methods
| Method | Description |
|---|---|
Object.hasOwn() | Checks if key exists (ES2022+) |
in operator | Checks if key exists in chain |
delete operator | Removes a property |
"age" in obj;         // true
delete obj.city;
Object.hasOwn(obj, "name"); // true
🧬 Prototype & Inheritance
function Person(name) {
  this.name = name;
}

Person.prototype.greet = function () {
  return `Hello, ${this.name}`;
};

let user = new Person("Hari");
user.greet(); // Hello, Hari
📋 Cloning & Merging Objects
// Shallow clone
const clone = Object.assign({}, obj);
const clone2 = { ...obj };

// Merge
const combined = { ...obj1, ...obj2 };
🔁 Looping Over Objects
for (let key in obj) {
  if (obj.hasOwnProperty(key)) {
    console.log(key, obj[key]);
  }
}

Object.entries(obj).forEach(([key, value]) => {
  console.log(key, value);
});
🧪 Object Meta Methods
| Method | Description |
|---|---|
Object.getOwnPropertyNames() | All own property names |
Object.getPrototypeOf() | Returns prototype |
Object.defineProperty() | Define a new property |
Object.is() | Compares two values |
Object.getPrototypeOf(obj);
Object.is(NaN, NaN); // true
✅ Bonus: Object Destructuring
const person = { name: "Hari", age: 30 };
const { name, age } = person; // Destructuring
🧱 Creating Objects
let user = {
  name: "Hari",
  age: 30
};

let empty = new Object(); // Constructor method
📝 Accessing & Updating Properties
console.log(user.name);      // "Hari"
console.log(user["age"]);    // 30

user.name = "Mohan";         // Update
user.city = "Bangalore";     // Add
delete user.age;             // Delete
🧰 Object Methods with Examples
🔹 Object.keys()
Returns an array of keys.
Object.keys(user); // ["name", "city"]
🔹 Object.values()
Returns an array of values.
Object.values(user); // ["Mohan", "Bangalore"]
🔹 Object.entries()
Returns array of key-value pairs.
Object.entries(user);
// [["name", "Mohan"], ["city", "Bangalore"]]
🔹 Object.assign()
Copies properties from one or more objects to a target object.
let obj1 = { a: 1 };
let obj2 = { b: 2 };
let combined = Object.assign({}, obj1, obj2); // { a: 1, b: 2 }
🔹 Object.freeze()
Prevents object modification.
let car = { brand: "Tesla" };
Object.freeze(car);
car.brand = "Ford"; // ❌ won't change
🔹 Object.seal()
Prevents adding/removing properties (but allows editing).
let book = { title: "JS" };
Object.seal(book);
book.title = "React"; // ✅ allowed
book.author = "New";  // ❌ won't add
🔹 Object.hasOwn()
Checks if a property exists on the object (not prototype).
Object.hasOwn(user, "name"); // true
🔹 in operator
Checks if a key exists in the object or prototype chain.
"name" in user; // true
🔹 delete operator
Deletes a property from the object.
delete user.city;
🔹 Object.getOwnPropertyNames()
Returns all own property names (even non-enumerable).
Object.getOwnPropertyNames({ a: 1 }); // ["a"]
🔹 Object.getPrototypeOf()
Returns the prototype of the object.
Object.getPrototypeOf(user); // Usually Object.prototype
🔹 Object.defineProperty()
Adds or modifies a property with descriptors.
Object.defineProperty(user, "role", {
  value: "admin",
  writable: false
});
console.log(user.role); // "admin"
🔹 Object.is()
Compares two values strictly.
Object.is(NaN, NaN); // true
Object.is(0, -0);    // false
🧬 Prototype & Inheritance
function Person(name) {
  this.name = name;
}
Person.prototype.greet = function () {
  return `Hi, ${this.name}`;
};

let p = new Person("Hari");
console.log(p.greet()); // Hi, Hari
📋 Cloning & Merging
🔹 Clone an object
let original = { a: 1 };
let copy = { ...original }; // Shallow clone
🔹 Merge objects
let obj1 = { a: 1 }, obj2 = { b: 2 };
let merged = { ...obj1, ...obj2 }; // { a: 1, b: 2 }
🔁 Looping Over Objects
🔹 Using for...in
for (let key in user) {
  if (user.hasOwnProperty(key)) {
    console.log(key, user[key]);
  }
}
🔹 Using Object.entries()
Object.entries(user).forEach(([key, val]) => {
  console.log(key, val);
});
🗓️ JavaScript Date Methods – With Simple Examples
JavaScript provides a powerful Date object to work with dates and times. Here’s your complete guide to using dates in JS – from getting today’s date to formatting it just the way you want!
📆 1. Create a Date
const now = new Date();
This creates a date object with the current date and time.
🔍 2. Get Date Information
const today = new Date();
today.getFullYear();  // 2025
today.getMonth();     // 6 (July - 0 based)
today.getDate();      // 14
today.getDay();       // 1 (Monday - 0 is Sunday)
today.getHours();     // 0 to 23
today.getMinutes();   // 0 to 59
today.getSeconds();   // 0 to 59
🕗 3. Set Date Values
const date = new Date();
date.setFullYear(2026);
date.setMonth(0);      // January
date.setDate(1);       // 1st of the month
🧾 4. Date Formatting
const date = new Date();

date.toDateString();       // "Mon Jul 14 2025"
date.toISOString();        // "2025-07-14T18:29:00.000Z"
date.toLocaleDateString(); // "7/14/2025" (US)
🛠️ 5. Custom Format – YYYY-MM-DD
const d = new Date();
const formatted = `${d.getFullYear()}-${d.getMonth() + 1}-${d.getDate()}`;
console.log(formatted); // "2025-7-14"
⏱️ 6. Date Comparison
const d1 = new Date("2025-07-14");
const d2 = new Date("2025-08-01");

console.log(d1 < d2);  // true
🧮 7. Date Difference in Days
const start = new Date("2025-07-01");
const end = new Date("2025-07-14");

const diffTime = end - start;
const diffDays = diffTime / (1000 * 60 * 60 * 24);
console.log(diffDays); // 13
📌 Summary
| Method | Description |
|---|---|
new Date() | Creates a new date |
getFullYear() | Gets the 4-digit year |
getMonth() | Gets the month (0–11) |
getDate() | Gets day of the month (1–31) |
toDateString() | Human-readable date |
toISOString() | ISO standard format |
setDate(), setMonth(), setFullYear() | Modify date values |
➕ JavaScript Math Methods – Full Guide with Examples
JavaScript provides the Math object with built-in methods for mathematical operations like rounding, random numbers, and more. Here’s a quick and clear guide with examples.
📌 1. Math Constants
Math.PI       // 3.141592653589793
Math.E        // 2.718281828459045
Math.SQRT2    // 1.4142135623730951
📐 2. Rounding Methods
Math.round(4.7);  // 5
Math.floor(4.7);  // 4
Math.ceil(4.3);   // 5
Math.trunc(4.9);  // 4 (removes decimal part)
🎲 3. Random Numbers
Math.random(); // 0 ≤ result < 1
// Random integer between 1 and 100
Math.floor(Math.random() * 100) + 1;
🧮 4. Power & Roots
Math.pow(2, 3);    // 8
Math.sqrt(16);     // 4
Math.cbrt(27);     // 3
📉 5. Min & Max
Math.min(5, 3, 9); // 3
Math.max(5, 3, 9); // 9
✖️ 6. Absolute & Sign
Math.abs(-7);      // 7
Math.sign(-10);    // -1
Math.sign(0);      // 0
Math.sign(8);      // 1
📐 7. Trigonometry
Math.sin(Math.PI / 2);  // 1
Math.cos(0);            // 1
Math.tan(Math.PI / 4);  // 1
🎯 Summary Table
| Method | Description |
|---|---|
Math.round() | Round to nearest integer |
Math.floor() | Round down |
Math.ceil() | Round up |
Math.trunc() | Remove decimal part |
Math.random() | Random number (0 to <1) |
Math.pow(x, y) | x raised to power y |
Math.sqrt() | Square root |
Math.abs() | Absolute value |
Math.min/max() | Minimum/Maximum from list |
Math.sign() | Sign of number (-1, 0, 1) |
🔍 Regular Expressions in JavaScript (Regex) – A Complete Guide
Regular Expressions (Regex) are patterns used to match character combinations in strings. In JavaScript, regex is a powerful tool for searching, validating, and manipulating strings.
📘 What is a Regular Expression?
A Regular Expression is a pattern wrapped between slashes:
const regex = /pattern/;
You can also create it using the RegExp constructor:
const regex = new RegExp('pattern');
🛠️ JavaScript Regex Syntax
| Symbol | Meaning |
|---|---|
. | Any character (except newline) |
* | 0 or more times |
+ | 1 or more times |
? | Optional (0 or 1 times) |
^ | Start of string |
$ | End of string |
\d | Any digit (0–9) |
\w | Word character (a-z, A-Z, 0–9, _) |
\s | Whitespace |
[abc] | Match any of a, b, or c |
| `(x | y)` |
✅ Common Use Cases
1. Test if a string contains a pattern
const regex = /hello/;
console.log(regex.test("hello world")); // true
2. Validate an Email Address
const emailRegex = /^[\w.-]+@[a-zA-Z_]+?\.[a-zA-Z]{2,3}$/;
console.log(emailRegex.test("user@example.com")); // true
3. Extract Digits from a String
const str = "Order #12345";
const digits = str.match(/\d+/);
console.log(digits[0]); // "12345"
4. Replace All Occurrences
const text = "foo bar foo";
const newText = text.replace(/foo/g, "baz");
console.log(newText); // "baz bar baz"
🎯 Regex Flags
| Flag | Meaning |
|---|---|
g | Global match |
i | Case-insensitive match |
m | Multiline matching |
Example:
const regex = /hello/gi;
📌 Useful Built-in Methods
| Method | Description |
|---|---|
test() | Returns true or false |
exec() | Returns matched groups |
match() | Retrieves matches |
replace() | Replaces matching substrings |
split() | Splits string by regex pattern |
search() | Finds index of first match |
🧪 Example: Split Sentence into Words
const sentence = "This is a test.";
const words = sentence.split(/\s+/);
console.log(words); // ["This", "is", "a", "test."]
🔐 Password Validation Regex
const strongPassword = /^(?=.*[A-Z])(?=.*\d)[A-Za-z\d@$!%*?&]{8,}$/;
console.log(strongPassword.test("Abc12345")); // true
🔄 JavaScript call(), apply(), and bind() Explained with Examples
In JavaScript, call(), apply(), and bind() are powerful methods available on functions. They are used to explicitly set the this value when calling a function.
🧠 Understanding this
Before we dive in, remember:
In JavaScript, this refers to the object that is executing the function.
✅ call() – Invoke Function with Arguments (comma-separated)
function greet(greeting) {
  console.log(`${greeting}, my name is ${this.name}`);
}

const person = { name: "Alice" };
greet.call(person, "Hello"); // Hello, my name is Alice
👉 call(thisArg, arg1, arg2, ...)
Sets this to person and passes “Hello” as an argument.
✅ apply() – Like call() but with Arguments in an Array
greet.apply(person, ["Hi"]); // Hi, my name is Alice
👉 apply(thisArg, [argsArray])
Useful when you already have an array of arguments.
✅ bind() – Returns a New Function with this Bound
const sayHello = greet.bind(person, "Hey");
sayHello(); // Hey, my name is Alice
👉 bind() does not call the function immediately.
It returns a new function with this set permanently.
🔁 Key Differences Table
| Method | Calls Function Immediately? | Pass Arguments | Returns New Function? |
|---|---|---|---|
call | ✅ Yes | ✅ Comma-separated | ❌ No |
apply | ✅ Yes | ✅ Array | ❌ No |
bind | ❌ No | ✅ Comma-separated | ✅ Yes |
🧪 Real-World Example
const math = {
  x: 5,
  y: 10,
  sum() {
    return this.x + this.y;
  }
};

const numbers = { x: 20, y: 30 };

console.log(math.sum.call(numbers)); // 50
console.log(math.sum.apply(numbers)); // 50

const boundSum = math.sum.bind(numbers);
console.log(boundSum()); // 50
📌 Conclusion
- Use
call()orapply()to invoke a function with a customthisimmediately. - Use
bind()when you want to save a function with a presetthisfor later use.
🏷️ Tags: JavaScript, call(), apply(), bind(), this, Web
🔬 Deep Dive: call(), apply(), and bind() in JavaScript
JavaScript is a functional and object-oriented language. Mastering how this behaves and how to control its context using call(), apply(), and bind() is crucial for writing clean, reusable, and predictable code.
🧠 What is this?
The value of this depends on how a function is called, not where it’s defined.
Example:
const person = {
  name: "Hari",
  greet() {
    console.log(`Hello, I'm ${this.name}`);
  }
};

const greetFn = person.greet;
greetFn(); // ❌ 'this' is undefined or window
We lose the context of this when we store greet in a variable.
🎯 Fixing this with call(), apply(), and bind()
These methods are part of Function.prototype, which means every function in JavaScript inherits them.
🔹 call() – Invoke Function with Custom this + Arguments (Comma-Separated)
function introduce(language) {
  console.log(`I'm ${this.name} and I code in ${language}`);
}

const dev = { name: "Alice" };

introduce.call(dev, "JavaScript");
// I'm Alice and I code in JavaScript
✅ Use Cases:
- Borrow methods from one object for another
- Invoke functions in a dynamic context
🔹 apply() – Same as call(), but Accepts Arguments as an Array
introduce.apply(dev, ["Python"]);
// I'm Alice and I code in Python
✅ Use Cases:
- Dynamic argument lists (e.g., spread from user input)
- Works well with
Math.max.apply(null, arr)
const nums = [1, 5, 9];
console.log(Math.max.apply(null, nums)); // 9
🔹 bind() – Returns a New Function with Bound this
const sayHello = introduce.bind(dev, "C++");
sayHello();
// I'm Alice and I code in C++
✅ Use Cases:
- Pass methods as callbacks while preserving
this - Event handlers in React, DOM, or Classes
- Delayed or repeated invocation (
setTimeout, etc.)
setTimeout(dev.greet.bind(dev), 1000); // Works even if this is lost
📊 Comparison Summary
| Feature | call() | apply() | bind() |
|---|---|---|---|
| Calls function immediately | ✅ | ✅ | ❌ |
| Argument format | Comma-separated | Array | Comma-separated |
| Returns new function | ❌ | ❌ | ✅ |
Changes this | ✅ | ✅ | ✅ |
📦 Real-world Example: Borrowing Array Methods
const nodeList = document.querySelectorAll('div');
const divsArray = Array.prototype.slice.call(nodeList);

console.log(Array.isArray(divsArray)); // true
🧠 Internal Mechanism (Simplified)
When you do:
fn.call(obj, arg1, arg2)
Internally:
obj.tempFn = fn;
obj.tempFn(arg1, arg2);
delete obj.tempFn;
🛑 Common Pitfalls
- Losing
thisin callbacks and event handlers - Using
bind()but forgetting to call the returned function - Rebinding already bound functions is not reversible
🧪 Pro Tip: Polyfill for bind()
Function.prototype.myBind = function(context, ...args) {
  const fn = this;
  return function(...newArgs) {
    return fn.apply(context, [...args, ...newArgs]);
  };
};
🔚 Conclusion
call()andapply()are used to invoke immediately with a controlledthisbind()is used to delay execution but fix the context- These tools are essential in callbacks, class methods, functional programming, and DOM event handling
🔄 Understanding Asynchronous JavaScript: Callbacks, Promises, and async/await
JavaScript is single-threaded, meaning it can only do one thing at a time. But what if you’re making an API call or reading a file? That’s where asynchronous programming comes in.
📞 1. Callback – The Old Way
A callback is a function passed to another function to be executed later.
function fetchData(callback) {
  setTimeout(() => {
    callback("Data loaded");
  }, 1000);
}

fetchData((data) => {
  console.log(data); // Output after 1s: Data loaded
});
🧱 2. Callback Hell
When callbacks are nested inside callbacks, it leads to “callback hell” – messy and hard to maintain.
loginUser("hari", (user) => {
  getProfile(user.id, (profile) => {
    getSettings(profile.id, (settings) => {
      console.log(settings);
    });
  });
});
✅ 3. Promises – The Better Way
A Promise represents a future value. Use .then() for chaining and .catch() for error handling.
function fetchData() {
  return new Promise((resolve, reject) => {
    setTimeout(() => resolve("Data loaded"), 1000);
  });
}

fetchData()
  .then(data => console.log(data))
  .catch(err => console.error(err));
✨ 4. async/await – The Modern Way
Syntactic sugar over Promises for cleaner, readable code.
async function loadData() {
  try {
    const data = await fetchData();
    console.log(data);
  } catch (err) {
    console.error(err);
  }
}
🔗 5. Async/Await + Promise Chaining
You can still chain Promises with await:
async function fullFlow() {
  try {
    const user = await loginUser("hari");
    const profile = await getProfile(user.id);
    const settings = await getSettings(profile.id);
    console.log(settings);
  } catch (err) {
    console.error("Error:", err);
  }
}
📌 Conclusion
| Approach | Pros | Cons |
|---|---|---|
| Callback | Simple use-case | Leads to callback hell |
| Promise | Cleaner, better error handling | Still can get messy |
| async/await | Clean, readable, maintainable | Needs ES2017+ browser support |
🧠 Tip: Always use async/await with try/catch for production-grade code.
🔄 1. Callback Example
function fetchData(callback) {
  setTimeout(() => {
    callback("✅ Data fetched via callback");
  }, 1000);
}

fetchData((data) => {
  console.log(data);
});
🔥 2. Callback Hell Example
function task1(cb) {
  setTimeout(() => {
    console.log("Task 1 done");
    cb();
  }, 1000);
}

function task2(cb) {
  setTimeout(() => {
    console.log("Task 2 done");
    cb();
  }, 1000);
}

task1(() => {
  task2(() => {
    console.log("All tasks done");
  });
});
🔗 1. Promise.all()
✅ Resolves when all Promises resolve.
❌ Rejects if any Promise rejects.
const p1 = Promise.resolve(1);
const p2 = Promise.resolve(2);
const p3 = Promise.resolve(3);

Promise.all([p1, p2, p3])
  .then(values => console.log("✅ All resolved:", values)) // [1, 2, 3]
  .catch(err => console.error("❌ Error:", err));
If any fails,
catchruns:
const p1 = Promise.resolve(1);
const p2 = Promise.reject("Error at p2");

Promise.all([p1, p2])
  .then(console.log)
  .catch(console.error); // ❌ Error at p2
🧱 2. Promise.allSettled()
✅ Resolves when all Promises settle (either resolve or reject).
Returns an array of result objects.
const p1 = Promise.resolve("Done");
const p2 = Promise.reject("Failed");

Promise.allSettled([p1, p2]).then(results => {
  results.forEach((result, index) => {
    if (result.status === "fulfilled") {
      console.log(`✅ Promise ${index} fulfilled with`, result.value);
    } else {
      console.log(`❌ Promise ${index} rejected with`, result.reason);
    }
  });
});
No error will be thrown, even if some reject.
🏁 3. Promise.race()
Returns the result of the first settled Promise (resolve or reject).
const slow = new Promise(res => setTimeout(() => res("Slow"), 2000));
const fast = new Promise(res => setTimeout(() => res("Fast"), 1000));

Promise.race([slow, fast])
  .then(result => console.log("🏁 First to settle:", result)); // Fast
If the fastest one rejects, it rejects:
const rejectFirst = new Promise((_, rej) => setTimeout(() => rej("Error!"), 500));
const resolveLater = new Promise(res => setTimeout(() => res("Later"), 1000));

Promise.race([rejectFirst, resolveLater])
  .then(console.log)
  .catch(err => console.error("❌", err)); // ❌ Error!
✅ 4. Promise.any()
✅ Resolves with the first fulfilled Promise.
❌ Rejects only if all Promises reject.
const p1 = Promise.reject("Fail 1");
const p2 = Promise.resolve("Success");
const p3 = Promise.reject("Fail 2");

Promise.any([p1, p2, p3])
  .then(result => console.log("✅ First fulfilled:", result)) // Success
  .catch(err => console.error("❌", err));
If all reject, you get
AggregateError:
Promise.any([
  Promise.reject("Fail 1"),
  Promise.reject("Fail 2")
]).catch(err => console.error("❌ All failed:", err));
✅ Summary Table
| Method | Resolves When | Rejects When |
|---|---|---|
Promise.all | All succeed | Any one fails |
Promise.allSettled | All settle | Never rejects |
Promise.race | First settles (success or fail) | N/A |
Promise.any | First success | All fail → AggregateError |
🔗 3. Promise Example
function fetchData() {
  return new Promise((resolve, reject) => {
    setTimeout(() => resolve("✅ Data fetched using Promise"), 1000);
  });
}

fetchData()
  .then(data => console.log(data))
  .catch(err => console.error(err));
✨ 4. Async/Await Example
function getData() {
  return new Promise(resolve => {
    setTimeout(() => resolve("✅ Data fetched with async/await"), 1000);
  });
}

async function load() {
  const data = await getData();
  console.log(data);
}

load();
🔁 5. Async/Await with Chaining
function login(user) {
return new Promise(resolve => setTimeout(() => resolve(`${user} logged in`), 500));
}
function fetchProfile(user) {
return new Promise(resolve => setTimeout(() => resolve(`Profile of ${user}`), 500));
}
function fetchSettings(profile) {
return new Promise(resolve => setTimeout(() => resolve(`Settings of ${profile}`), 500));
}
async function main() {
const user = await login("Hari");
const profile = await fetchProfile(user);
const settings = await fetchSettings(profile);
console.log(settings);
}
main();
🧠 Interview Programs
Q1: Convert a callback function into a Promise
function oldStyle(fn, callback) {
setTimeout(() => callback(`Hello, ${fn}`), 500);
}
function promisifyOldStyle(fn) {
return new Promise(resolve => oldStyle(fn, resolve));
}
promisifyOldStyle("World").then(console.log);
Q2: Run 3 asynchronous functions sequentially
async function stepOne() {
return "Step 1 done";
}
async function stepTwo() {
return "Step 2 done";
}
async function stepThree() {
return "Step 3 done";
}
async function run() {
console.log(await stepOne());
console.log(await stepTwo());
console.log(await stepThree());
}
run();
Q3: Retry a function 3 times before failing
async function unstable() {
if (Math.random() < 0.7) throw new Error("Fail");
return "Success";
}
async function retry(fn, attempts = 3) {
for (let i = 0; i < attempts; i++) {
try {
const res = await fn();
return res;
} catch (e) {
console.log(`Attempt ${i + 1} failed`);
}
}
throw new Error("All attempts failed");
}
retry(unstable).then(console.log)
.catch(console.error);
🧠 Core Web Vitals: Deep Dive for Developers
⚙️ 1. Largest Contentful Paint (LCP)
✅ What It Measures:
LCP marks the point when the main content (largest image/text block) is visible to the user.
- Measured in seconds.
- Triggered when the largest visible element is rendered in viewport.
- Usually affected by: hero images, background images, large headers.
🔍 Ideal Score:
≤ 2.5 seconds
🛠️ Deep Optimization Techniques:
- Preload key images:
<link rel="preload" as="image" href="hero.webp" /> - Use plugins like Perfmatters or WP Rocket to delay non-critical JS.
- Critical CSS generation to load above-the-fold styles first.
- Self-host Google Fonts to prevent blocking requests.
🔌 WordPress Plugins:
⚡ 2. First Input Delay (FID)
✅ What It Measures:
FID is the delay between user interaction (click, tap, key press) and when the browser starts processing that event.
- Measured in milliseconds (ms)
- Affected mostly by JavaScript execution time
🔍 Ideal Score:
≤ 100 ms
🛠️ Deep Optimization Techniques:
- Break long JS tasks into smaller chunks using
requestIdleCallback - Use code splitting (advanced for custom themes/plugins)
- Load JavaScript asynchronously or defer:
<script src="example.js" defer></script> - Use web workers (where possible) to move JS execution off the main thread.
🔌 WordPress Plugins:
- Flying Scripts: Load JS only after user interaction.
- WP Rocket: Delay all JavaScript execution.
🌀 3. Cumulative Layout Shift (CLS)
✅ What It Measures:
CLS tracks how much visible elements move unexpectedly during page load.
- Measured as a unitless number (not time)
- A score > 0.1 is considered bad.
🔍 Ideal Score:
≤ 0.1
🛠️ Deep Optimization Techniques:
- Always define width and height for images/videos
- Reserve space for ads or iframes using CSS:
.ad-slot { min-height: 250px; } - Preload fonts and use:
font-display: swap; - Don’t inject content above existing content (e.g., notification bars).
🔌 WordPress Plugins:
- OMGF – Host Google Fonts Locally
- CAOS for Analytics (avoid layout shifts from GA scripts)
📈 Measuring Real User Data (Field vs Lab)
| Type | Tools |
|---|---|
| Lab Data (Simulated) | Lighthouse, PageSpeed Insights |
| Field Data (Real user data) | CrUX (Chrome User Experience Report), Search Console Core Web Vitals |
💡 Field data is what Google uses for rankings.
🛠️ Advanced Developer Techniques (Custom Themes)
- Critical CSS Injection:
Generate critical CSS and inline it in<head>. - Defer Non-Essential JS/CSS:
Usewp_dequeue_script()andwp_dequeue_style()for unused assets. - Lazy Load Background Images:
Usedata-bg+ JavaScript or Lazy Loader - Font Optimization:
function preload_fonts() { echo '<link rel="preload" href="/fonts/Inter.woff2" as="font" type="font/woff2" crossorigin>'; } add_action('wp_head', 'preload_fonts');
🎯 CWV & SEO Impact
Google uses CWV as a ranking signal in its Page Experience update.
- Slow pages = high bounce rates
- Bad CLS = user frustration
- Poor FID = laggy experience on mobile
📦 Bonus: Recommended Stack
| Purpose | Plugin/Service |
|---|---|
| Hosting | Cloudways, Rocket.net |
| CDN | Cloudflare (with APO), BunnyCDN |
| Cache | WP Rocket, FlyingPress |
| Fonts | OMGF (local Google Fonts) |
| Image Optimization | ShortPixel, Imagify |
| JS/CSS | Perfmatters, Asset CleanUp |
📌 TL;DR Cheat Sheet
| Metric | Goal | Fix |
|---|---|---|
| LCP | ≤ 2.5s | Optimize images, preload, lazy load |
| FID | ≤ 100ms | Minimize JS, delay execution |
| CLS | ≤ 0.1 | Set dimensions, preload fonts |
🧠 What Are Core Web Vitals?
Core Web Vitals are performance metrics by Google that measure real user experience for:
| Metric | Measures | Good Score |
|---|---|---|
| LCP (Largest Contentful Paint) | Loading speed | ≤ 2.5 sec |
| FID (First Input Delay) | Interactivity | ≤ 100 ms |
| CLS (Cumulative Layout Shift) | Visual stability | ≤ 0.1 |
🧾 These affect your SEO, Google ranking, and user engagement.
🛠 How to Measure Core Web Vitals
Use these free tools:
- Google PageSpeed Insights
- Lighthouse in Chrome DevTools
- Web Vitals Chrome Extension
- Search Console → Core Web Vitals Report
🚀 How to Improve Core Web Vitals in WordPress
✅ 1. Improve LCP (Loading Speed)
- Optimize images: Use WebP, compress with ShortPixel
- Lazy load below-the-fold images: Built-in from WordPress 5.5+
- Use a fast theme: e.g. GeneratePress, Astra
- Reduce server response time: Use a fast host (e.g., Cloudways, SiteGround)
- Use caching: Install WP Rocket or LiteSpeed Cache
✅ 2. Improve FID (Interactivity)
- Minimize JS execution: Delay unused JS with WP Rocket or Flying Scripts
- Remove unused plugins
- Defer JavaScript loading
- Use a lightweight page builder (avoid bloated builders like WPBakery if possible)
✅ 3. Improve CLS (Layout Stability)
- Always set image dimensions (height + width)
- Avoid ads, popups, or embeds shifting layout
- Use font-display: swap to avoid invisible text flash (done via plugins or theme code)
- Avoid loading Google Fonts externally — self-host them
🔧 Plugins to Help You
| Plugin | Purpose |
|---|---|
| WP Rocket | Speed, caching, delay JS/CSS |
| ShortPixel / Imagify | Image optimization |
| Perfmatters | Script manager, lazy loading |
| Flying Scripts / Flying Images | JS/image optimizations |
| Asset CleanUp | Remove unused CSS/JS |
🎯 Bonus Tips
- Use CDN (e.g., Cloudflare, BunnyCDN) to speed up global delivery
- Enable HTTP/2 or HTTP/3
- Keep WordPress + plugins updated
- Minimize redirects
- Remove bloated themes or page builders
📄 SEO Tip
Google ranks pages based on real user CWV scores (CrUX data). So optimizing Core Web Vitals boosts both UX and rankings.
💡 Summary Table
| Metric | Fix |
|---|---|
| LCP | Optimize images, lazy load, cache pages |
| FID | Reduce JS, defer scripts |
| CLS | Set dimensions, avoid layout shifts |
Here’s a complete and beginner-friendly example with code and explanation to measure Web Vitals (Core Web Vitals) using JavaScript.
✅ What are Web Vitals?
Core Web Vitals are essential metrics that measure real-world performance of a webpage:
| Metric | Description | Good Score |
|---|---|---|
| LCP (Largest Contentful Paint) | Loading performance | < 2.5s |
| FID (First Input Delay) | Interactivity | < 100ms |
| CLS (Cumulative Layout Shift) | Visual stability | < 0.1 |
| INP (Interaction to Next Paint) | Responsiveness | < 200ms |
| TTFB (Time To First Byte) | Backend speed | < 800ms |
🧠 Install Web Vitals Library
npm install web-vitals
💻 Example Code (React or Vanilla JS)
✅ measureVitals.js
import {
getCLS,
getFID,
getLCP,
getTTFB,
getINP,
} from 'web-vitals';
export function reportWebVitals(onPerfEntry) {
if (onPerfEntry && onPerfEntry instanceof Function) {
getCLS(onPerfEntry); // layout shift
getFID(onPerfEntry); // first input delay
getLCP(onPerfEntry); // loading
getTTFB(onPerfEntry); // server response
getINP(onPerfEntry); // responsiveness
}
}
🧪 Usage in React (index.js)
import React from 'react';
import ReactDOM from 'react-dom';
import App from './App';
import { reportWebVitals } from './measureVitals';
ReactDOM.render(<App />, document.getElementById('root'));
// Log to console
reportWebVitals(console.log);
You’ll see output like:
{
name: "LCP",
value: 1234.56, // in ms
id: "v1-123...",
delta: 1234.56,
entries: [...],
rating: "good"
}
📤 Optionally Send to Analytics
reportWebVitals((metric) => {
fetch('/analytics', {
method: 'POST',
body: JSON.stringify(metric),
});
});
🌐 Use in WordPress or HTML Page
<script src="https://unpkg.com/web-vitals@3/dist/web-vitals.iife.js"></script>
<script>
webVitals.getCLS(console.log);
webVitals.getLCP(console.log);
webVitals.getFID(console.log);
webVitals.getTTFB(console.log);
webVitals.getINP(console.log);
</script>
📊 Visual Dashboard (Optional)
You can visualize metrics using:
- Google Analytics 4 (custom events)
- Datadog/New Relic
- In-house dashboard
Complete Guide to Class-Based JavaScript (2025)
JavaScript introduced class-based syntax in ES6 (2015) to make object-oriented programming easier and cleaner. Under the hood, JavaScript classes still use prototypes, but the class keyword gives a more readable and structured approach.
📘 Table of Contents
- What is a JavaScript Class?
- Defining a Class
- Constructor Method
- Adding Methods
- Class Instantiation
- Inheritance with
extends - Using
super() - Static Methods
- Getters and Setters
- Private Fields (#)
- Real-world Example: Bank Account
- Class vs Prototype
- Best Practices
1. What is a JavaScript Class?
A class is a blueprint for creating objects with shared methods and properties. It follows the OOP (Object-Oriented Programming) style.
2. Defining a Class
class Person {
constructor(name, age) {
this.name = name;
this.age = age;
}
}
3. Constructor Method
The constructor() is a special method that runs when an object is instantiated.
const user = new Person("Hari", 25);
4. Adding Methods
class Person {
constructor(name) {
this.name = name;
}
greet() {
return `Hello, ${this.name}`;
}
}
5. Class Instantiation
const p1 = new Person("Mohan");
console.log(p1.greet()); // Hello, Mohan
6. Inheritance with extends
class Animal {
speak() {
return "Animal speaks";
}
}
class Dog extends Animal {
speak() {
return "Dog barks";
}
}
7. Using super()
class Animal {
constructor(name) {
this.name = name;
}
}
class Dog extends Animal {
constructor(name, breed) {
super(name);
this.breed = breed;
}
}
8. Static Methods
Static methods belong to the class, not instances.
class MathUtil {
static add(a, b) {
return a + b;
}
}
console.log(MathUtil.add(2, 3)); // 5
9. Getters and Setters
class Product {
constructor(name) {
this._name = name;
}
get name() {
return this._name.toUpperCase();
}
set name(value) {
this._name = value;
}
}
10. Private Fields (#)
class Secret {
#code = "12345";
reveal() {
return this.#code;
}
}
const s = new Secret();
console.log(s.reveal()); // 12345
11. Real-world Example: Bank Account
class BankAccount {
constructor(owner, balance = 0) {
this.owner = owner;
this.balance = balance;
}
deposit(amount) {
this.balance += amount;
}
withdraw(amount) {
if (amount <= this.balance) {
this.balance -= amount;
} else {
console.log("Insufficient funds");
}
}
getBalance() {
return this.balance;
}
}
12. Class vs Prototype
// Prototype
function Car(make) {
this.make = make;
}
Car.prototype.drive = function () {
return `${this.make} drives`;
};
// Class
class CarClass {
constructor(make) {
this.make = make;
}
drive() {
return `${this.make} drives`;
}
}
13. Best Practices
- Use meaningful class names
- Prefer composition over inheritance
- Encapsulate data with private fields
- Use getters/setters responsibly
- Avoid unnecessary use of
this
🏁 Conclusion
JavaScript classes offer a modern, cleaner syntax for building scalable, object-oriented code. Understanding class-based programming makes you a better JS developer and prepares you for frameworks like React, Angular, and Node.js.
🔥 Functional JavaScript Explained (2025)
Functional programming (FP) is a powerful paradigm in JavaScript that treats computation as the evaluation of pure functions without changing state or data. It leads to cleaner, more maintainable code.
📘 Table of Contents
- What is Functional Programming?
- Key Principles
- Pure Functions
- First-Class & Higher-Order Functions
- Immutability
- Function Composition
- Closures
- Recursion
- Map, Filter, Reduce
- Currying
- Partial Application
- Real-World Example: Todo Manager
- Functional vs OOP
1. What is Functional Programming?
Functional programming focuses on:
- Using pure functions
- Avoiding shared state
- Emphasizing expressions over statements
- Favoring immutability
2. Key Principles
- Pure Functions
- Immutability
- Higher-Order Functions
- Declarative Style
- Function Composition
3. Pure Functions
A pure function always:
- Returns the same output for same input
- Has no side effects
function add(a, b) {
return a + b;
}
4. First-Class & Higher-Order Functions
First-Class: Functions can be stored in variables, passed as arguments.
Higher-Order: Functions that accept or return other functions.
const greet = name => `Hello, ${name}`;
function executor(fn, value) {
return fn(value);
}
executor(greet, "Hari"); // Hello, Hari
5. Immutability
Avoid changing original objects.
const arr = [1, 2, 3];
const newArr = [...arr, 4]; // ✅ Immutable
6. Function Composition
Combine small functions into bigger ones.
const multiply = x => x * 2;
const square = x => x * x;
const composed = x => square(multiply(x));
composed(3); // 36
7. Closures
Functions that remember outer variables.
function outer(a) {
return function inner(b) {
return a + b;
};
}
const add5 = outer(5);
add5(3); // 8
8. Recursion
Function calling itself.
function factorial(n) {
return n === 1 ? 1 : n * factorial(n - 1);
}
9. Map, Filter, Reduce
// Map
[1, 2, 3].map(x => x * 2); // [2, 4, 6]
// Filter
[1, 2, 3].filter(x => x > 1); // [2, 3]
// Reduce
[1, 2, 3].reduce((acc, cur) => acc + cur, 0); // 6
10. Currying
Transforming a function with multiple arguments into nested functions.
function curryAdd(a) {
return function (b) {
return a + b;
};
}
const add10 = curryAdd(10);
add10(5); // 15
11. Partial Application
Fixing a few arguments of a function.
function multiply(a, b) {
return a * b;
}
const double = multiply.bind(null, 2);
double(5); // 10
12. Real-World Example: Todo Manager
const todos = [
{ task: "Code", done: true },
{ task: "Eat", done: false },
];
// Filter incomplete todos
const incomplete = todos.filter(t => !t.done);
// Add new task immutably
const addTask = (todos, newTask) => [...todos, { task: newTask, done: false }];
13. Functional vs OOP
| Feature | Functional JS | OOP JS |
|---|---|---|
| Style | Declarative | Imperative |
| Focus | Functions | Objects & Classes |
| Reusability | High (composition) | Via inheritance |
| State | Avoids shared state | Uses internal state |
🧠 Object-Oriented Programming (OOP) in JavaScript: A Complete Guide
JavaScript is primarily prototype-based but supports OOP principles via functions and ES6 classes. Let’s explore all major OOPs concepts in JavaScript with examples.
📦 1. What is Object-Oriented Programming?
OOP is a programming paradigm where everything is treated as an object — a container with properties (data) and methods (functions).
👤 2. Class & Object
✅ Class:
A class is a blueprint for creating objects.
class Car {
constructor(brand, model) {
this.brand = brand;
this.model = model;
}
drive() {
console.log(`${this.brand} ${this.model} is driving`);
}
}
✅ Object:
An object is an instance of a class.
const myCar = new Car("Toyota", "Camry");
myCar.drive(); // Toyota Camry is driving
🔒 3. Encapsulation
Encapsulation means hiding internal details and exposing only necessary parts.
class BankAccount {
#balance = 0; // private field
deposit(amount) {
this.#balance += amount;
}
getBalance() {
return this.#balance;
}
}
const account = new BankAccount();
account.deposit(1000);
console.log(account.getBalance()); // 1000
#balanceis private and cannot be accessed directly outside the class.
👨👩👧 4. Inheritance
Inheritance allows one class to inherit properties/methods of another.
class Animal {
speak() {
console.log("Animal speaks");
}
}
class Dog extends Animal {
bark() {
console.log("Dog barks");
}
}
const d = new Dog();
d.speak(); // Animal speaks
d.bark(); // Dog barks
🎭 5. Polymorphism
Polymorphism means one function behaves differently based on context.
class Animal {
makeSound() {
console.log("Some sound");
}
}
class Cat extends Animal {
makeSound() {
console.log("Meow");
}
}
class Cow extends Animal {
makeSound() {
console.log("Moo");
}
}
const animals = [new Cat(), new Cow()];
animals.forEach(a => a.makeSound()); // Meow Moo
Method
makeSound()behaves differently for Cat and Cow.
🧩 6. Abstraction
Abstraction means exposing only the essential features and hiding complexities.
class APIService {
constructor(url) {
this.url = url;
}
async fetchData() {
const res = await fetch(this.url);
return await res.json();
}
}
const api = new APIService("https://api.example.com/data");
api.fetchData().then(console.log);
Internal fetch logic is abstracted from the consumer.
🧱 7. Static Methods & Properties
Static methods belong to the class, not instance.
class MathUtil {
static add(a, b) {
return a + b;
}
}
console.log(MathUtil.add(2, 3)); // 5
🧬 8. Getters & Setters
They help in controlled access to properties.
class Person {
constructor(name) {
this._name = name;
}
get name() {
return this._name.toUpperCase();
}
set name(newName) {
this._name = newName;
}
}
const p = new Person("Hari");
console.log(p.name); // HARI
p.name = "Mohan";
console.log(p.name); // MOHAN
🔗 9. Prototype-Based Inheritance
Behind the scenes, JavaScript uses prototype chains.
function Hero(name) {
this.name = name;
}
Hero.prototype.sayHi = function () {
console.log(`Hi, I am ${this.name}`);
};
const h = new Hero("Ironman");
h.sayHi(); // Hi, I am Ironman
📌 Summary of OOPs Concepts in JS
| Concept | Description |
|---|---|
| Class & Object | Template and Instance |
| Encapsulation | Data hiding using private fields |
| Inheritance | One class extends another |
| Polymorphism | Same method, different behavior |
| Abstraction | Hide complex details from users |
| Static | Belongs to class, not object |
| Getter/Setter | Controlled access to properties |
| Prototype | Core mechanism for inheritance |
🛒 Build a Real-World E-Commerce Cart in JavaScript using OOPs Concepts
Object-Oriented Programming (OOP) in JavaScript isn’t just for theory. Let’s apply OOPs principles like encapsulation, abstraction, inheritance, and polymorphism to build a real-world shopping cart system — just like you’d see in Amazon or Flipkart.
🧱 Classes We’ll Build
Product– represents an item in the storeCartItem– product with quantityShoppingCart– manages cart operations
✅ Step 1: Define Product & CartItem (Class & Polymorphism)
class Product {
constructor(id, name, price) {
this.id = id;
this.name = name;
this.price = price;
}
}
class CartItem {
constructor(product, quantity = 1) {
this.product = product;
this.quantity = quantity;
}
// Polymorphism: calculate total differently per item
getTotal() {
return this.product.price * this.quantity;
}
}
🔒 Step 2: ShoppingCart Class (Encapsulation & Abstraction)
class ShoppingCart {
#items = []; // Encapsulation: private data
addProduct(product, quantity = 1) {
const found = this.#items.find(i => i.product.id === product.id);
if (found) {
found.quantity += quantity;
} else {
this.#items.push(new CartItem(product, quantity));
}
}
removeProduct(productId) {
this.#items = this.#items.filter(i => i.product.id !== productId);
}
// Abstraction: expose only what’s needed
getTotalAmount() {
return this.#items.reduce((sum, item) => sum + item.getTotal(), 0);
}
getItems() {
return this.#items.map(i => ({
name: i.product.name,
price: i.product.price,
quantity: i.quantity,
total: i.getTotal()
}));
}
}
🧪 Step 3: Real Usage
const p1 = new Product(1, "Laptop", 1000);
const p2 = new Product(2, "Mouse", 50);
const cart = new ShoppingCart();
cart.addProduct(p1);
cart.addProduct(p2, 2);
console.table(cart.getItems());
console.log("Total:", cart.getTotalAmount());
✅ OOPs Concepts in Action
| Concept | Where it’s Used |
|---|---|
| Class/Object | Product, CartItem, ShoppingCart |
| Encapsulation | #items is private |
| Abstraction | addProduct(), getItems() simplify API |
| Polymorphism | getTotal() method in CartItem |
| Real-world | Models actual cart behavior |
Here’s your WordPress-friendly blog article using the real-world E-Commerce Shopping Cart System example, showcasing all OOPs concepts in JavaScript.
🛒 Build a Real-World E-Commerce Cart in JavaScript using OOPs Concepts
Object-Oriented Programming (OOP) in JavaScript isn’t just for theory. Let’s apply OOPs principles like encapsulation, abstraction, inheritance, and polymorphism to build a real-world shopping cart system — just like you’d see in Amazon or Flipkart.
🧱 Classes We’ll Build
Product– represents an item in the storeCartItem– product with quantityShoppingCart– manages cart operations
✅ Step 1: Define Product & CartItem (Class & Polymorphism)
class Product {
constructor(id, name, price) {
this.id = id;
this.name = name;
this.price = price;
}
}
class CartItem {
constructor(product, quantity = 1) {
this.product = product;
this.quantity = quantity;
}
// Polymorphism: calculate total differently per item
getTotal() {
return this.product.price * this.quantity;
}
}
🔒 Step 2: ShoppingCart Class (Encapsulation & Abstraction)
class ShoppingCart {
#items = []; // Encapsulation: private data
addProduct(product, quantity = 1) {
const found = this.#items.find(i => i.product.id === product.id);
if (found) {
found.quantity += quantity;
} else {
this.#items.push(new CartItem(product, quantity));
}
}
removeProduct(productId) {
this.#items = this.#items.filter(i => i.product.id !== productId);
}
// Abstraction: expose only what’s needed
getTotalAmount() {
return this.#items.reduce((sum, item) => sum + item.getTotal(), 0);
}
getItems() {
return this.#items.map(i => ({
name: i.product.name,
price: i.product.price,
quantity: i.quantity,
total: i.getTotal()
}));
}
}
🧪 Step 3: Real Usage
const p1 = new Product(1, "Laptop", 1000);
const p2 = new Product(2, "Mouse", 50);
const cart = new ShoppingCart();
cart.addProduct(p1);
cart.addProduct(p2, 2);
console.table(cart.getItems());
console.log("Total:", cart.getTotalAmount());
✅ OOPs Concepts in Action
| Concept | Where it’s Used |
|---|---|
| Class/Object | Product, CartItem, ShoppingCart |
| Encapsulation | #items is private |
| Abstraction | addProduct(), getItems() simplify API |
| Polymorphism | getTotal() method in CartItem |
| Real-world | Models actual cart behavior |
🌐 A Complete Guide to DOM and DOM Manipulation in JavaScript
If you want to build interactive web pages, you must master the DOM (Document Object Model). This guide covers everything — what the DOM is, how it works, and how to manipulate it using JavaScript.
📘 What is the DOM?
The DOM (Document Object Model) is a tree-like structure that represents your HTML page in the browser. JavaScript uses the DOM to access and manipulate elements, attributes, and styles.
Example:
<body>
<h1>Hello, World!</h1>
<button>Click Me</button>
</body>
The DOM turns this into:
Document
└── HTML
└── Body
├── h1
└── button
🛠 Accessing DOM Elements
You can select elements in multiple ways:
| Method | Example | Description |
|---|---|---|
getElementById() | document.getElementById("title") | Selects by ID |
getElementsByClassName() | document.getElementsByClassName("btn") | HTMLCollection |
getElementsByTagName() | document.getElementsByTagName("div") | All matching tags |
querySelector() | document.querySelector(".btn") | First match (CSS-style) |
querySelectorAll() | document.querySelectorAll("p") | All matches (NodeList) |
✏️ DOM Manipulation Methods
1. Change Text Content
document.getElementById("title").textContent = "Welcome!";
2. Change HTML Inside
document.querySelector("#content").innerHTML = "<strong>Bold Text</strong>";
3. Change Styles
document.querySelector("h1").style.color = "blue";
4. Add/Remove Classes
element.classList.add("active");
element.classList.remove("hidden");
element.classList.toggle("dark-mode");
🧱 Creating & Appending Elements
const newDiv = document.createElement("div");
newDiv.textContent = "New Element";
document.body.appendChild(newDiv);
🧹 Removing Elements
const elem = document.getElementById("removeMe");
elem.remove();
🎯 Event Listeners
Make your website interactive by listening to events like click, submit, or keydown.
document.querySelector("button").addEventListener("click", function () {
alert("Button clicked!");
});
You can also remove event listeners:
function sayHi() {
alert("Hi");
}
button.addEventListener("click", sayHi);
button.removeEventListener("click", sayHi);
🔍 DOM Traversal (Parent, Children, Siblings)
element.parentElement
element.children
element.nextElementSibling
element.previousElementSibling
🧪 DOM Example: Toggle Dark Mode
document.querySelector("#toggle").addEventListener("click", () => {
document.body.classList.toggle("dark");
});
🧩 Real-World Use Cases
- Show/hide modals or dropdowns
- Live form validation
- Toggle light/dark themes
- Add items dynamically (to-do list, comments)
- Update UI based on API response
🧠 Best Practices
- Use
const/letinstead ofvar - Avoid overusing
innerHTML(security risk) - Use
classListinstead ofclassName += - Add events via
addEventListener(not inline in HTML)
📦 Summary Table
| Concept | Usage Example |
|---|---|
| Select Element | querySelector("#id") |
| Read/Update Text | textContent, innerHTML |
| Style Elements | style.color = "red" |
| Create Elements | createElement() + appendChild() |
| Events | addEventListener("click", ...) |
| Class Management | classList.add/remove/toggle() |
| Traversal | parentElement, children |
✅ Final Thoughts
DOM Manipulation is essential for creating dynamic, user-friendly web apps. With just JavaScript, you can build everything from interactive forms to real-time UI changes.
Start with simple operations and build toward dynamic components like tabs, modals, or sliders — all powered by DOM methods.
🧪 Real DOM Manipulation Example: Todo List App
Let’s build a simple To-Do List using plain HTML + JavaScript with DOM manipulation.
🔧 HTML
<h2>My To-Do List</h2>
<input type="text" id="taskInput" placeholder="Enter a task" />
<button id="addBtn">Add Task</button>
<ul id="taskList"></ul>
💻 JavaScript
const taskInput = document.getElementById("taskInput");
const addBtn = document.getElementById("addBtn");
const taskList = document.getElementById("taskList");
addBtn.addEventListener("click", function () {
const taskText = taskInput.value.trim();
if (taskText === "") {
alert("Please enter a task");
return;
}
// Create new list item
const li = document.createElement("li");
li.textContent = taskText;
// Add delete button
const delBtn = document.createElement("button");
delBtn.textContent = "❌";
delBtn.style.marginLeft = "10px";
delBtn.addEventListener("click", () => {
li.remove(); // ❌ Remove task
});
li.appendChild(delBtn);
taskList.appendChild(li);
taskInput.value = "";
});
✅ Concepts Used
| Concept | Example Used |
|---|---|
| Element Selection | getElementById() |
| Create Element | document.createElement("li") |
| Add Text | element.textContent = ... |
| Append to DOM | appendChild() |
| Add Event Listener | addEventListener("click", ...) |
| Remove Element | element.remove() |
🎯 Final Output
- Add tasks dynamically
- Remove tasks with a click
- Real-time interaction — no reload
🧪 Real DOM Manipulation Example: Modal Popup (Login Form)
💻 Use Case:
You click a “Login” button → a modal opens → you fill in your email/password → submit → feedback shown.
🔧 HTML Structure
<button id="openModalBtn">Login</button>
<div id="modal" class="modal hidden">
<div class="modal-content">
<span id="closeModalBtn" class="close">×</span>
<h2>Login</h2>
<form id="loginForm">
<input type="email" id="email" placeholder="Email" required />
<input type="password" id="password" placeholder="Password" required />
<button type="submit">Submit</button>
</form>
<div id="feedback"></div>
</div>
</div>
🧵 CSS (Basic)
<style>
.modal {
position: fixed;
top: 0;
left: 0;
width: 100%;
height: 100%;
display: flex;
justify-content: center;
align-items: center;
background: rgba(0,0,0,0.6);
}
.modal-content {
background: white;
padding: 20px;
width: 300px;
position: relative;
}
.close {
position: absolute;
top: 5px;
right: 10px;
cursor: pointer;
}
.hidden {
display: none;
}
</style>
🧠 JavaScript Logic
const openModalBtn = document.getElementById("openModalBtn");
const closeModalBtn = document.getElementById("closeModalBtn");
const modal = document.getElementById("modal");
const loginForm = document.getElementById("loginForm");
const feedback = document.getElementById("feedback");
// Open modal
openModalBtn.addEventListener("click", () => {
modal.classList.remove("hidden");
});
// Close modal
closeModalBtn.addEventListener("click", () => {
modal.classList.add("hidden");
});
// Submit form
loginForm.addEventListener("submit", (e) => {
e.preventDefault();
const email = document.getElementById("email").value.trim();
const password = document.getElementById("password").value.trim();
if (email === "" || password === "") {
feedback.textContent = "Please fill all fields.";
feedback.style.color = "red";
return;
}
if (!email.includes("@")) {
feedback.textContent = "Invalid email format.";
feedback.style.color = "red";
return;
}
feedback.textContent = "Login Successful ✅";
feedback.style.color = "green";
// Auto close after success
setTimeout(() => {
modal.classList.add("hidden");
loginForm.reset();
feedback.textContent = "";
}, 2000);
});
✅ Concepts Covered
| Concept | Usage Example |
|---|---|
| Show/Hide Elements | .classList.add/remove("hidden") |
| Event Handling | addEventListener("click/submit") |
| Form Validation | Email, password checks |
| Style Manipulation | style.color, toggle modal class |
| DOM Traversal | getElementById, querySelector |
| Dynamic Feedback | innerText based on input |
🧩 Real Use Cases
- Reusable login/signup modals
- Dynamic feedback without reloading
- Responsive UI with form + error handling
- Mimics production login UIs (e.g. Facebook, Twitter)
🌐 JavaScript Browser Object Model (BOM) – Complete Guide
The Browser Object Model (BOM) allows JavaScript to interact with the browser window, navigation, history, and more. Unlike the DOM (Document Object Model), which deals with the page content, the BOM deals with the browser itself.
📦 What is BOM?
BOM (Browser Object Model) represents all objects provided by the browser for interacting with:
- The window
- The URL
- The history
- The location
- The screen
- The navigator
Everything global in JavaScript (like alert(), confirm(), console.log()) is part of the BOM — because the global window object is at the top of the BOM.
🧠 BOM Hierarchy
window
├── document (DOM)
├── location
├── navigator
├── screen
├── history
├── localStorage / sessionStorage
├── alert(), prompt(), confirm()
🔍 1. window Object
All browser APIs are children of window.
console.log(window.innerWidth); // browser width
window.alert("Welcome!");
| Property | Description |
|---|---|
innerWidth | Viewport width in pixels |
innerHeight | Viewport height |
setTimeout() | Delay code execution |
open() | Open new browser window |
🌍 2. location Object
Gives info about the current URL and allows redirects.
console.log(location.href); // Full URL
location.href = "https://google.com"; // Redirect
| Property | Description |
|---|---|
href | Full URL |
hostname | Domain name |
pathname | Path after domain |
search | Query string |
hash | Anchor part |
🌐 3. navigator Object
Info about the user’s browser & system.
console.log(navigator.userAgent);
console.log(navigator.language);
| Property | Description |
|---|---|
userAgent | Browser & OS info |
language | User language |
onLine | Is user online? |
platform | OS type (Win, Mac, etc.) |
🖥 4. screen Object
Gives screen resolution details.
console.log(screen.width, screen.height);
| Property | Description |
|---|---|
width | Total screen width |
height | Total screen height |
availWidth | Width excluding taskbar |
🕓 5. history Object
Control the browser’s history stack.
history.back(); // Go back one page
history.forward(); // Go forward
| Method | Description |
|---|---|
back() | Navigate backward |
forward() | Navigate forward |
go(n) | Navigate by n steps |
💬 6. Dialog Boxes (part of window)
alert("This is an alert");
confirm("Are you sure?");
prompt("Enter your name");
| Method | Description |
|---|---|
alert() | Show simple message |
confirm() | Ask yes/no and return bool |
prompt() | Get user input string |
💡 Real BOM Use Case: Redirect after Confirm
if (confirm("Do you want to visit Google?")) {
location.href = "https://www.google.com";
}
💾 Bonus: localStorage & sessionStorage
localStorage.setItem("username", "Hari");
console.log(localStorage.getItem("username")); // Hari
| Storage Type | Lifetime | Accessible After Reload? |
|---|---|---|
localStorage | Forever | ✅ |
sessionStorage | Until tab closes | ❌ |
🧠 BOM vs DOM
| Feature | DOM | BOM |
|---|---|---|
| Focus | Page content (HTML elements) | Browser & environment |
| Example Obj | document, element | window, location, history |
| Use | Interact with page structure | Interact with browser & tabs |
📦 Final Thoughts
BOM gives JavaScript the power to interact with browser-level features: windows, URLs, screen size, history, and more. Combine it with DOM for full control of the browser + page.
Here’s a real-world example of using the Browser Object Model (BOM) in JavaScript: a Custom Redirect + Info Popup App using window, location, navigator, and screen.
🧪 Real Example: Smart Redirect with Device Info
✅ Use Case:
When a user clicks “Visit Site,” show device/browser info and ask for confirmation before redirecting to another page.
🔧 HTML
<h2>Welcome to CodeWithHari</h2>
<button id="visitBtn">Visit Google</button>
<div id="info"></div>
💻 JavaScript (BOM)
const visitBtn = document.getElementById("visitBtn");
const infoDiv = document.getElementById("info");
visitBtn.addEventListener("click", () => {
// Get BOM Info
const userAgent = navigator.userAgent;
const lang = navigator.language;
const screenSize = `${screen.width} x ${screen.height}`;
const currentURL = location.href;
// Display info
infoDiv.innerHTML = `
<p><strong>Browser:</strong> ${userAgent}</p>
<p><strong>Language:</strong> ${lang}</p>
<p><strong>Screen:</strong> ${screenSize}</p>
<p><strong>Current URL:</strong> ${currentURL}</p>
`;
// Ask user to confirm redirection
const confirmRedirect = confirm("Do you want to visit Google?");
if (confirmRedirect) {
location.href = "https://www.google.com";
}
});
✅ BOM Features Used
| Feature | Used in Example |
|---|---|
navigator | Get browser & language info |
screen | Get screen size |
location.href | Current URL & redirect |
confirm() | Show confirmation dialog |
window | Implicit global (used everywhere) |
💡 Extensions
- Show whether the user is online using
navigator.onLine - Store this info in
localStorage - Auto-redirect based on screen size (e.g., mobile redirect)
🚀 Mastering the Critical Rendering Path (CRP) in Web Development
📌 What is the Critical Rendering Path?
The Critical Rendering Path is the process by which the browser transforms your HTML, CSS, and JavaScript into visual pixels on a user’s screen. It directly affects page load performance, which is essential for SEO, user experience, and conversion rates.
🛠️ 1. CRP Full Workflow
Here’s a step-by-step breakdown:
✅ Step 1: HTML Parsing → DOM Construction
- The browser parses your HTML file top to bottom.
- It builds the DOM (Document Object Model) — a tree structure representing HTML content.
✅ Step 2: CSS Parsing → CSSOM Construction
- Separately, it parses all CSS files and builds the CSSOM (CSS Object Model) — a tree of styling information.
✅ Step 3: Combine DOM + CSSOM → Render Tree
- Browser combines DOM + CSSOM to form the Render Tree.
- Only visible elements are included (e.g., hidden with
display: noneare excluded).
✅ Step 4: Layout / Reflow
- Browser calculates geometry (position, width, height) for each element in the render tree.
✅ Step 5: Painting
- Browser paints each element pixel by pixel on the screen using computed styles.
📈 Visual Flowchart
HTML --> DOM
CSS --> CSSOM
↓
DOM + CSSOM → Render Tree → Layout → Paint → Screen
🚨 Render-Blocking Resources
❌ What Blocks Rendering?
- CSS is render-blocking by default.
- JavaScript can block DOM parsing unless marked as
asyncordefer.
⚡ How to Optimize the CRP
✅ Minimize Critical Resources
- Inline critical CSS (for above-the-fold content).
- Remove unused CSS with tools like PurgeCSS.
✅ Load JS Smartly
- Use
deferto delay execution until HTML is parsed. - Use
asyncfor non-dependent scripts.
<script src="main.js" defer></script>
✅ Lazy Load Non-Essentials
- Images, videos, iframes → load when in viewport using
loading="lazy".
<img src="image.jpg" loading="lazy" />
✅ Reduce DOM Complexity
- Fewer DOM nodes = faster layout calculations.
🧪 Tools to Analyze CRP
| Tool | Use Case |
|---|---|
| Chrome DevTools → Performance | View CRP in action (flame charts) |
| Google Lighthouse | Performance audit + suggestions |
| PageSpeed Insights | Field + lab data |
| WebPageTest.org | Waterfall view of requests |
🔍 Real-World Example
<!-- GOOD: Inline critical CSS -->
<style>
body { font-family: sans-serif; background: white; }
header { padding: 20px; font-size: 1.5rem; }
</style>
<!-- GOOD: Defer JS -->
<script src="app.js" defer></script>
✅ Summary
| Concept | Importance |
|---|---|
| DOM/CSSOM | Required for rendering |
| Render Tree | Combines content + style |
| Layout + Paint | Actual visual rendering |
| Optimization | Reduces load + improves UX |
💡 Pro Tips for Developers
- Use webpack to split JS/CSS into critical and non-critical chunks.
- Host assets via CDN for faster fetch.
- Minify and compress HTML/CSS/JS.
- Use preload for fonts and critical assets.
<link rel="preload" href="font.woff2" as="font" type="font/woff2" crossorigin="anonymous">
🔍 1. HTML Parsing → DOM Construction
✅ What happens?
- Browser reads the HTML file line by line.
- Converts HTML elements into a tree structure called the DOM (Document Object Model).
- Ignores styling and only focuses on content and structure.
⚠️ Render-blocking?
Yes — parsing pauses when encountering <script> (unless defer/async is used).
🎨 2. CSS Parsing → CSSOM Construction
✅ What happens?
- CSS files (internal/external) are parsed into the CSSOM (CSS Object Model).
- CSSOM represents styles (color, size, layout) as a tree-like structure.
⚠️ Render-blocking?
Yes — the browser must finish CSSOM before rendering. That’s why large or unused CSS can hurt performance.
🌲 3. DOM + CSSOM → Render Tree Construction
✅ What happens?
- The browser combines the DOM and CSSOM into a Render Tree.
- Only visible elements are included (e.g., elements with
display: noneare excluded). - This tree tells the browser what to display and how.
📐 4. Layout / Reflow
✅ What happens?
- The browser calculates the exact position, size, and coordinates of each element.
- This step is also called Reflow, especially when done repeatedly during runtime.
⚠️ Costly Operation?
Yes — repeated layouts due to JS changes or DOM mutations can slow down the page (layout thrashing).
🖌️ 5. Paint
✅ What happens?
- Each visible element is painted onto the screen: backgrounds, borders, text, shadows, etc.
- This is where pixels are drawn.
📺 6. Composite & Display
✅ What happens?
- Browser combines all painted layers into a final bitmap.
- GPU assists in rendering the composed layers to the screen.
🎯 Summary Table
| Phase | Description | Blocks Rendering? |
|---|---|---|
| HTML → DOM | HTML parsed to structure | Yes (if <script>) |
| CSS → CSSOM | CSS parsed to style info | Yes |
| DOM + CSSOM | Render Tree construction | Yes |
| Layout/Reflow | Calculate size/position | No (but costly) |
| Paint | Draw pixels to screen | No (GPU helps) |
| Composite/Display | Final step to display content | No |
⚙️ JavaScript Blocking in CRP
By default, when the browser encounters a <script> tag, it:
- Pauses HTML parsing.
- Fetches and executes the script.
- Resumes parsing afterward.
This blocks the CRP, delaying DOM construction and rendering.
🔥 async vs defer
| Attribute | Fetch | Execute | Blocks HTML Parsing? | Maintains Script Order? |
|---|---|---|---|---|
| ❌ None | Yes | Immediately | ✅ Yes | ❌ No |
✅ async | Yes | As soon as ready | ❌ No (but may interrupt DOM parsing) | ❌ No |
✅ defer | Yes | After DOM parsed | ❌ No | ✅ Yes |
🧪 Example Comparison
❌ Default Script (Blocking)
<script src="app.js"></script>
<!-- DOM parsing pauses here -->
✅ async Script (Non-blocking, but unordered)
<script src="analytics.js" async></script>
<!-- Loads independently; execution timing is unpredictable -->
✅ Use case: Third-party scripts (ads, analytics)
✅ defer Script (Best for CRP)
<script src="main.js" defer></script>
<!-- DOM parsed fully first, then script runs -->
✅ Use case: Your main app logic that depends on the DOM
📈 Impact on CRP Timeline
Without defer/async:
HTML ──> BLOCK ──> JS fetched & run ──> Resume HTML ──> DOM → Render
With defer:
HTML ──> JS fetched (in parallel) ──> DOM → THEN JS runs → Render
With async:
HTML ──> JS fetched (in parallel) ──> JS may interrupt parsing → DOM → Render
✅ Best Practices for CRP + JS
- Place
<script defer>before</body> - Only use
asyncfor non-essential JS - Split code with code-splitting and lazy loading
- Combine and minify scripts to reduce blocking
⚡ How async and defer Affect the CRP Phases
🧱 1. HTML Parsing (DOM Construction)
❌ Without async/defer:
- Parsing pauses when it hits
<script src="...">. - Browser downloads and executes the script immediately.
- Then resumes HTML parsing → Slows DOM construction.
✅ With async:
- Parsing continues while script downloads.
- When downloaded, script executes immediately, interrupting parsing.
- Unpredictable execution order if multiple scripts.
✅ With defer:
- Script downloads in parallel with parsing.
- Executes only after HTML parsing is complete.
- Preserves execution order (ideal for dependent scripts).
🎨 2. CSS Parsing (CSSOM Construction)
- Independent from JS, but rendering is blocked until both CSSOM and DOM are complete.
- Large CSS files delay the CRP — minimize CSS size and defer non-critical styles.
🌲 3. Render Tree Construction
- Needs both DOM and CSSOM to be complete.
- If JS modifies DOM/CSSOM during parsing (
async), render tree build may get delayed. deferensures clean DOM + CSSOM combo before render tree is built.
📐 4. Layout / Reflow
- If JS modifies element sizes/positions (e.g., via
offsetHeight), it may trigger reflow. asyncscripts running mid-way can cause layout thrashing.deferensures DOM is ready → avoids extra reflows.
🖌️ 5. Paint + Composite
- Fewer layout changes = smoother paint.
- With
async, unexpected DOM/CSS changes can lead to extra paints. deferensures rendering happens once, cleanly.
✅ Summary Comparison Table
| Attribute | HTML Parsing | Script Download | Script Execution | Order Preserved | Impact on CRP |
|---|---|---|---|---|---|
| ❌ No Attr | Blocked | Immediately | Immediately | ❌ No | ❌ Bad |
✅ async | Continues | In Parallel | Interrupts parsing | ❌ No | ⚠️ Unstable |
✅ defer | Continues | In Parallel | After parsing | ✅ Yes | ✅ Best |
💡 Pro Tip
- ✅ Use
deferfor internal app scripts (main logic). - ✅ Use
asyncfor external scripts (analytics, ads). - ✅ Avoid unmarked
<script>tags above the fold.
🔹 Memory Management in JavaScript
JavaScript automatically allocates memory when objects are created and frees it when not needed — automatic memory management.
There are two main memory life cycle stages:
- Allocation – Memory is allocated when variables, objects, arrays, etc., are created.
- Release (Garbage Collection) – When data is no longer accessible, JS engine reclaims that memory.
🔹 Garbage Collection (GC)
JavaScript engines like V8 (used in Chrome/Node.js) use Garbage Collection algorithms to find and clean up unused memory.
Common GC Algorithms:
- Mark and Sweep
- GC “marks” all reachable values from root (like
windoworglobal). - Unmarked (unreachable) objects are “swept” (deleted).
- GC “marks” all reachable values from root (like
- Reference Counting (historical)
- Objects are tracked by how many references point to them.
- If 0 references, object is collected.
- ❌ Issue: can’t handle circular references well.
🔹 Root References
These are always reachable:
- Global variables
- Currently executing function’s local variables
- Closures
🧠 Best Practices to Avoid Memory Leaks
- Remove event listeners when no longer needed.
- Avoid global variables where possible.
- Clean up DOM references.
- Be cautious with closures holding large objects.
Here’s a WordPress-friendly blog article covering JavaScript Garbage Collection, especially focusing on Mark-and-Sweep and Reference Counting:
JavaScript Garbage Collection Explained: Mark-and-Sweep vs Reference Counting
Efficient memory management is essential for building high-performance web applications. Thankfully, JavaScript handles memory allocation and garbage collection automatically. But understanding how it works under the hood can help you write cleaner, faster, and leak-free code.
In this blog, we’ll break down the two major garbage collection strategies used in JavaScript:
✅ Mark-and-Sweep
⚠️ Reference Counting (historical and problematic)
🔍 What is Garbage Collection?
Garbage Collection (GC) is a process by which the JavaScript engine reclaims memory occupied by objects that are no longer needed by the program.
JavaScript engines like V8 (Chrome, Node.js) and SpiderMonkey (Firefox) use advanced techniques to detect and clean up unused memory automatically.
🟢 1. Mark-and-Sweep (Modern GC)
This is the most widely used garbage collection algorithm today.
✅ How It Works:
- Mark Phase:
The GC starts at a set of “root” objects (likewindow,global, or local variables in scope). It recursively marks all objects reachable from the root. - Sweep Phase:
Any object not marked is considered unreachable and deleted from memory.
📌 Example:
function greet() {
let name = "Hari";
console.log("Hello " + name); // `name` is reachable
}
// After greet() runs, `name` becomes unreachable → swept
📈 Why It’s Great:
- Handles circular references
- Efficient for modern apps
- Doesn’t require manual memory management
🔴 2. Reference Counting (Legacy GC)
Used in older JavaScript engines or simpler environments.
⚙️ How It Works:
Each object has a reference counter.
- When an object is referenced, its counter increases.
- When a reference is removed, the counter decreases.
- When the counter hits 0, the object is deleted.
❌ Problem: Circular References
const a = {};
const b = {};
a.ref = b;
b.ref = a;
// Both objects reference each other → never collected!
Even though a and b are unreachable from the root, the GC fails to collect them due to their circular references.
✅ Summary: Which One Wins?
| Feature | Mark-and-Sweep | Reference Counting |
|---|---|---|
| Handles circular refs | ✅ Yes | ❌ No |
| Used in modern engines | ✅ Yes | ❌ No |
| Efficiency | ✅ Good | ⚠️ Poor in complex graphs |
🧼 How You Can Help the GC
While JS handles memory, you can prevent leaks by:
- Removing unused event listeners
- Avoiding global variables
- Clearing intervals/timeouts
- Breaking circular references manually when needed
💡 Bonus Tip: Use tools like Chrome DevTools > Memory tab to inspect retained memory and detect leaks in real projects!
🔚 Final Words
Understanding how garbage collection works in JavaScript can help you write more efficient code, debug better, and avoid subtle memory leaks — especially in long-running SPAs or heavy DOM apps.
🧠 Memory Leaks, Closures, and Heap Snapshots in JavaScript — A Deep Dive
JavaScript is a garbage-collected language, meaning the engine automatically cleans up memory. But despite this, memory leaks can still occur, especially in long-running applications like SPAs, dashboards, or games.
Let’s explore:
- 🔥 What causes Memory Leaks
- 🔐 How Closures can unintentionally retain memory
- 🔍 Using Heap Snapshots to investigate and fix leaks
🧨 What is a Memory Leak?
A memory leak occurs when memory that’s no longer needed isn’t released by the garbage collector, leading to increased RAM usage and degraded performance over time.
🔁 Common Causes of Memory Leaks:
- Global Variables
function run() {
leakedVar = "Oops!"; // Implicit global
}
- Detached DOM Elements
const button = document.getElementById("btn");
button.onclick = () => console.log("Clicked");
// If `button` is removed from DOM but `onclick` remains, memory is retained
- Timers or Intervals
setInterval(() => {
// This will run forever if not cleared!
}, 1000);
- Closures Capturing Large Data
🧵 Closures & Memory Retention
Closures allow a function to access variables from its lexical scope, even after the outer function has finished execution.
✅ Powerful, but Risky:
function outer() {
const largeArray = new Array(1e6).fill("💾");
return function inner() {
console.log(largeArray[0]);
};
}
const leak = outer(); // `largeArray` is now retained in memory
If inner is never used or disposed of, the huge array is never garbage collected, even though it’s no longer needed.
📌 Fix:
Avoid retaining unnecessary references in closures. Extract or nullify heavy variables if not needed after execution.
🧪 Debugging with Heap Snapshots
Modern browsers like Chrome let you take Heap Snapshots to inspect memory usage.
🔍 Steps in Chrome DevTools:
- Open DevTools → Memory Tab
- Click Take Snapshot
- Perform your app’s interaction
- Take another snapshot
- Compare → Look for retained objects
✅ What to look for:
- Detached DOM trees
- Growing arrays
- Objects retaining unexpected closures
- Event listeners that aren’t removed
🧼 Best Practices to Avoid Leaks
- ❌ Avoid globals
- 🧹 Clear timers and intervals
- 🔄 Remove event listeners on unmount
- 🧯 Break closure references if not needed
- 📦 Use memory profiling tools regularly
🔚 Wrapping Up
Memory leaks can silently kill performance, especially in long sessions or mobile apps. Mastering closures and profiling with heap snapshots can help you build faster, more stable JavaScript apps.
🧪 Example 1: Memory Leak via Closures
function createLeak() {
const hugeData = new Array(1e6).fill("🔥");
return function holdData() {
// Accessing hugeData creates a closure
console.log(hugeData[0]);
};
}
const leakyClosure = createLeak();
// leakyClosure still holds reference to hugeData
// hugeData will not be garbage collected
💡 Fix:
If hugeData is not needed anymore, break the reference:
function createFixed() {
let hugeData = new Array(1e6).fill("🔥");
const inner = () => {
console.log(hugeData[0]);
};
// Break reference after use
hugeData = null;
return inner;
}
🔍 Example 2: Debugging Memory Leak with Heap Snapshot (Chrome DevTools)
Let’s simulate a leak by attaching events to removed DOM elements:
<button id="add">Add Element</button>
<div id="container"></div>
document.getElementById("add").addEventListener("click", () => {
const el = document.createElement("button");
el.textContent = "Leaky Button";
// Adds an event listener → creates closure
el.addEventListener("click", () => {
console.log("Clicked!");
});
document.getElementById("container").appendChild(el);
el.remove(); // DOM element removed but listener stays in memory
});
🧪 How to Detect with Heap Snapshot:
- Open Chrome DevTools → Memory Tab
- Click Take Snapshot
- Click “Add Element” a few times
- Take another snapshot
- Search for
Detached HTMLButtonElementor retained event closures
💡 Fix:
Manually remove event listeners before deleting DOM nodes:
el.removeEventListener("click", listener);
el.remove();

1. Understanding Network Requests in JavaScript
- Slug:
/network-requests-javascript - Overview: Explain HTTP, client-server model, and how JS handles web communication.
- Keywords: network requests JavaScript, HTTP requests in web
- Sections:
- Synchronous vs Asynchronous
- HTTP Methods (GET, POST, etc.)
- Headers and Status Codes
- Real-world examples
2. Mastering the Fetch API in JavaScript
- Slug:
/fetch-api-javascript - Overview: Deep dive into
fetch(), its syntax, and use-cases. - Keywords: fetch api javascript, modern api call
- Code Examples:
- Basic GET/POST
- Custom headers
- Async/await usage
3. Working with FormData in JavaScript
- Slug:
/formdata-in-javascript - Overview: Handling HTML form submissions and file uploads using FormData.
- Keywords: formdata javascript, form upload js
- Code Examples:
- Uploading files
- Appending fields manually
- Sending FormData with
fetch()
4. Track Download Progress using Fetch
- Slug:
/fetch-download-progress - Overview: Track and display download progress (using Streams API).
- Keywords: fetch download progress js, progress bar js
- Code Examples:
- Progress bar UI
- Using
response.body.getReader()
5. How to Abort a Fetch Request
- Slug:
/abort-fetch-requests - Overview: Use
AbortControllerto cancel ongoing requests. - Keywords: cancel fetch request js, abortcontroller js
- Code Examples:
- Abort on timeout
- Abort on navigation
6. Cross-Origin Requests (CORS) Explained
- Slug:
/cross-origin-requests-cors - Overview: Deep dive into CORS headers and browser restrictions.
- Keywords: cors explained, cross origin request
- Visuals:
- CORS flow diagram
- Allowed vs blocked request example
7. URL Objects in JavaScript
- Slug:
/url-objects-javascript - Overview: Work with
URLandURLSearchParams. - Keywords: javascript url object, query string manipulation js
- Examples:
- Creating URLs dynamically
- Reading/modifying query params
8. XMLHttpRequest vs Fetch API
- Slug:
/xmlhttprequest-vs-fetch-api - Overview: Compare old and modern ways to handle requests.
- Keywords: xhr vs fetch, ajax request js
- Table:
- Syntax comparison
- Feature comparison (e.g., promises)
9. Resumable File Upload in JavaScript
- Slug:
/resumable-file-upload-js - Overview: Implement resumable uploads using chunks.
- Keywords: resumable upload js, large file upload
- Examples:
- Chunking files
- Uploading with progress and resume
10. Implementing Long Polling in JavaScript
- Slug:
/long-polling-javascript - Overview: Emulate real-time behavior with repeated requests.
- Keywords: long polling js, real-time web without websocket
- Examples:
- Long polling with setTimeout
- Use-cases in chat apps
11. Using WebSockets in JavaScript
- Slug:
/websockets-javascript - Overview: Persistent 2-way communication with server.
- Keywords: websocket javascript example, real-time chat js
- Examples:
- Basic connect/send
- Real-time app with Node.js backend
12. Understanding Server-Sent Events (SSE)
- Slug:
/server-sent-events-javascript - Overview: One-way real-time updates from server to client.
- Keywords: server sent events, sse javascript
- Examples:
- Real-time stock prices
- Auto-refresh data updates
Here’s a WordPress-friendly blog on HTTP Methods and Status Codes — SEO-optimized, structured, and beginner-to-advanced friendly.
🔗 Understanding HTTP Methods & Status Codes in Web Development
Slug: /http-methods-and-status-codes
When building web applications or APIs, understanding HTTP methods and status codes is essential for effective communication between the client and server.
📬 HTTP Methods: The Verbs of the Web
Each HTTP method defines a type of action to perform on a resource.
| Method | Description | Example |
|---|---|---|
| GET | Retrieve data (safe, idempotent) | GET /users |
| POST | Create new data | POST /users |
| PUT | Replace existing data | PUT /users/123 |
| PATCH | Update part of a resource | PATCH /users/123 |
| DELETE | Remove a resource | DELETE /users/123 |
| OPTIONS | Get supported methods of a server | OPTIONS / |
| HEAD | Same as GET but returns headers only | HEAD /users |
🧠 Tip: Use
GETfor reads,POSTfor creation,PUTorPATCHfor updates, andDELETEto remove.
📟 HTTP Status Codes: The Web’s Response Language
These codes help you understand the result of an HTTP request. Grouped by categories:
✅ 1xx – Informational
| Code | Meaning |
|---|---|
| 100 | Continue |
| 101 | Switching Protocols |
🟢 2xx – Success
| Code | Meaning |
|---|---|
| 200 | OK |
| 201 | Created |
| 202 | Accepted |
| 204 | No Content |
🟡 3xx – Redirection
| Code | Meaning |
|---|---|
| 301 | Moved Permanently |
| 302 | Found |
| 304 | Not Modified |
🔴 4xx – Client Errors
| Code | Meaning |
|---|---|
| 400 | Bad Request |
| 401 | Unauthorized |
| 403 | Forbidden |
| 404 | Not Found |
| 409 | Conflict |
🔥 5xx – Server Errors
| Code | Meaning |
|---|---|
| 500 | Internal Server Error |
| 502 | Bad Gateway |
| 503 | Service Unavailable |
💡 Real-World Example (Using fetch)
fetch('https://api.example.com/users/1')
.then(response => {
if (response.ok) {
return response.json();
} else {
throw new Error(`Error: ${response.status}`);
}
})
.then(data => console.log(data))
.catch(err => console.error(err));
📘 Common Scenarios
POST /signupreturns 201 CreatedGET /profilereturns 200 OKGET /private-datareturns 401 UnauthorizedDELETE /users/999returns 404 Not Found
🎯 Summary
| Method | Common Status |
|---|---|
| GET | 200, 404 |
| POST | 201, 400 |
| PUT | 200, 204, 400 |
| DELETE | 200, 204, 404 |
🌐 Complete Guide to HTTP Methods and Status Codes for Web Developers
Slug: /http-methods-status-codes-guide
📖 What is HTTP?
HTTP (Hypertext Transfer Protocol) is the foundation of communication on the web. It allows the client (like your browser) to talk to a server to fetch or send data.
Example:
GET /blog/123 HTTP/1.1
Host: www.example.com
🔨 HTTP Methods: The Action Types
HTTP methods define what action you want to perform on a resource (like data, file, user, etc.).
1. GET
- Purpose: Retrieve data from the server.
- Idempotent: Yes
- Safe: Yes
- Example: Fetching blog posts.
GET /posts HTTP/1.1
fetch('/posts')
2. POST
- Purpose: Create a new resource.
- Idempotent: No
- Safe: No
- Example: Creating a new user.
POST /users HTTP/1.1
fetch('/users', {
method: 'POST',
body: JSON.stringify({ name: 'Hari' }),
headers: { 'Content-Type': 'application/json' }
})
3. PUT
- Purpose: Update or replace an existing resource.
- Idempotent: Yes
- Safe: No
- Example: Replacing a blog post.
PUT /posts/123 HTTP/1.1
4. PATCH
- Purpose: Partially update a resource.
- Idempotent: Yes
- Safe: No
- Example: Update just the blog title.
PATCH /posts/123 HTTP/1.1
5. DELETE
- Purpose: Remove a resource.
- Idempotent: Yes
- Safe: No
- Example: Deleting a user account.
DELETE /users/5 HTTP/1.1
6. HEAD
- Like
GET, but only returns headers. - Useful for checking resource availability without downloading the content.
7. OPTIONS
- Returns allowed HTTP methods for a resource.
- Often used in CORS preflight requests.
🚦 HTTP Status Codes: The Server’s Response
Status codes tell the client what happened during the request.
✅ 1xx – Informational
| Code | Meaning | Use Case |
|---|---|---|
| 100 | Continue | Client should continue the request |
| 101 | Switching Protocols | Server is switching protocols |
🟢 2xx – Success
| Code | Meaning | Use Case |
|---|---|---|
| 200 | OK | Everything worked as expected |
| 201 | Created | Resource created (POST) |
| 202 | Accepted | Request accepted, async proc. |
| 204 | No Content | Success, no body returned |
🟡 3xx – Redirection
| Code | Meaning | Use Case |
|---|---|---|
| 301 | Moved Permanently | Resource moved (URL changed) |
| 302 | Found | Temporary redirect |
| 304 | Not Modified | Caching – content hasn’t changed |
🔴 4xx – Client Errors
| Code | Meaning | Use Case |
|---|---|---|
| 400 | Bad Request | Missing or invalid parameters |
| 401 | Unauthorized | Missing or invalid auth token |
| 403 | Forbidden | Authenticated but no permission |
| 404 | Not Found | Resource doesn’t exist |
| 409 | Conflict | Resource conflict (e.g., duplicate) |
🔥 5xx – Server Errors
| Code | Meaning | Use Case |
|---|---|---|
| 500 | Internal Server Error | Generic server crash |
| 502 | Bad Gateway | Invalid response from upstream server |
| 503 | Service Unavailable | Server is temporarily offline |
📈 Visual Summary (Infographic Ready)
- GET – Read 📖
- POST – Create ➕
- PUT – Replace 🔁
- PATCH – Modify 🛠
- DELETE – Remove ❌
Method | Safe | Idempotent | Used for
----------|------|------------|----------
GET | ✅ | ✅ | Reading data
POST | ❌ | ❌ | Creating data
PUT | ❌ | ✅ | Replacing data
PATCH | ❌ | ✅ | Updating part of data
DELETE | ❌ | ✅ | Deleting data
💡 Common Developer Mistakes
- Sending body in a GET request (don’t do this!)
- Using PUT when PATCH is better (leads to data overwrite)
- Not checking for
response.okin fetch - Ignoring 304 Not Modified for caching
- Assuming 200 = always success (could be partial error inside JSON)
👨💻 Real-World Example: Error Handling in Fetch
fetch('/api/users/999')
.then(res => {
if (!res.ok) {
throw new Error(`HTTP error: ${res.status}`);
}
return res.json();
})
.then(data => console.log(data))
.catch(err => console.error('Error:', err.message));
📌 Conclusion
Understanding HTTP methods and status codes isn’t just for backend developers. Every frontend developer, API consumer, or tester benefits from knowing:
- What action they are sending (
GET,POST, etc.) - What response they’re getting back (
200,404,500)
This knowledge improves debugging, API design, error handling, and performance optimization.
🧠 HTTP Headers: The Unsung Heroes of Web Communication
When your browser talks to a server, it doesn’t just ask for a webpage—it sends a full HTTP request packed with headers. Likewise, the server responds with its own set of headers. These HTTP headers are the metadata of the web—they define how content is delivered, cached, secured, and understood.
Let’s break it down for both beginners and pros.
📬 What Are HTTP Headers?
HTTP headers are key-value pairs sent in HTTP requests and responses. They provide essential information about the request/response like:
- Content type (
Content-Type) - Caching rules (
Cache-Control) - Authentication (
Authorization) - Language (
Accept-Language) - Security policies (
Strict-Transport-Security)
⚙️ Types of HTTP Headers
1. Request Headers
Sent from the client (usually a browser) to the server.
| Header | Description |
|---|---|
Host | Specifies the domain name |
User-Agent | Identifies the client (browser, bot, etc.) |
Accept | Specifies accepted response formats (e.g., JSON, HTML) |
Authorization | Used to pass credentials (e.g., Bearer token) |
Cookie | Sends stored cookies to the server |
2. Response Headers
Sent from the server back to the client.
| Header | Description |
|---|---|
Content-Type | Type of content returned (e.g., application/json) |
Set-Cookie | Instructs the browser to store cookies |
Cache-Control | Defines caching rules |
Access-Control-Allow-Origin | CORS policy settings |
Strict-Transport-Security | Enforces HTTPS |
🔐 Important Security Headers
| Header | Purpose |
|---|---|
Content-Security-Policy | Prevents XSS and data injection |
X-Content-Type-Options | Stops MIME type sniffing |
X-Frame-Options | Prevents clickjacking |
Referrer-Policy | Controls how much referrer info is sent |
Permissions-Policy | Restricts browser features (like camera, mic) |
🌍 Real-World Example
GET /home HTTP/1.1
Host: example.com
User-Agent: Mozilla/5.0
Accept: text/html
Authorization: Bearer eyJhbGciOiJIUzI1NiIsInR5cCI6...
HTTP/1.1 200 OK
Content-Type: text/html
Set-Cookie: sessionId=abc123; Secure; HttpOnly
Cache-Control: no-cache
Strict-Transport-Security: max-age=31536000; includeSubDomains
📦 Custom Headers
You can define your own headers like:
X-Custom-Token: 123456
X-Requested-With: XMLHttpRequest
These are helpful for internal logic, APIs, or debugging.
📈 Use in APIs
For RESTful APIs, headers are crucial:
Authorization: for bearer tokens or API keysContent-Type:application/jsonAccept:application/jsonX-RateLimit-Limit: shows API rate limit
✅ Best Practices
- Always set
Content-Type - Use security headers to harden your app
- Don’t expose sensitive data in headers
- Minimize use of custom headers unless necessary
🧠 Understanding HTTP Caching Headers: Boosting Web Performance
Efficient caching is crucial for faster load times and a smoother user experience. HTTP provides several caching-related headers that control how browsers and proxies store and reuse responses. Let’s explore the most important ones:
📌 1. Age
Definition:
Indicates how long (in seconds) a response has been stored in a proxy cache.
Use Case:
Helps browsers or intermediate caches determine how “fresh” the cached copy is.
Age: 120
📌 2. Cache-Control
Definition:
Controls caching behavior in both requests and responses.
Common Directives:
no-cache– Forces validation with the server.no-store– Do not store anywhere (privacy/security).public– Can be stored by any cache.private– Only the browser can cache.max-age=3600– Response is fresh for 1 hour.
Cache-Control: public, max-age=3600
📌 3. Clear-Site-Data
Definition:
Clears browsing data like cookies, cache, storage, and execution contexts when sent by the server.
Use Case:
Useful after logout or when resetting site data during updates.
Clear-Site-Data: "cache", "cookies", "storage"
📌 4. Expires
Definition:
Sets a specific date/time after which the cached response is considered stale.
Use Case:
Legacy HTTP/1.0-compatible way of defining freshness.
Expires: Wed, 23 Jul 2025 10:00:00 GMT
📌 5. No-Vary-Search (Experimental)
Definition:
Specifies rules for how URL query parameters affect caching.
Use Case:
Optimizes caching by treating URLs with similar structure but different query strings as the same (or different), depending on rules.
No-Vary-Search: {"exclude": ["utm_*", "ref"], "vary-by-default": false}
⚙️ HTTP Conditional Requests: Smart Caching with Headers
Conditional headers are essential for efficient web performance, enabling browsers and proxies to determine when to reuse cached data and when to fetch fresh content.
Let’s break down each header and its role:
📌 1. Last-Modified
Definition:
Timestamp of the last update to the resource.
Used With:
If-Modified-SinceIf-Unmodified-Since
Pros: Easy to implement.
Cons: Less precise than ETag.
Last-Modified: Wed, 22 Jul 2025 10:00:00 GMT
📌 2. ETag (Entity Tag)
Definition:
A unique identifier (string) for the version of a resource. Helps in precise cache validation.
Used With:
If-MatchIf-None-Match
ETag: "abc123xyz"
📌 3. If-Match
Definition:
Request only succeeds if the current resource matches one of the listed ETags.
Use Case:
Optimistic concurrency control – update only if the document hasn’t changed.
If-Match: "abc123xyz"
📌 4. If-None-Match
Definition:
Request succeeds only if the current resource does NOT match any listed ETags.
Use Case:
- Prevent overwriting existing resources.
- Used in safe methods like
GETto refresh cache only if changed.
If-None-Match: "abc123xyz"
📌 5. If-Modified-Since
Definition:
Fetch the resource only if it’s modified after the specified date.
Use Case:
Efficient GET requests – avoid downloading unchanged files.
If-Modified-Since: Wed, 22 Jul 2025 10:00:00 GMT
📌 6. If-Unmodified-Since
Definition:
Execute the request only if the resource has NOT changed since the given date.
Use Case:
Concurrency control – useful during PATCH, PUT, or range-based requests.
If-Unmodified-Since: Wed, 22 Jul 2025 10:00:00 GMT
📌 7. Vary
Definition:
Informs the cache which request headers affect the response content.
Example:
If a server returns different responses for different Accept-Encoding, it should vary on that.
Vary: Accept-Encoding
✅ Final Tip
By leveraging conditional headers, you can:
- Minimize data transfer
- Improve load times
- Reduce server load
- Enable smart cache validation at scale
🌐 HTTP Headers: Connection Management & Content Negotiation Explained
Understanding how clients and servers manage connections and agree on the format of exchanged data is essential to optimizing performance and user experience. Here’s a detailed breakdown of Connection Management and Content Negotiation headers.
🔗 Connection Management
These headers define how long a connection between client and server remains open:
📌 1. Connection
Definition:
Controls whether the network connection stays open after the current transaction finishes.
Common Values:
keep-alive– Persistent connectionclose– Terminate after current request
Connection: keep-alive
📌 2. Keep-Alive
Definition:
Specifies how long and how many requests a persistent connection should allow.
Keep-Alive: timeout=5, max=100
Use Case:
Improves performance by reusing the same connection instead of opening a new one.
🧠 Content Negotiation
The browser and server communicate to agree on the best format, language, or encoding for a response.
📌 3. Accept
Definition:
Indicates the MIME types that the client can understand.
Accept: text/html, application/json
Use Case:
A browser might prefer HTML, while an API client may request JSON.
📌 4. Accept-Encoding
Definition:
Specifies the compression algorithms (like gzip, br, deflate) that the client supports.
Accept-Encoding: gzip, br
Use Case:
Helps reduce payload size and improve load speed.
📌 5. Accept-Language
Definition:
Informs the server about the preferred human languages.
Accept-Language: en-US,en;q=0.9,hi;q=0.8
Use Case:
Allows delivering content in the user’s preferred language.
📌 6. Accept-Patch
Definition:
Tells the client what media types the server accepts for PATCH requests.
Accept-Patch: application/json-patch+json
📌 7. Accept-Post
Definition:
Tells the client what media types the server accepts for POST requests.
Accept-Post: application/json
✅ Final Words
Using the right headers:
- Saves bandwidth 💾
- Improves load speed ⚡
- Enhances internationalization 🌍
- Supports flexible API integrations 🤝
Whether you’re building REST APIs, optimizing website performance, or enhancing multilingual support, understanding these headers is essential.
🎛️ HTTP Control Headers: Expect and Max-Forwards Explained
When handling complex HTTP requests or debugging network hops, control headers play an important role in managing expectations and behavior across intermediaries.
Let’s explore two rarely discussed but powerful headers: Expect and Max-Forwards.
📌 1. Expect
Definition:
The Expect header tells the server what the client expects before proceeding with the request body.
Common Value:
Expect: 100-continue
Use Case:
- Used in large POST or PUT requests.
- Prevents sending large data unless the server acknowledges it can handle it.
- The server replies with
100 Continueto proceed or417 Expectation Failed.
Example:
POST /upload HTTP/1.1
Host: example.com
Content-Length: 5242880
Expect: 100-continue
📌 2. Max-Forwards
Definition:
Used with TRACE and OPTIONS methods to limit how many times a request is forwarded by proxies.
Use Case:
- Prevents infinite loops in proxy chains.
- Acts like a TTL (Time-To-Live) for HTTP requests.
Example:
TRACE / HTTP/1.1
Host: example.com
Max-Forwards: 3
If the number reaches 0, the request is processed by the current server and not forwarded further.
✅ Final Insight
These headers are rarely needed for everyday browsing but are crucial when:
- Debugging complex proxy chains 🔁
- Sending large payloads efficiently 📦
- Optimizing client-server communication 🎯
Use them wisely in your APIs, enterprise networking, or debugging tools.
🍪 HTTP Cookie Headers: Cookie and Set-Cookie Explained
Cookies are essential to making the web stateful — enabling login sessions, preferences, tracking, and personalization. Let’s break down the two key HTTP headers involved in cookie handling: Cookie and Set-Cookie.
📌 1. Cookie
Definition:
The Cookie header is sent from the client (browser) to the server. It contains all previously stored cookies for the current domain.
Use Case:
Used to maintain sessions, store preferences, and enable authenticated requests.
Example:
Cookie: sessionId=abc123; theme=dark
This tells the server: “Hey, I’ve already been here — here’s my session info.”
📌 2. Set-Cookie
Definition:
The Set-Cookie header is sent from the server to the client. It tells the browser to store a new cookie.
Attributes:
Expires/Max-Age– Defines cookie lifespanPath– Scope of URL the cookie applies toDomain– Specific domain/subdomainSecure– Transmit only over HTTPSHttpOnly– Inaccessible to JavaScriptSameSite– Controls cross-site behavior (Strict,Lax, orNone)
Example:
Set-Cookie: sessionId=abc123; Max-Age=3600; Secure; HttpOnly; SameSite=Lax
✅ Final Notes
🔐 Security Tip: Always use Secure and HttpOnly for sensitive cookies.
🌍 User Experience: Cookies enable persistent sessions, language preferences, and cart data.
⚖️ Privacy Caution: Misuse of cookies (especially third-party) can lead to privacy issues and is heavily regulated by GDPR and other laws.
Cookies are the cornerstone of stateful web applications.
Use them wisely for performance, personalization, and security.
🌍 Understanding CORS (Cross-Origin Resource Sharing) in HTTP Headers
Modern web applications often need to request resources across different origins — say, a frontend hosted on frontend.com accessing an API on api.backend.com. To do this securely, browsers enforce the Same-Origin Policy, and CORS headers are used to relax those restrictions where safe.
Let’s break down the most important CORS headers you should know:
🚦 CORS Basics
When a browser makes a cross-origin request, it may first send a preflight request (OPTIONS) to ask the server if it allows the actual request. The server then responds with specific CORS headers.
📌 1. Access-Control-Allow-Origin
Definition:
Specifies which origin(s) are allowed to access the resource.
Example:
Access-Control-Allow-Origin: https://frontend.com
📌 2. Access-Control-Allow-Credentials
Definition:
Indicates whether the response can be shared when cookies, authorization headers, or TLS client certificates are involved.
Example:
Access-Control-Allow-Credentials: true
📌 3. Access-Control-Allow-Methods
Definition:
Lists the HTTP methods allowed when accessing the resource (in response to a preflight request).
Example:
Access-Control-Allow-Methods: GET, POST, PUT, DELETE
📌 4. Access-Control-Allow-Headers
Definition:
Specifies which custom headers can be used in the actual request.
Example:
Access-Control-Allow-Headers: Content-Type, Authorization
📌 5. Access-Control-Expose-Headers
Definition:
Tells the browser which headers in the response are safe to expose to frontend JavaScript.
Example:
Access-Control-Expose-Headers: X-Rate-Limit, X-Custom-Header
📌 6. Access-Control-Max-Age
Definition:
Defines how long the results of a preflight request can be cached by the browser (in seconds).
Example:
Access-Control-Max-Age: 600
📌 7. Access-Control-Request-Method
Definition:
Used in preflight requests to specify the actual HTTP method that will be used.
Example:
Access-Control-Request-Method: POST
📌 8. Access-Control-Request-Headers
Definition:
Used in preflight requests to list custom headers the client wants to send.
Example:
Access-Control-Request-Headers: X-Auth-Token, Content-Type
📌 9. Origin
Definition:
Included in every cross-origin request; tells the server where the request originated.
Example:
Origin: https://frontend.com
📌 10. Timing-Allow-Origin
Definition:
Controls which origins can access detailed timing information for performance measurements.
Example:
Timing-Allow-Origin: https://frontend.com
✅ Final Thoughts
Correct use of CORS headers:
- Enables secure cross-origin requests
- Protects user credentials
- Supports frontend-backend separation
- Helps with APIs and third-party integrations
📥 HTTP Header: Content-Disposition for File Downloads
When you want a browser to download a file instead of opening it directly, the Content-Disposition header is your best friend.
📌 What is Content-Disposition?
By default, when a browser receives a response like an image, PDF, or plain text, it tries to display the content inline. But sometimes, you want the browser to prompt the user to download the file instead.
That’s where the Content-Disposition header comes in.
🛠️ Syntax
Content-Disposition: attachment; filename="example.pdf"
inline– (default) Display the content directly in the browser.attachment– Prompt a “Save As” dialog for downloading.filename– Suggests a default file name for saving.
📄 Example: Force File Download
HTTP/1.1 200 OK
Content-Type: application/pdf
Content-Disposition: attachment; filename="invoice_2025.pdf"
➡️ The browser will trigger a download window for invoice_2025.pdf.
📄 Example: Display Inline
Content-Disposition: inline; filename="preview.pdf"
➡️ The PDF will open directly in the browser (if supported).
✅ Use Cases
- 📂 Download invoices, reports, images
- 📄 Export files from dashboards
- 📎 Deliver email attachments via API
🔐 Security Tip
Avoid setting Content-Disposition: attachment with unvalidated file names to prevent header injection or directory traversal vulnerabilities.
Final Thoughts:
The Content-Disposition header provides fine control over how browsers handle content delivery, enabling both seamless inline previews and secure file downloads.
🔐 Integrity Policy & 📦 Message Body HTTP Headers Explained
HTTP headers do more than just pass metadata — they enforce security, define content behavior, and improve user experience. This article explores:
- Integrity policies that enhance resource security
- Message body headers that describe how content is packaged and sent
🔒 Integrity Policy Headers (Subresource Integrity)
These headers enforce or report whether resources like scripts or styles are delivered without tampering.
📌 1. Integrity-Policy
Definition:
Tells the browser to enforce Subresource Integrity (SRI) for specific resource types (like scripts or images).
Example:
Integrity-Policy: require-sri-for script style
🔒 Ensures any <script> or <link> must include an integrity attribute — otherwise it gets blocked.
📌 2. Integrity-Policy-Report-Only
Definition:
Used for testing. Violations are reported but not blocked.
Example:
Integrity-Policy-Report-Only: require-sri-for script
🔍 Good for auditing your website before enforcing the policy live.
📦 Message Body Information Headers
These headers tell the browser how to understand and decode the body of the HTTP response.
📌 1. Content-Length
Definition:
Specifies the size of the response body in bytes.
Example:
Content-Length: 3487
⚙️ Helps with progress indicators, streaming, and proper data transfer.
📌 2. Content-Type
Definition:
Tells the browser the media type of the resource (e.g. HTML, JSON, JPEG).
Example:
Content-Type: application/json
🎯 Critical for APIs and dynamic rendering.
📌 3. Content-Encoding
Definition:
Specifies the compression algorithm used (e.g. gzip, br).
Example:
Content-Encoding: gzip
💨 Used to reduce file size and accelerate page load.
📌 4. Content-Language
Definition:
Specifies the human language intended for the content.
Example:
Content-Language: en-US
🌍 Helps serve the correct language version of a site.
📌 5. Content-Location
Definition:
Specifies an alternate URI for the content.
Example:
Content-Location: /cached/article.html
🔁 Useful for caching, mirrors, and translation versions.
✅ Final Thoughts
🔐 Integrity policies keep your site secure from tampered CDN or third-party resources.
📦 Message body headers help browsers correctly process, display, and cache content.
Whether you’re building secure SPAs, optimizing API responses, or tuning your CDN, understanding these headers is crucial.
📦 HTTP Message Body Information Headers — Explained with Examples
When a client receives a response from a server, it needs to understand how to interpret the body of that response. This is where Message Body Information headers come in — they describe the size, type, encoding, language, and source location of the content.
Let’s break them down one by one:
📌 1. Content-Length
Definition:
Specifies the size of the resource body in bytes.
Purpose:
- Allows the client to know how much data to expect.
- Useful for progress tracking or when streaming responses.
Example:
Content-Length: 5248
📝 If the body is exactly 5248 bytes, the browser knows when to stop reading.
📌 2. Content-Type
Definition:
Defines the MIME type of the resource — this tells the browser or client how to interpret the data.
Common Values:
text/htmlapplication/jsonimage/jpegapplication/pdf
Example:
Content-Type: application/json
💡 Crucial for rendering webpages or processing API responses properly.
📌 3. Content-Encoding
Definition:
Specifies the compression algorithm used to reduce the size of the response body.
Common Values:
gzipbr(Brotli)deflate
Example:
Content-Encoding: gzip
🚀 Helps reduce bandwidth and improve page load speed — browsers will decompress the content automatically.
📌 4. Content-Language
Definition:
Specifies the natural human language of the content, allowing clients to serve or prefer localized content.
Example:
Content-Language: en-US
🌍 Important for internationalization (i18n), SEO, and accessibility.
📌 5. Content-Location
Definition:
Specifies an alternate URL for the content — where the resource can be found or is mirrored.
Use Cases:
- Redirecting to a cached version
- Serving a localized copy
- Indicating original location of transformed content
Example:
Content-Location: /articles/en/tutorial.html
🔁 Helps clients and caches find or validate content efficiently.
✅ Summary Table
| Header | Description | Example |
|---|---|---|
Content-Length | Size of the body in bytes | Content-Length: 5248 |
Content-Type | MIME type of the content | Content-Type: text/html |
Content-Encoding | Compression algorithm used | Content-Encoding: gzip |
Content-Language | Human language of the content | Content-Language: en-US |
Content-Location | Alternate location of the returned data | Content-Location: /cached/page |
🚀 Final Thoughts
Understanding and using these headers correctly will help you:
- Optimize performance ⚡
- Improve SEO 🌐
- Enable localization 🌍
- Ensure accurate content rendering 🧩
📦 Complete Guide to HTTP Message Body Information Headers
When a web server sends content to a browser or API client, it uses message body headers to describe what’s being sent — such as its size, type, compression, language, and even where else it might live.
Let’s explore each key header, with clear definitions, usage examples, and real-life applications.
🔢 1. Content-Length
📘 Definition:
Specifies the exact size (in bytes) of the response body.
📌 Why it matters:
- Helps browsers know when to stop reading.
- Used to track download progress.
- Required for persistent connections.
🧪 Example:
Content-Length: 1048576
This tells the browser that the response body is 1 MB.
🔍 Real-world usage:
Downloading a file or streaming video/audio over HTTP/1.1 where the content length must be known.
⚠️ Caution:
Mismatched content length can lead to incomplete reads or hanging connections.
🧾 2. Content-Type
📘 Definition:
Specifies the MIME type of the data sent to the client so it knows how to handle it.
🧪 Examples:
Content-Type: text/html
Content-Type: application/json
Content-Type: image/png
📌 Why it matters:
- Browsers need this to render or download content correctly.
- APIs use this to parse responses.
🔍 Real-world usage:
- A webpage returns
text/htmlfor HTML content. - A REST API returns
application/json.
🛠 Frontend use:
fetch('/api/data', {
headers: { 'Accept': 'application/json' }
});
🗜️ 3. Content-Encoding
📘 Definition:
Specifies the compression algorithm used to reduce data size.
🧪 Examples:
Content-Encoding: gzip
Content-Encoding: br
📌 Why it matters:
- Improves performance by shrinking payloads.
- Client decompresses content automatically.
🔍 Real-world usage:
A 2MB JSON API response might compress to 200KB using gzip.
🛠 Example from server (Express.js):
const compression = require('compression');
app.use(compression());
Which results in:
Content-Encoding: gzip
⚠️ Note:
Content length must reflect compressed size, not original.
🌍 4. Content-Language
📘 Definition:
Specifies the intended human language for the content.
🧪 Examples:
Content-Language: en-US
Content-Language: fr-CA
📌 Why it matters:
- Helps with localization.
- Search engines use it for geo-targeted SEO.
- Users see content in their preferred language.
🔍 Real-world usage:
A French version of a product page may return:
Content-Language: fr-FR
🛠 Tip:
You can detect and adapt language in React or Next.js apps using this value.
🌐 5. Content-Location
📘 Definition:
Indicates the actual or alternate URL for the response content.
🧪 Examples:
Content-Location: /en/article/intro.html
Content-Location: https://cdn.example.com/image.jpg
📌 Why it matters:
- Can be used to identify the origin of the content.
- Useful for caching and versioning.
- Allows multiple language versions to share a canonical endpoint.
🔍 Real-world usage:
A REST API might respond to:
GET /products/123?lang=es
with:
Content-Location: /es/products/123
📦 Used with:
Vary: Accept-Language- Caching headers (like
ETagandExpires)
✅ Final Takeaways
| Header | What It Does | Example | Common Use Case |
|---|---|---|---|
Content-Length | Declares exact size of content | Content-Length: 5248 | File downloads, streamed media |
Content-Type | Describes MIME type | Content-Type: application/json | Web pages, APIs, file previews |
Content-Encoding | Indicates compression method | Content-Encoding: gzip | Speeding up large responses |
Content-Language | Declares human-readable language | Content-Language: en-US | Localization, SEO, UX |
Content-Location | Indicates alternate or original resource URL | Content-Location: /cached/page | Language variants, CDNs, caches |
🎯 Pro Tip for Devs
You can inspect these headers in Chrome DevTools → Network tab → click on any request → Headers section → Response Headers.
🎛️ HTTP Preference Headers: Prefer and Preference-Applied Explained
In modern APIs, clients often want to tweak how servers behave — maybe they want fewer response fields, asynchronous processing, or a silent update. That’s where HTTP preference headers like Prefer and Preference-Applied come into play.
These headers are not used by browsers natively but are incredibly useful for custom clients, APIs, and enterprise applications.
📌 1. Prefer Header
📘 Definition:
Used in HTTP requests to indicate optional preferences the client wants the server to honor — if possible.
🛠 Syntax:
Prefer: return=minimal
💡 Common Preferences:
return=minimal– Don’t return a full response body (just status).respond-async– Server should accept the request and respond later (asynchronous).handling=lenient– Process even if errors are found.wait=10– Client is willing to wait 10 seconds before timeout.
🧪 Examples:
➡️ Minimal response (PATCH example):
PATCH /user/123 HTTP/1.1
Prefer: return=minimal
Content-Type: application/json
{ "email": "new@example.com" }
Server responds with:
204 No Content
Instead of returning the full updated user object.
📌 2. Preference-Applied Header
📘 Definition:
Sent in the response to indicate which preferences from the Prefer header were actually honored.
🧪 Example:
HTTP/1.1 204 No Content
Preference-Applied: return=minimal
This tells the client: “Yes, I honored your request for a minimal response.”
🔍 Real-world usage:
Used heavily in REST APIs like Microsoft Graph API, Open Data Protocol (OData), and Google APIs.
🧠 Why Use Preferences?
- Improve performance by reducing response payloads.
- Add flexibility for API consumers.
- Allow non-breaking optional enhancements.
- Great for mobile clients or asynchronous systems.
✅ Summary Table
| Header | Direction | Purpose | Example |
|---|---|---|---|
Prefer | Request | Ask for specific behavior | Prefer: return=minimal |
Preference-Applied | Response | Tell which preference was accepted | Preference-Applied: return=minimal |
🚀 Bonus Tip
You can implement Prefer headers in custom clients using tools like:
fetchin JavaScriptaxioswithheadersoptioncurl:
curl -X PATCH -H "Prefer: return=minimal" -d '{...}' https://api.example.com/resource
🚀 1. Express.js (Node.js) Example
📁 server.js
const express = require('express');
const app = express();
app.use(express.json());
app.patch('/user/:id', (req, res) => {
const prefer = req.header('Prefer');
// Simulate update logic
const updatedUser = { id: req.params.id, email: req.body.email };
// Handle 'Prefer: return=minimal'
if (prefer === 'return=minimal') {
res.set('Preference-Applied', 'return=minimal');
return res.status(204).send(); // No Content
}
// Default full response
res.set('Preference-Applied', 'return=representation');
res.status(200).json(updatedUser);
});
app.listen(3000, () => console.log('Server running at http://localhost:3000'));
⚙️ 2. FastAPI (Python) Example
📁 main.py
from fastapi import FastAPI, Request, Header, Response
from pydantic import BaseModel
app = FastAPI()
class UserUpdate(BaseModel):
email: str
@app.patch("/user/{user_id}")
async def update_user(user_id: str, user: UserUpdate, prefer: str = Header(None)):
updated_user = {"id": user_id, "email": user.email}
if prefer == "return=minimal":
return Response(status_code=204, headers={"Preference-Applied": "return=minimal"})
return {
"Preference-Applied": "return=representation",
"user": updated_user
}
🧪 Test with curl
curl -X PATCH http://localhost:3000/user/123 \
-H "Content-Type: application/json" \
-H "Prefer: return=minimal" \
-d '{"email": "new@example.com"}' -i
🛡️ Understanding HTTP Proxy Headers: Forwarded and Via
When requests pass through proxy servers, certain client details can be altered or hidden. To maintain transparency and traceability, HTTP introduces special headers like Forwarded and Via.
Let’s break them down with real examples.
📌 1. Forwarded Header
📘 Definition:
The Forwarded header carries information about the original client, host, and protocol used before the request passed through a proxy.
🧪 Example:
Forwarded: for=192.0.2.43; proto=https; by=203.0.113.60; host=example.com
for– IP of the original clientproto– Original protocol (httporhttps)by– The proxy server that relayed the requesthost– OriginalHostrequested
🔍 Real-world use cases:
- Reverse proxies (like NGINX, Cloudflare) use this to pass along the true origin of the request.
- Load balancers and microservices use this to trace request origins.
🔐 Security Tip:
Use this for audit logging, geo-location, and rate-limiting based on client IP.
📌 2. Via Header
📘 Definition:
The Via header lists all intermediate proxies (forward or reverse) the request/response passed through.
🧪 Example:
Via: 1.1 cache.example.com, 1.1 loadbalancer.local
- Each proxy adds its own identifier.
- Can appear in both request and response headers.
🔍 Real-world use cases:
- Helps debug multi-proxy environments
- Assists with troubleshooting slowdowns
- Allows clients to detect interception or modification of traffic
✅ Summary Table
| Header | Direction | Purpose | Example |
|---|---|---|---|
Forwarded | Request | Carries original client & proxy details | for=192.0.2.43; proto=https; by=203.0.113.60 |
Via | Both | Lists intermediate proxies (hops) | Via: 1.1 cache.example.com, 1.1 loadbalancer.local |
🔄 Related Headers
X-Forwarded-For– Older, still widely used alternativeX-Forwarded-Proto,X-Real-IP– Custom headers used in reverse proxies like NGINX
🧠 Pro Tip for Devs
To ensure accurate tracking:
- In Express.js, enable:
app.set('trust proxy', true);
- In FastAPI, use
client.hostfromRequest.clientcarefully if behind a proxy.
🎯 HTTP Range Requests: Resume Downloads, Stream Media & Optimize Data Transfer
HTTP range requests allow clients to request only part of a file, instead of the full content. This is essential for:
- 🎵 Media players with fast-forward support
- 📥 Download managers that pause/resume
- 📊 Data tools accessing large datasets efficiently
Let’s explore the key headers involved in range requests.
📌 1. Accept-Ranges
🧾 Definition:
Tells the client whether the server supports range requests, and in what unit (e.g. bytes).
🧪 Example:
Accept-Ranges: bytes
📌 Use Case:
The server is telling the client: “Yes, I support partial file delivery in bytes.”
📌 2. Range
🧾 Definition:
Used by the client to request a specific byte range of a resource.
🧪 Example:
Range: bytes=0-999
This asks for bytes 0 to 999 of the file — useful when resuming downloads or streaming a portion of a video.
📌 Use Case:
A download manager requesting the remaining 10MB of a 100MB file.
📌 3. If-Range
🧾 Definition:
A conditional range request. It tells the server to send the specified range only if the file hasn’t changed (using ETag or date).
🧪 Example:
If-Range: "abc123etag"
Range: bytes=500-999
If the resource matches ETag "abc123etag", the server returns the range. Otherwise, it returns the full content to avoid version mismatch.
📌 Use Case:
Prevent downloading two incompatible pieces of a file after an update.
📌 4. Content-Range
🧾 Definition:
Sent in the server response to indicate what part of the file is being returned.
🧪 Example:
Content-Range: bytes 0-999/5000
This means: “I’m sending bytes 0–999 out of a total of 5000 bytes.”
📌 Use Case:
Streaming audio chunks, resuming large PDF downloads.
🧠 Real-World Example
Client Request:
GET /video.mp4 HTTP/1.1
Host: example.com
Range: bytes=1000-1999
Server Response:
HTTP/1.1 206 Partial Content
Accept-Ranges: bytes
Content-Range: bytes 1000-1999/500000
Content-Length: 1000
Content-Type: video/mp4
✅ Benefits of Range Requests
| Feature | Description |
|---|---|
| 📶 Efficient | Don’t re-download the whole file |
| 🎧 Media Ready | Stream from any point in audio/video files |
| 🧩 Resumable | Resume broken or paused downloads |
| 🔐 Conditional | Avoids corrupted segments via If-Range |
🔁 HTTP Redirects & Request Context Headers – Deep Dive with Real Examples
When a browser or API client makes a request, HTTP headers carry vital context — who made the request, where it came from, what software made it, and even if it should be redirected.
This guide covers two important groups of headers:
- 🔁 Redirects
- 📩 Request Context
🔁 HTTP Redirect Headers
📌 1. Location
🧾 Definition:
Indicates the new URL to which the resource should be redirected.
Used With:
3xxstatus codes like301,302,307,308
🧪 Example:
HTTP/1.1 301 Moved Permanently
Location: https://www.new-domain.com/
📌 Use Case:
SEO-friendly domain redirection, route versioning, or login redirection.
🔍 SEO Tip:
Use 301 for permanent moves to transfer link equity.
📌 2. Refresh
🧾 Definition:
Tells the browser to reload or redirect the page after a time delay.
🧪 Example:
Refresh: 5; url=https://example.com/next
This means: “Wait 5 seconds, then redirect to /next.”
📌 Use Case:
- Auto-redirect after showing a message (“Thank you. Redirecting…”)
- Fallback method where JavaScript isn’t allowed
⚠️ SEO Warning:
Use cautiously — not a standard redirect method for SEO.
📩 HTTP Request Context Headers
These headers describe who made the request, from where, and what client is used.
📌 3. From
🧾 Definition:
Contains an email address for a person responsible for the request.
🧪 Example:
From: user@example.com
📌 Use Case:
Used by crawlers or bots for accountability and contact purposes.
🧠 Bonus: Required by some APIs for rate limit tracking.
📌 4. Host
🧾 Definition:
Specifies the domain name and optional port of the server being requested.
🧪 Example:
Host: www.example.com
📌 Use Case:
- Required for virtual hosting (multiple domains on one IP).
- Must be present in HTTP/1.1+.
📌 5. Referer (yes, it’s misspelled)
🧾 Definition:
Indicates the URL of the previous page that linked to the current resource.
🧪 Example:
Referer: https://google.com/search?q=my+site
📌 Use Case:
- Analytics & tracking
- Access control (e.g., only allow from specific sites)
- Logging
⚠️ Privacy Tip:
Leaks private URLs or search queries unless controlled.
📌 6. Referrer-Policy
🧾 Definition:
Specifies how much referer info should be sent in Referer header during cross-origin or same-origin requests.
🧪 Examples:
Referrer-Policy: no-referrer
Referrer-Policy: strict-origin-when-cross-origin
📌 Use Case:
- Prevent data leaks (e.g., secret page paths)
- Control security/privacy in SPAs and apps
📌 7. User-Agent
🧾 Definition:
Identifies the client software, including browser, OS, and version.
🧪 Example:
User-Agent: Mozilla/5.0 (Windows NT 10.0; Win64; x64) AppleWebKit/537.36 Chrome/114.0.0.0 Safari/537.36
📌 Use Case:
- Browser compatibility handling
- Bot detection
- Analytics & traffic breakdown
🛡️ Security Tip:
Don’t rely solely on User-Agent for authentication — it’s easily spoofed.
🧾 Summary Table
| Header | Purpose | Common Use Case |
|---|---|---|
Location | Redirects to another URL | 301/302 page redirects |
Refresh | Delayed reload or redirect | Auto-redirect after message display |
From | Email of requestor (for bots) | Crawler contact, API usage |
Host | Target server’s domain and port | Virtual hosting, mandatory in HTTP/1.1 |
Referer | Previous page URL | Analytics, navigation tracking |
Referrer-Policy | Controls referer leakage | Privacy control, security |
User-Agent | Info about client browser/OS | Analytics, device targeting, detection |
✅ Final Thoughts
Understanding these headers helps you:
- Redirect users smartly
- Secure sensitive referrer info
- Debug client and bot requests
- Customize API and browser behavior
📬 HTTP Response Context Headers: Allow and Server Explained
When a server responds to a client, it can include headers that describe the capabilities of the resource or details about the server itself. These are known as Response Context Headers.
Let’s explore two key headers: Allow and Server.
📌 1. Allow
📘 Definition:
Specifies the list of HTTP methods (e.g., GET, POST, PUT) that are supported by the target resource.
🧪 Example:
Allow: GET, POST, OPTIONS
📌 When is it used?
- Most often returned with:
405 Method Not AllowedOPTIONSpreflight requests (CORS)
- Helps clients know which methods they’re allowed to use
🔍 Real-World Use Case:
Let’s say you try to PUT a resource, but the server only supports GET and POST. It might respond:
HTTP/1.1 405 Method Not Allowed
Allow: GET, POST
🧠 Dev Tip (Express.js):
app.options('/resource', (req, res) => {
res.set('Allow', 'GET, POST').send();
});
📌 2. Server
📘 Definition:
Describes the software used by the origin server to process the request.
🧪 Example:
Server: Apache/2.4.46 (Unix)
📌 Why is it used?
- For transparency or debugging
- May be customized or hidden for security reasons
🔍 Real-World Use Case:
An API hosted on NGINX might include:
Server: nginx/1.18.0
But some services hide or customize it to avoid leaking vulnerabilities:
Server: secure-api-gateway
⚠️ Security Tip:
Don’t expose exact versions in production to reduce your attack surface.
✅ Summary
| Header | Direction | Description | Example |
|---|---|---|---|
Allow | Response | Lists HTTP methods supported by a resource | Allow: GET, POST, OPTIONS |
Server | Response | Indicates web server software and version | Server: nginx/1.18.0 |
🔐 Best Practices
- ✅ Use
Allowto inform clients about acceptable request types. - ⚠️ Mask or remove
Serverversion info in production for security.
🛡️ HTTP Security Headers: The Complete Guide for Secure Web Applications
HTTP security headers help protect your website from attacks like XSS, clickjacking, protocol downgrade, and data leaks. They’re part of every serious web security checklist.
Here’s a deep dive into the most important HTTP security headers — highlighted in ✅ green for clarity.
✅ Cross-Origin-Embedder-Policy (COEP)
🟢 Allows a server to declare a policy to control how content is embedded.
Enablingrequire-corpimproves isolation and is needed for powerful APIs likeSharedArrayBuffer.
Cross-Origin-Embedder-Policy: require-corp
✅ Cross-Origin-Opener-Policy (COOP)
🟢 Prevents your site from being opened or manipulated by another origin.
Enables isolated browsing context — improves protection from cross-origin attacks.
Cross-Origin-Opener-Policy: same-origin
✅ Cross-Origin-Resource-Policy (CORP)
🟢 Controls who can load your resources (like images or scripts).
Prevents leaks when cross-origin content is embedded.
Cross-Origin-Resource-Policy: same-origin
✅ Content-Security-Policy (CSP)
🟢 Defines which resources (scripts, styles, images, etc.) can be loaded.
Protects against XSS, data injection, and more.
Content-Security-Policy: default-src 'self'; script-src 'self' cdn.example.com
✅ Content-Security-Policy-Report-Only
🟢 Used to monitor and test CSP policies without enforcing them.
Useful during development.
Content-Security-Policy-Report-Only: default-src 'self'; report-uri /csp-report
✅ Expect-CT (Deprecated)
🟢 Used to detect misissued TLS certificates.
Now mostly deprecated in favor of Certificate Transparency in browsers.
Expect-CT: enforce, max-age=86400
✅ Permissions-Policy
🟢 Controls what browser APIs (e.g. camera, geolocation, clipboard) are allowed.
Replaces the deprecatedFeature-Policy.
Permissions-Policy: geolocation=(), camera=()
✅ Reporting-Endpoints (Experimental)
🟢 Lets you define a server to receive violation reports for CSP, COOP, and more.
Reporting-Endpoints: default="https://example.com/report"
✅ Strict-Transport-Security (HSTS)
🟢 Forces all future requests to use HTTPS.
Prevents SSL stripping attacks.
Strict-Transport-Security: max-age=31536000; includeSubDomains; preload
✅ Upgrade-Insecure-Requests
🟢 Tells the server: I prefer secure (HTTPS) resources.
Commonly used by modern browsers.
Upgrade-Insecure-Requests: 1
✅ X-Content-Type-Options
🟢 Disables MIME type sniffing.
Prevents the browser from trying to guess a file’s type and loading it as something dangerous.
X-Content-Type-Options: nosniff
✅ X-Frame-Options
🟢 Prevents clickjacking by disallowing embedding of your page in a frame.
X-Frame-Options: DENY
or
X-Frame-Options: SAMEORIGIN
✅ X-Permitted-Cross-Domain-Policies
🟢 Restricts Adobe Flash and other clients from loading cross-domain policy files.
A strong defense in legacy environments.
X-Permitted-Cross-Domain-Policies: none
✅ X-Powered-By
🟢 Reveals server tech (like Express, PHP, ASP.NET).
🔒 Best practice: Remove it to avoid leaking version info.
X-Powered-By: Express
🔐 Recommendation:
// In Express.js
app.disable('x-powered-by');
✅ X-XSS-Protection
🟢 Enables legacy browser-based XSS filters.
Note: Obsolete in modern browsers, but useful for older ones.
X-XSS-Protection: 1; mode=block
🧠 Final Security Checklist
| Header | Purpose | Recommended Value |
|---|---|---|
Content-Security-Policy | Block malicious scripts/styles | default-src 'self' |
Strict-Transport-Security | Force HTTPS | max-age=31536000; includeSubDomains |
X-Frame-Options | Prevent clickjacking | DENY or SAMEORIGIN |
X-Content-Type-Options | Block MIME sniffing | nosniff |
Permissions-Policy | Limit browser features | geolocation=(), camera=() |
🔄 Server-Sent Events & Reporting Headers: Real-Time + Resilience in HTTP
Modern web apps rely on real-time communication and smart monitoring. That’s where Server-Sent Events (SSE) and reporting headers come in.
This guide explains:
- 🔄 SSE for real-time, unidirectional data
- 🛠️ Reporting-Endpoints to collect CSP, COOP, or network errors
- ⚠️
Report-To(deprecated) and its status
🔄 What Are Server-Sent Events (SSE)?
Server-Sent Events let the server push text-based updates to the browser over a single long-lived HTTP connection.
Unlike WebSockets, SSE is:
- 🔁 Unidirectional (server → client)
- 📄 Text-based (usually
text/event-stream) - 🌐 Built-in browser support (no library needed)
🧪 Example: SSE with Node.js
Server:
// Express.js
app.get('/events', (req, res) => {
res.setHeader('Content-Type', 'text/event-stream');
res.setHeader('Cache-Control', 'no-cache');
res.setHeader('Connection', 'keep-alive');
res.write('data: Hello SSE\n\n');
setInterval(() => {
res.write(`data: ${new Date().toISOString()}\n\n`);
}, 5000);
});
Client:
<script>
const evtSource = new EventSource('/events');
evtSource.onmessage = (e) => {
console.log('New message:', e.data);
};
</script>
📡 Reporting Headers
✅ Reporting-Endpoints
🟢 Specifies where the browser should send error/warning reports, like CSP violations, COOP failures, and network issues.
🧪 Example:
Reporting-Endpoints: default="https://monitor.example.com/reports"
📌 Used with:
Content-Security-Policy-Report-OnlyCross-Origin-Opener-Policy-Report-OnlyDeprecation,Network Error Logging
⚠️ Report-To (Deprecated)
🟢 Older way of defining reporting groups and endpoints. Replaced by
Reporting-Endpointsin modern implementations.
Example:
Report-To: {
"group":"csp-endpoint",
"max_age":10886400,
"endpoints":[{"url":"https://monitor.example.com/reports"}]
}
🔐 Status: Deprecated. Avoid using it in new systems.
🧠 Real Use Case: Catching CSP Violations
Headers:
Content-Security-Policy-Report-Only: default-src 'self'; report-to=default;
Reporting-Endpoints: default="https://security.example.com/reports"
JSON report sent via POST:
{
"type": "csp-violation",
"body": {
"blockedURL": "https://evil.com/malware.js",
"violatedDirective": "script-src",
"documentURI": "https://your-site.com/"
}
}
✅ Summary
| Feature | Purpose | Example Value |
|---|---|---|
| Server-Sent Events | Real-time one-way updates (server → client) | Content-Type: text/event-stream |
| Reporting-Endpoints | Where to send browser error reports | default="https://your-endpoint.com/reports" |
| Report-To (deprecated) | Legacy report routing | JSON group of endpoints — avoid using |
🔄 HTTP Transfer Coding Headers Explained: Transfer-Encoding, TE, and Trailer
In HTTP, transfer coding defines how data is encoded during transmission, especially when sending large or dynamically generated content. It ensures safe, flexible, and efficient delivery — especially for streaming or chunked responses.
Let’s break down the three key headers involved:
📌 1. Transfer-Encoding
🟢 Specifies the type of transformation applied to the message body for safe transport.
Most common use:chunkedencoding for streaming responses when content length is unknown.
🧪 Example:
Transfer-Encoding: chunked
🔹 This tells the client: “I’ll send the body in chunks — keep reading until I say it’s done.”
🔍 Real-world use case:
- Streaming APIs, video/audio segments, or dynamic pages.
- No need to calculate
Content-Lengthbeforehand.
🛠 How it works:
4\r\n
Wiki\r\n
5\r\n
pedia\r\n
0\r\n
\r\n
Each chunk is sent with its size in hexadecimal.
📌 2. TE (Transfer-Encoding Accepted)
🟢 Sent by the client to tell the server which transfer encodings it supports.
🧪 Example:
TE: trailers, gzip
🔹 This means: “I accept trailer headers and gzip transfer encodings.”
🔍 Use case:
- Rare in modern browsers but used in advanced clients or proxies.
- Important for streamed API clients, or for proxies caching compressed data.
📌 3. Trailer
🟢 Allows extra HTTP headers to be sent after the message body, but only when using
Transfer-Encoding: chunked.
🧪 Example:
Trailer: X-Request-Id, Server-Timing
🔹 The server will send these headers at the end of the response, after the body.
🔍 Use case:
- Include logging IDs, signatures, or timing data after body generation.
- Useful when you don’t know header values until body processing is complete.
🔐 Note:
- Both client and server must agree to use trailers.
- Must declare trailer fields in advance using the
Trailerheader.
🧾 Summary Table
| Header | Direction | Purpose | Example |
|---|---|---|---|
Transfer-Encoding | Response | Encoding type for body transfer | Transfer-Encoding: chunked |
TE | Request | Encoding types client supports | TE: trailers, gzip |
Trailer | Response | Declares which trailers will follow | Trailer: X-Request-Id |
✅ Final Tips
- ✅ Use
Transfer-Encoding: chunkedfor streaming or dynamically generated content. - ⚠️ Be cautious with trailers — some proxies and browsers ignore or strip them.
- 🚀
TEandTrailerare more common in APIs, proxies, and Node.js streaming apps than in regular browser interactions.
🌐 WebSocket Handshake Headers Explained: A Guide to Real-Time HTTP Upgrades
WebSockets allow full-duplex, real-time communication between clients and servers — unlike traditional HTTP. But before this bi-directional channel opens, a WebSocket handshake takes place using specialized headers.
Here’s a breakdown of all WebSocket-specific headers involved in the handshake:
🔁 How the WebSocket Handshake Works
- The client sends a regular HTTP request with headers requesting an upgrade to WebSocket.
- The server replies with headers accepting the upgrade.
- If successful, the HTTP connection is upgraded to a WebSocket connection.
📌 WebSocket Request Headers
✅ Sec-WebSocket-Key
🟢 A base64-encoded random string sent by the client to prove the request is intentional.
Example:
Sec-WebSocket-Key: dGhlIHNhbXBsZSBub25jZQ==
🔐 The server uses this to generate the Sec-WebSocket-Accept in the response.
✅ Sec-WebSocket-Version
🟢 The WebSocket protocol version the client supports. The most common version is
13.
Example:
Sec-WebSocket-Version: 13
🧠 If the version is not supported, the server can respond with:
Sec-WebSocket-Version: 13, 12
✅ Sec-WebSocket-Protocol
🟢 A list of sub-protocols the client supports (e.g., chat, JSON, mqtt).
Example (request):
Sec-WebSocket-Protocol: chat, superchat
Example (response):
Sec-WebSocket-Protocol: chat
🎯 This allows the server and client to agree on a communication protocol layered over WebSocket.
✅ Sec-WebSocket-Extensions
🟢 A list of WebSocket extensions (e.g., permessage-deflate) the client supports.
Example (request):
Sec-WebSocket-Extensions: permessage-deflate; client_max_window_bits
Example (response):
Sec-WebSocket-Extensions: permessage-deflate
⚙️ Extensions modify WebSocket behavior (e.g., compression), and servers can choose which to accept.
📌 WebSocket Response Header
✅ Sec-WebSocket-Accept
🟢 The server returns this header to confirm the handshake. It is a SHA-1 hash of the client’s key + GUID, base64-encoded.
Example:
Sec-WebSocket-Accept: s3pPLMBiTxaQ9kYGzzhZRbK+xOo=
🧠 This proves the server understands the WebSocket protocol and accepts the upgrade.
🧾 Full Handshake Example
🔼 Client Request:
GET /ws HTTP/1.1
Host: example.com
Upgrade: websocket
Connection: Upgrade
Sec-WebSocket-Key: dGhlIHNhbXBsZSBub25jZQ==
Sec-WebSocket-Version: 13
Sec-WebSocket-Protocol: chat, superchat
🔽 Server Response:
HTTP/1.1 101 Switching Protocols
Upgrade: websocket
Connection: Upgrade
Sec-WebSocket-Accept: s3pPLMBiTxaQ9kYGzzhZRbK+xOo=
Sec-WebSocket-Protocol: chat
🎉 After this exchange, the socket is “upgraded” to a WebSocket channel!
✅ Summary Table
| Header | Direction | Purpose |
|---|---|---|
Sec-WebSocket-Key | Request | Verifies intent to establish WebSocket |
Sec-WebSocket-Version | Request | States WebSocket protocol version (usually 13) |
Sec-WebSocket-Protocol | Both | Negotiates application-level sub-protocol |
Sec-WebSocket-Extensions | Both | Suggests/accepts WebSocket extensions (e.g. compression) |
Sec-WebSocket-Accept | Response | Validates the request and completes handshake |
🧠 Developer Tip
In Node.js, you can use libraries like ws, socket.io, or uWebSockets.js to manage the full handshake and communication.
npm install ws
const WebSocket = require('ws');
const wss = new WebSocket.Server({ port: 8080 });
wss.on('connection', socket => {
socket.on('message', msg => console.log('Received:', msg));
socket.send('Hello Client!');
});
🚀 WebSocket Setup Using Express + Socket.IO
📁 Folder Structure
/websocket-app
├── server.js
└── public/
└── index.html
📦 Step 1: Install Dependencies
npm init -y
npm install express socket.io
🧠 Step 2: Create the WebSocket Server (server.js)
const express = require('express');
const http = require('http');
const { Server } = require('socket.io');
const app = express();
const server = http.createServer(app);
const io = new Server(server); // Attach socket.io to HTTP server
// Serve static HTML
app.use(express.static('public'));
// Handle socket connection
io.on('connection', (socket) => {
console.log('✅ A user connected:', socket.id);
// Custom event: chat message
socket.on('chat message', (msg) => {
console.log(`💬 Message from ${socket.id}: ${msg}`);
io.emit('chat message', msg); // broadcast to all clients
});
socket.on('disconnect', () => {
console.log('❌ User disconnected:', socket.id);
});
});
// Start server
const PORT = 3000;
server.listen(PORT, () => {
console.log(`🚀 Server running at http://localhost:${PORT}`);
});
🌐 Step 3: Client Page (public/index.html)
<!DOCTYPE html>
<html lang="en">
<head>
<meta charset="UTF-8" />
<title>Socket.IO Chat</title>
</head>
<body>
<h2>Real-time Chat</h2>
<ul id="messages"></ul>
<form id="form">
<input id="input" autocomplete="off" /><button>Send</button>
</form>
<script src="/socket.io/socket.io.js"></script>
<script>
const socket = io(); // Auto connects to the server
const form = document.getElementById('form');
const input = document.getElementById('input');
const messages = document.getElementById('messages');
form.addEventListener('submit', (e) => {
e.preventDefault();
if (input.value) {
socket.emit('chat message', input.value);
input.value = '';
}
});
socket.on('chat message', (msg) => {
const li = document.createElement('li');
li.textContent = msg;
messages.appendChild(li);
});
</script>
</body>
</html>
✅ How It Works
- The client connects via a WebSocket handshake (
Sec-WebSocket-*headers). - On connection,
socket.idis logged on the server. - Messages are emitted via custom events (
chat message) in real-time. - Socket.IO handles the protocol, fallbacks, and automatic reconnections.
🔄 Long Polling in JavaScript: A Simple Way to Get Real-Time Updates Without WebSockets
In real-time web applications, we often want to get immediate updates from the server — whether it’s chat messages, alerts, or notifications. While WebSockets and Server-Sent Events are advanced tools for this, Long Polling is a simple, widely-supported alternative.
Let’s break it down.
🔁 Regular Polling (Basic but Inefficient)
This method sends a request to the server every few seconds to ask:
“Hey, got anything new?”
🧪 Example:
setInterval(() => {
fetch('/get-messages').then(res => res.text()).then(showMessage);
}, 10000); // every 10 seconds
❌ Problems:
- Delay: Messages might arrive up to 10s late.
- Server load: Too many unnecessary requests — even if no new data.
- Battery/network waste on mobile.
⚡ Enter: Long Polling
Long Polling improves regular polling by holding the connection open until the server has something to send.
🔄 How Long Polling Works
- The client sends a request.
- The server doesn’t respond immediately — it waits.
- When new data is available, the server responds.
- The client immediately re-sends another request to wait again.
🧠 Benefits of Long Polling
✅ Low delay — instant delivery once data is available
✅ Low server load — no useless requests
✅ Works with fetch/HTTP — no special protocol required
📄 Client-Side Code (JavaScript)
async function subscribe() {
let response = await fetch("/subscribe");
if (response.status == 502) {
// connection timeout — retry
await subscribe();
} else if (response.status != 200) {
// error — retry after delay
await new Promise(resolve => setTimeout(resolve, 1000));
await subscribe();
} else {
// got message — show and re-subscribe
const message = await response.text();
showMessage(message);
await subscribe();
}
}
subscribe();
🧪 502 is a common timeout error, especially through proxies.
🖥️ Server Requirements
To support long polling:
- The server must handle many open (pending) connections.
- Node.js or modern async frameworks like FastAPI, Go, etc., handle this well.
- Avoid blocking architectures (e.g., traditional PHP without async support).
📊 When to Use Long Polling
| Use Case | Should You Use Long Polling? |
|---|---|
| Notifications (low freq.) | ✅ Perfect fit |
| Chat apps (moderate freq.) | ✅ Works, but consider SSE |
| Stock tickers / games | ❌ Use WebSockets |
| Realtime dashboards | ❌ Use WebSockets/SSE |
📉 When Not to Use It
- ⚠️ If messages are frequent (e.g., stock prices, multiplayer games), long polling becomes inefficient:
- Too many requests
- Too much overhead
- In those cases, prefer:
- WebSocket – bi-directional, low-latency
- SSE (Server-Sent Events) – one-way, event-stream from server
🧪 Demo Chat (Node.js Example)
Would you like the full code for a Node.js + Express long polling chat app with client/server setup? I can share that too!
✅ Summary
Long Polling is a simple but powerful real-time technique:
- 👶 Easy to implement
- 🌐 Works with
fetch()and all browsers - ⚡ Delivers updates quickly, with fewer requests
It’s perfect for notifications, low-frequency updates, and fallback scenarios when WebSockets aren’t supported.
🔁 HTTP Methods + Headers + Body – CRUD Examples Explained
When building web applications or APIs, it’s important to understand how HTTP methods, headers, and body work together.
Let’s walk through CRUD operations with full HTTP examples — including headers and request/response bodies.
📦 1. CREATE (POST)
➕ HTTP Method: POST
Used to create a new resource on the server.
✅ Request
POST /api/products HTTP/1.1
Host: example.com
Content-Type: application/json
Authorization: Bearer <token>
{
"name": "MacBook Air",
"price": 999
}
✅ Response
HTTP/1.1 201 Created
Content-Type: application/json
{
"id": "123",
"name": "MacBook Air",
"price": 999
}
📄 2. READ (GET)
🔍 HTTP Method: GET
Used to fetch data from the server.
✅ Request
GET /api/products/123 HTTP/1.1
Host: example.com
Authorization: Bearer <token>
Accept: application/json
✅ Response
HTTP/1.1 200 OK
Content-Type: application/json
{
"id": "123",
"name": "MacBook Air",
"price": 999
}
🔄 3. UPDATE (PUT / PATCH)
✏️ HTTP Method: PUT or PATCH
PUTreplaces the whole objectPATCHupdates a partial object
✅ PUT Request
PUT /api/products/123 HTTP/1.1
Host: example.com
Content-Type: application/json
Authorization: Bearer <token>
{
"name": "MacBook Pro",
"price": 1299
}
✅ Response
HTTP/1.1 200 OK
Content-Type: application/json
{
"id": "123",
"name": "MacBook Pro",
"price": 1299
}
❌ 4. DELETE
🗑️ HTTP Method: DELETE
Used to remove a resource from the server.
✅ Request
DELETE /api/products/123 HTTP/1.1
Host: example.com
Authorization: Bearer <token>
✅ Response
HTTP/1.1 204 No Content
🧠 Summary: CRUD + HTTP
| Operation | Method | Body | Common Headers | Success Code |
|---|---|---|---|---|
| Create | POST | ✅ Yes | Content-Type, Authorization | 201 Created |
| Read | GET | ❌ No | Authorization, Accept | 200 OK |
| Update | PUT | ✅ Yes | Content-Type, Authorization | 200 OK |
| Delete | DELETE | ❌ No | Authorization | 204 No Content |
📦 Step-by-Step Express.js CRUD API
📁 Folder Structure
/crud-api
├── server.js
└── routes/
└── products.js
📦 1. Install Dependencies
npm init -y
npm install express body-parser cors
🧠 2. server.js – Entry Point
const express = require('express');
const cors = require('cors');
const bodyParser = require('body-parser');
const productRoutes = require('./routes/products');
const app = express();
const PORT = 4000;
// Middleware
app.use(cors());
app.use(bodyParser.json());
// Routes
app.use('/api/products', productRoutes);
// Start server
app.listen(PORT, () => {
console.log(`🚀 Server running on http://localhost:${PORT}`);
});
🔁 3. routes/products.js – CRUD Handlers
const express = require('express');
const router = express.Router();
let products = [];
// CREATE - POST /api/products
router.post('/', (req, res) => {
const { name, price } = req.body;
const newProduct = { id: Date.now().toString(), name, price };
products.push(newProduct);
res.status(201).json(newProduct);
});
// READ - GET /api/products/:id
router.get('/:id', (req, res) => {
const product = products.find(p => p.id === req.params.id);
if (!product) return res.status(404).send('Product not found');
res.json(product);
});
// UPDATE - PUT /api/products/:id
router.put('/:id', (req, res) => {
const index = products.findIndex(p => p.id === req.params.id);
if (index === -1) return res.status(404).send('Product not found');
products[index] = { ...products[index], ...req.body };
res.json(products[index]);
});
// DELETE - DELETE /api/products/:id
router.delete('/:id', (req, res) => {
products = products.filter(p => p.id !== req.params.id);
res.status(204).send(); // No Content
});
module.exports = router;
🧪 Test in Postman
🔄 POST /api/products
- Headers:
Content-Type: application/json - Body:
{ "name": "iPhone 15", "price": 1200 }
🔍 GET /api/products/:id
✏️ PUT /api/products/:id
- Update price or name with JSON body
🗑️ DELETE /api/products/:id
Here’s a WordPress-friendly guide to using Postman and similar tools like Insomnia or Hoppscotch to test your Express.js CRUD API — including headers, body, and method configuration.
🛠️ How to Test Express.js CRUD APIs Using Postman & Alternatives
Once you’ve built a REST API with Express.js, the next step is to test and debug it. Tools like Postman, Insomnia, and Hoppscotch make it easy to send HTTP requests with custom headers, body, and methods.
🧪 POSTMAN: Step-by-Step CRUD Testing
✅ Download from https://www.postman.com/downloads/
🔄 1. POST – Create Product
- Method:
POST - URL:
http://localhost:4000/api/products - Headers:
Content-Type: application/json
- Body → raw →
JSON:
{
"name": "MacBook Air",
"price": 999
}
🟢 Response:
{
"id": "1693456789091",
"name": "MacBook Air",
"price": 999
}
🔍 2. GET – Read Product
- Method:
GET - URL:
http://localhost:4000/api/products/<productId> - No body required
🟢 Response:
{
"id": "1693456789091",
"name": "MacBook Air",
"price": 999
}
✏️ 3. PUT – Update Product
- Method:
PUT - URL:
http://localhost:4000/api/products/<productId> - Headers:
Content-Type: application/json - Body → raw → JSON:
{
"price": 1299
}
🟢 Response:
{
"id": "1693456789091",
"name": "MacBook Air",
"price": 1299
}
🗑️ 4. DELETE – Remove Product
- Method:
DELETE - URL:
http://localhost:4000/api/products/<productId> - No body required
🟢 Response:204 No Content
⚙️ Alternatives to Postman
1. 🔌 Hoppscotch (Web-based)
- URL: https://hoppscotch.io
- Free, lightweight, no install
- Great for quick API tests in browser
2. 🌙 Insomnia
- URL: https://insomnia.rest
- Best for advanced testing, GraphQL, auth
- Clean UI + environment variables support
✅ Summary Table
| Tool | Platform | Best For | Offline Support |
|---|---|---|---|
| Postman | Desktop/Web | General API testing | ✅ Yes |
| Hoppscotch | Browser | Quick requests, lightweight | ❌ No |
| Insomnia | Desktop | GraphQL, REST, OAuth | ✅ Yes |
